ComfyUI Workflows
Browse real AI workflows from Flux, SDXL, Pony, ControlNet, video generation and commercial AI creators.

LTX-2 I2V Distilled 60-Frame 1080p Consistency Workflow
This ComfyUI workflow is designed for LTX-2 image-to-video generation with a distilled acceleration route, stronger frame-to-frame consistency, and 1080p-class high-resolution output. The main goal of this workflow is to turn one input image into a stable short video while preserving the original subject identity, scene layout, lighting direction, camera framing, and overall visual style across the generated frames.Compared with a heavier non-distilled LTX-2 route, this workflow focuses on a more efficient distilled generation setup. It still uses the LTX-2 Dev model backbone, but adds a distilled LoRA route to improve speed and sampling efficiency. This makes the workflow more suitable for repeated testing, online generation, RunningHub deployment, prompt iteration, and short video production where users need both visual quality and faster turnaround.The workflow is built around LTX-2 19B Dev FP8, using ltx-2-19b-dev-fp8.safetensors as the main checkpoint and gemma_3_12B_it.safetensors as the text encoder. It also uses LTX-2 spatial latent upscaling through ltx-2-spatial-upscaler-x2-1.0.safetensors. The distilled behavior is introduced through the LTX-2 distilled LoRA route, allowing the workflow to run with a more compact sampling structure while still keeping the LTX-2 visual generation pipeline.The core logic is image-to-video consistency. A source image is loaded, resized, preprocessed, injected into the video latent, sampled through LTX-2, spatially upscaled in latent space, refined again, and finally decoded into video frames. This makes the workflow more advanced than a simple one-pass image-to-video graph. It is built as a multi-stage LTX-2 I2V pipeline for creators who want more stable short clips instead of unstable single-pass motion.The input stage starts from a still image. The image is prepared through ImageResizeKJv2 and ResizeImagesByLongerEdge. The workflow is designed around high-resolution output logic, with a 1080p-class route such as 1920 x 1088 available for stronger GPUs. The workflow note also explains that width and height should follow LTX-2 valid size rules, and the frame count should follow the “divisible by 8 plus 1” rule. If invalid values are used, the workflow may silently choose the closest valid parameters, so correct resolution and frame-count planning is important.The frame calculation stage uses a calculator-style rule to keep the video length compatible with LTX-2. This is important because LTX-2 is sensitive to frame structure. A 60-frame-class video must still follow the internal frame-count constraints. This workflow therefore uses a structured frame-count route rather than arbitrary video length values, making it more suitable for predictable image-to-video generation.The image is passed through LTXVPreprocess before being injected into the latent video. This preprocessing step prepares the source image for the LTX-2 latent pipeline and helps control image compression behavior. EmptyLTXVLatentVideo creates the base video latent with the selected width, height, length, and batch size. LTXVImgToVideoInplace then places the source image into the video latent, giving the model a strong visual anchor. This is the key step for preserving the original image identity.The workflow also uses LTXVEmptyLatentAudio, LTXVConcatAVLatent, and LTXVSeparateAVLatent. This audio-video latent structure allows the workflow to operate inside the broader LTX-2 AV latent system. Even when the main task is image-to-video consistency, the audio latent structure remains part of the pipeline. The video latent and audio latent are combined during sampling and separated again before decoding, which makes the graph closer to a complete LTX-2 workflow rather than a simplified video-only route.The prompt section uses CLIPTextEncode and LTXVConditioning. The positive prompt should describe the subject, motion, scene behavior, camera movement, lighting, atmosphere, and any dialogue or audio-related action if needed. LTX-2 prompting works better when the prompt describes events over time rather than only describing a static image. For example, instead of only writing “a man and woman eating hot pot,” a better prompt describes who moves, who speaks, what the camera does, and how the scene changes over the clip.The negative prompt is detailed and designed to suppress common video-generation problems. It targets blur, overexposure, underexposure, low contrast, flickering, motion blur, distorted proportions, deformed facial features, wrong hand count, incorrect text, missing microphone, inconsistent perspective, camera shake, mismatched lip sync, distorted voice, off-sync audio, added dialogue, repetitive speech, jittery movement, awkward pauses, unnatural transitions, and general AI artifacts. This is important because in a longer short video, small errors become more visible across frames.A key difference in this distilled workflow is the use of LTX2_NAG. The NAG stage helps adjust model behavior using negative audio/video guidance logic. It receives negative conditioning and applies controlled guidance parameters such as nag_scale, nag_alpha, and nag_tau. In practical terms, this gives the workflow another layer of control for reducing unwanted generation behavior, especially when working with audio-video latent structure and image-to-video consistency.The first sampling stage uses RandomNoise, CFGGuider, KSamplerSelect, LTX scheduler logic, and SamplerCustomAdvanced. The workflow uses a low CFG-style distilled route, which is suitable for accelerated generation. Distilled workflows often do not need the same high guidance settings as normal full-step workflows. The goal is to keep the output coherent while allowing the distilled route to generate efficiently.The workflow uses Euler-style sampling for the main generation stage, then uses a second refinement stage with ManualSigmas and gradient estimation sampling. ManualSigmas gives a compact and controlled refinement schedule. This second stage is especially useful after latent spatial upscaling because the model can refine detail, edges, and stability without regenerating the entire video from scratch.The spatial upscaling stage is one of the most important parts of the workflow. LTXVLatentUpsampler uses the LTX-2 spatial upscaler model to enlarge the latent video before final decoding. This is different from simply resizing the final frames after generation. Latent-space upscaling can produce cleaner high-resolution output because the video representation is enhanced before it becomes pixels. This is useful for 1080p-class results and for creators who want sharper Civitai, YouTube, Bilibili, or RunningHub examples.After latent upscaling, LTXVImgToVideoInplace can be used again to maintain or reinforce the source-image relationship inside the upscaled latent route. This helps preserve consistency after the spatial upscale stage. The second LTXVConcatAVLatent then combines the refined video latent with the audio latent, and the second SamplerCustomAdvanced stage performs the compact refinement pass.Finally, LTXVSeparateAVLatent separates the video latent and audio latent. VAEDecode converts the video latent into image frames, while LTXVAudioVAEDecode can decode the audio latent when needed. The workflow can then output the generated video frames for assembly into the final video.This workflow is especially useful for creators who want a faster LTX-2 I2V route without giving up too much control. It can be used for character motion, product shots, two-person scenes, cinematic social media clips, AI short video previews, image-to-video demonstrations, Civitai video examples, YouTube workflow showcases, and Bilibili tutorials. The distilled route makes iteration more practical, while the latent upscaler and refinement stage help keep the final output polished.Main features:- LTX-2 image-to-video workflow- Distilled acceleration route for faster generation- Uses LTX-2 19B Dev FP8 model backbone- Uses LTX-2 distilled LoRA route- Gemma 3 12B text encoder support- Designed for 60-frame-class video consistency- 1080p-class output route with 1920 x 1088 support- Source image preprocessing with LTXVPreprocess- Image-to-video latent injection with LTXVImgToVideoInplace- LTXVConditioning for video prompt conditioning- Detailed negative prompt for consistency and artifact control- LTX2_NAG guidance support- LTXVConcatAVLatent and LTXVSeparateAVLatent AV pipeline- LTXVLatentUpsampler spatial latent upscaling- ManualSigmas compact refinement stage- SamplerCustomAdvanced generation and refinement- Suitable for faster I2V testing and high-resolution outputRecommended use cases:LTX-2 distilled image-to-video generation, 60-frame short video creation, 1080p AI video output, character animation, product motion video, cinematic image-to-video generation, portrait-to-video testing, social media video covers, YouTube AI video previews, Bilibili workflow demonstrations, Civitai video examples, RunningHub workflow publishing, fast LTX-2 I2V experiments, and consistency-focused video production.Suggested workflow:Start by preparing a clean source image. The input image should have a clear subject, stable lighting, good contrast, and a readable composition. If the image is too blurry, noisy, compressed, or visually confusing, the video will usually become less stable. For character videos, make sure the face, hands, clothing, and body shape are clearly visible.Use a valid resolution. The workflow note explains that width and height must follow LTX-2 valid size behavior. The default route is safer for testing, while 1920 x 1088 can be used when the GPU is powerful enough. For early prompt tests, use a smaller resolution first. After the seed and motion are stable, switch to the 1080p-class route.Set the frame count correctly. LTX-2 frame count should follow the divisible-by-8-plus-1 rule. If the target is a 60-frame-class clip, keep the workflow’s internal frame calculation logic active so the final frame count remains compatible. Invalid values may be silently adjusted, so it is better to control the count directly.Write a motion-focused prompt. Do not treat the prompt like a still-image prompt. Describe what happens during the clip. Include subject action, camera behavior, lighting change, dialogue, sound cues, object interaction, and emotional tone if needed. LTX-2 responds better when the prompt describes temporal behavior.Keep movement moderate for better consistency. If your priority is stable identity and clean 1080p output, avoid extreme camera movement, fast spinning, rapid body turns, or large background changes. Use subtle head movement, natural hand motion, slow camera push-in, gentle parallax, or small environmental movement.Use the negative prompt to control drift. Suppress flicker, bad hands, distorted faces, unstable eyes, camera shake, background clutter, wrong text, mismatched lip sync, robotic audio, off-sync timing, and unnatural transitions. The longer the clip, the more important these controls become.Use the distilled route for faster iteration. Because this workflow uses a distilled LoRA route and compact sampling, it is practical for testing multiple prompts and seeds. If the result is good, keep the seed and refine the prompt gradually. If the video drifts, change the seed or reduce motion complexity.Use the latent upscaler only after the base motion is acceptable. LTXVLatentUpsampler is powerful, but it is not meant to fix bad motion. If the first generated video has identity drift or unstable camera behavior, adjust the first stage before relying on the upscaler. Upscaling unstable motion will only make the problems more visible.Use the second refinement stage for final polish. ManualSigmas and gradient estimation sampling help refine the upscaled latent. This is useful for improving detail, edge quality, and high-resolution sharpness while preserving the established video structure.When evaluating results, look at more than sharpness. Check character identity, lighting consistency, camera smoothness, face stability, hand stability, background continuity, and whether the video still feels like the original input image. A good result should feel like the still image naturally came alive, not like a different image was generated every frame.For 1080p output, monitor VRAM and generation time carefully. High-resolution I2V with latent upscaling is heavier than normal text-to-image or low-resolution video generation. If the workflow becomes unstable, reduce resolution, shorten the frame count, or test with a simpler prompt.This workflow is designed for creators who want a faster and more practical LTX-2 image-to-video consistency pipeline. It combines source-image conditioning, distilled LTX-2 acceleration, AV latent structure, NAG control, latent spatial upscaling, and second-stage refinement into one production-oriented workflow for high-quality short video generation.🎥 YouTube Video TutorialWant to know what this workflow actually does and how to start fast?This video explains what the tool is, how to launch the workflow instantly, and shares my core design logic — no local setup, no complicated environment.Everything starts directly on RunningHub, so you can experience it in action first.👉 YouTube Tutorial: https://youtu.be/VYBoOk7pCJABefore you begin, I recommend watching the video thoroughly — getting the full context helps you understand the tool faster and avoid common detours.⚙️ RunningHub WorkflowTry the workflow online right now — no installation required.👉 Workflow: https://www.runninghub.ai/post/2019439198570287106/?inviteCode=rh-v1111If the results meet your expectations, you can later deploy it locally for customization.🎁 Fan Benefits: Register to get 1000 points + daily login 100 points — enjoy 4090 performance and 48 GB super power!📺 Bilibili Updates (Mainland China & Asia-Pacific)If you’re in the Asia-Pacific region, you can watch the video below to see the workflow demonstration and creative breakdown.📺 Bilibili Video: https://www.bilibili.com/video/BV1wiFzzwEoR/☕ Support Me on Ko-fiIf you find my content helpful and want to support future creations, you can buy me a coffee ☕.Every bit of support helps me keep creating — just like a spark that can ignite a blazing flame.👉 Ko-fi: https://ko-fi.com/aiksk💼 Business ContactFor collaboration or inquiries, please contact aiksk95 on WeChat.🎥 YouTube 视频教程想了解这个工作流到底是怎样的工具,以及如何快速启动?视频主要介绍 工具定位、快速启动方法 和 我的构筑思路。我们会直接在 RunningHub 上进行演示,让你第一时间看到实际效果。👉 YouTube 教程: https://youtu.be/VYBoOk7pCJA开始前建议尽量完整地观看视频 —— 把握整体思路会更快上手,也能少走常见弯路。⚙️ 在线体验工作流现在就可以在线体验,无需安装。👉 工作流: https://www.runninghub.ai/post/2019439198570287106/?inviteCode=rh-v1111打开上方链接即可直接运行该工作流,实时查看生成效果。如果觉得效果理想,你也可以在本地进行自定义部署。🎁 粉丝福利: 注册即送 1000 积分,每日登录 100 积分,畅玩 4090 体验 48 G 超级性能!📺 Bilibili 更新(中国大陆及南亚太地区)如果你在中国大陆或南亚太地区,可以通过下方视频查看该工作流的实测效果与构思讲解。📺 B站视频: https://www.bilibili.com/video/BV1wiFzzwEoR/我会在 夸克网盘 持续更新模型资源:👉 https://pan.quark.cn/s/20c6f6f8d87b这些资源主要面向本地用户,方便进行创作与学习。

Two-Person InfiniteTalk Native Loop Long-Duration Workflow
This ComfyUI workflow is designed for two-person InfiniteTalk native looping, dual-speaker talking video generation, and long-duration audio-driven character interaction. The main goal of this workflow is to generate a two-character dialogue video from a start frame and audio input, then continue the output through a native loop structure so creators can extend the video duration more naturally across multiple segments.Unlike a simple single-person talking-head workflow, this graph is built for two speakers. It uses two speaker regions, two audio encoder outputs, character masks, InfiniteTalk multi-speaker model patching, previous-frame continuation, and repeated video generation stages. This makes it suitable for AI dialogue scenes, two-person digital human videos, interview-style content, virtual host conversations, short drama dialogue, character interaction videos, product explanation conversations, and long-form AI video narration.The workflow is built around the Wan 2.1 InfiniteTalk multi-speaker pipeline. It uses a Wan video model route, UMT5 text encoder, Wan VAE, wav2vec2 audio encoder, InfiniteTalk multi-speaker model patch, start image input, two character masks, two audio encoder outputs, sampler control, continuation frames, and CreateVideo / SaveVideo output nodes. The central generation module is WanInfiniteTalkToVideo, which receives the model, InfiniteTalk model patch, positive and negative conditioning, VAE, audio features, start image, previous frames, speaker masks, width, height, video length, motion frame count, and audio scale.The key feature of this workflow is dual-speaker native continuation. In many AI video workflows, a two-person scene is difficult to maintain because the model may not know which person should speak, which mouth should move, or how to keep both characters stable. This workflow solves that problem by using speaker-specific masks and audio encoder outputs. Character 1 and Character 2 can each have their own mask region, allowing the model to understand where each speaking area is located.The workflow includes instructions for drawing masks in the ComfyUI MaskEditor. Users upload the start frame, open the image in MaskEditor, then draw the mask for Character 1. The same process is repeated for Character 2. These masks are important because they define the active speaker regions. Without clear masks, the model may move the wrong face, animate both characters at the wrong time, or create unstable mouth movement.The model patch used in this workflow is the InfiniteTalk multi-speaker patch. This is different from a single-speaker setup. The multi-speaker route is designed for dialogue scenarios where more than one character needs audio-driven motion. The workflow uses the two_speakers mode inside WanInfiniteTalkToVideo, with inputs for audio_encoder_output_1, audio_encoder_output_2, mask_1, and mask_2. This allows the graph to handle two separate speaker controls inside the same video scene.The audio encoder is loaded through AudioEncoderLoader, using wav2vec2-chinese-base_fp16. The audio encoder extracts speech features from the input audio. These features are then used to drive the character mouth movement and facial performance. For a two-person dialogue scene, clean audio is especially important. If the audio contains overlapping speakers, heavy background music, echo, or unclear speech, the model may have a harder time deciding which character should respond.The workflow can be used for two-person dialogue, but users should prepare audio carefully. A clean dialogue track, segmented speaker audio, or clearly separated voice arrangement will usually produce better results than a noisy mixed track. If the workflow is set up with two separate audio encoder outputs, each speaker’s audio should correspond to the correct character mask. This helps the model connect Character 1’s voice to Character 1’s face, and Character 2’s voice to Character 2’s face.The start image defines the entire visual scene. It should contain two visible characters with clear faces, readable mouth areas, and stable composition. A two-person front-facing or semi-front-facing scene usually works better than extreme angles. Both faces should be large enough for the model to animate. If one person is too small, blocked, blurred, or heavily turned away from camera, the lip movement may become weak or unstable.The text prompt controls the overall visual behavior. For this type of workflow, the prompt should usually be stable and conservative. It should describe two people speaking naturally, subtle head movement, stable camera, clear facial expressions, consistent lighting, and natural dialogue performance. Avoid prompts that introduce excessive body motion, camera shake, complex action, or identity-changing style shifts, because those can reduce continuity in long videos.The negative prompt should suppress common dialogue-video problems. Useful negative terms include wrong speaker movement, both mouths moving at the same time, distorted mouth, bad lip sync, flickering face, unstable eyes, broken teeth, duplicated mouth, deformed jaw, face drift, identity change, exaggerated head motion, camera shake, blurry face, and unnatural expression. For two-person videos, it is also useful to suppress speaker confusion and unwanted background motion.The workflow uses SamplerCustomAdvanced, CFGGuider, BasicScheduler, KSamplerSelect, and RandomNoise for the generation process. This gives users control over seed variation, guidance strength, scheduler behavior, and sampling. The included setup uses a compact sampling structure, which is practical for iterative testing. Two-person dialogue generation often requires several tests to find the best mask, audio, and seed combination.Native looping is the second key feature. Instead of generating one isolated short clip, this workflow supports continuation through previous frames. The previous_frames input allows a later generation stage to continue from the visual state of an earlier segment. This is important for long-duration output because it helps reduce hard resets between clips. The workflow can generate one segment, use its ending or previous frames as continuity context, and then generate the next segment.This is why the workflow is useful for “infinite duration” production. It does not mean a single generation can run forever. In practical production, the user splits a long dialogue or narration into segments, generates each section, then uses previous-frame continuation to keep the visual flow connected. This gives creators a repeatable method for building longer AI talking videos while maintaining stronger continuity than manual looping.The workflow includes two generation stages and video creation nodes. One stage can create the first dialogue segment from the start frame, masks, and audio features. Another stage can continue from previous frames. The outputs are decoded through VAEDecode and converted into video through CreateVideo or SaveVideo. The final output can include audio, making it ready for preview or publishing.The output fps is set to 25 in the CreateVideo nodes. Keeping the same fps across all generated segments is important. If the fps changes between segments, the audio may drift, the mouth timing may feel wrong, or the transition between clips may become unstable. For long-form generation, users should keep fps, resolution, prompt style, and mask setup consistent across all segments.The workflow also includes model notes for local users, covering Wan diffusion model files, UMT5 text encoder, InfiniteTalk single and multi model patches, wav2vec2 audio encoder, Wan VAE, and LightX2V LoRA. This makes the graph more useful for both RunningHub online users and local ComfyUI users who want to deploy the workflow themselves.Main features:- Two-person InfiniteTalk native loop workflow- Dual-speaker audio-driven video generation- WanInfiniteTalkToVideo two_speakers mode- InfiniteTalk multi-speaker model patch support- Two character mask control- Two audio encoder output support- Start image to two-person talking video- Previous-frame continuation for longer video generation- Native loop / continuation structure- wav2vec2 Chinese audio encoder support- UMT5 Wan text encoder support- Wan VAE decoding support- SamplerCustomAdvanced generation pipeline- CFGGuider and BasicScheduler control- CreateVideo and SaveVideo output- Suitable for interviews, dialogue scenes, short dramas, and virtual host conversationsRecommended use cases:Two-person digital human video, AI interview scene, dual-host talking video, virtual host conversation, short drama dialogue, character interaction video, AI podcast-style video, product explanation conversation, two-character animation dubbing, social media dialogue clip, Bilibili creator content, YouTube talking video, long-form AI narration, InfiniteTalk loop testing, RunningHub workflow publishing, and Civitai video workflow demonstration.Suggested workflow:Start by preparing a clean two-person start image. Both characters should be clearly visible, with readable faces and mouth areas. Avoid images where one face is too small, blocked by objects, heavily blurred, or turned too far away from camera. The more stable the start image, the easier it is for the workflow to maintain identity across long outputs.Next, draw masks for both characters. Open the start image in MaskEditor and draw the mask for Character 1. Then repeat the process for Character 2. The masks should cover the speaker regions clearly. In most cases, include the face and upper head area, and optionally part of the neck or upper body if subtle motion is needed. Do not make masks too large unless you want more body movement.Prepare the audio carefully. For best results, use clean dialogue audio with clear speech. If the workflow is using two separate audio encoder outputs, make sure each audio input corresponds to the correct character. Character 1’s audio should drive Character 1’s mask. Character 2’s audio should drive Character 2’s mask. If the audio assignment is wrong, the wrong person may speak.Write a stable prompt. The prompt should describe two people speaking naturally, facing the camera or facing each other, with subtle head movement, stable lighting, consistent background, and natural mouth motion. For long videos, avoid adding too many changing scene details, because every extra style change can increase drift.Use a clear negative prompt. Suppress wrong speaker movement, both mouths moving together, distorted mouths, flickering, identity drift, face deformation, unstable eyes, bad teeth, excessive head motion, camera shake, and background distortion. These are common problems in two-person talking video workflows.Generate a short first segment. Do not start with a long video immediately. Test a short clip first to confirm that the correct character moves with the correct audio, both faces remain stable, and the masks are working. If the wrong character moves, check the mask and audio connections. If both characters move too much, refine the masks and reduce unnecessary motion language in the prompt.Use the native loop continuation section for longer output. After generating the first segment, use previous frames from the end of that segment as context for the next segment. This helps the next clip continue from the earlier visual state instead of restarting from the original still image. This is the core method for building long-duration output.Split long dialogue into smaller audio sections. Generating shorter connected segments is usually more stable than trying to generate a very long clip in one pass. If one segment fails, only that segment needs to be regenerated. This is also better for controlling lip sync, face stability, and transition quality.Keep settings consistent across segments. Use the same resolution, fps, prompt style, masks, and similar sampler settings. If these change too much, the final long video may show visible differences between segments. Consistency is more important than aggressive motion when building long-form dialogue videos.Check transition points carefully. Look at eye direction, mouth shape, face identity, head position, lighting, and background. If the transition feels abrupt, use a better previous-frame selection or shorten the segment length. A good continuation should feel like the same scene is continuing, not restarting.For interview-style scenes, keep the characters stable and avoid excessive camera movement. For short drama scenes, allow more expression but keep masks accurate. For virtual host dialogue, use clean lighting and clear frontal composition. For product conversation videos, keep the background simple and focus on speech clarity.This workflow is designed for creators who need a practical two-person InfiniteTalk pipeline inside ComfyUI. It combines dual-character masking, audio feature extraction, InfiniteTalk multi-speaker generation, previous-frame continuation, sampler control, VAE decoding, and final video output into one workflow. It is especially useful for building longer AI dialogue videos without manually reconstructing every segment from scratch.🎥 YouTube Video TutorialWant to know what this workflow actually does and how to start fast?This video explains what the tool is, how to launch the workflow instantly, and shares my core design logic — no local setup, no complicated environment.Everything starts directly on RunningHub, so you can experience it in action first.👉 YouTube Tutorial: https://youtu.be/OjsHOyPtF0sBefore you begin, I recommend watching the video thoroughly — getting the full context helps you understand the tool faster and avoid common detours.⚙️ RunningHub WorkflowTry the workflow online right now — no installation required.👉 Workflow: https://www.runninghub.ai/post/2018267797146570753/?inviteCode=rh-v1111If the results meet your expectations, you can later deploy it locally for customization.🎁 Fan Benefits: Register to get 1000 points + daily login 100 points — enjoy 4090 performance and 48 GB super power!📺 Bilibili Updates (Mainland China & Asia-Pacific)If you’re in the Asia-Pacific region, you can watch the video below to see the workflow demonstration and creative breakdown.📺 Bilibili Video: https://www.bilibili.com/video/BV1mwFLzTELL/☕ Support Me on Ko-fiIf you find my content helpful and want to support future creations, you can buy me a coffee ☕.Every bit of support helps me keep creating — just like a spark that can ignite a blazing flame.👉 Ko-fi: https://ko-fi.com/aiksk💼 Business ContactFor collaboration or inquiries, please contact aiksk95 on WeChat.🎥 YouTube 视频教程想了解这个工作流到底是怎样的工具,以及如何快速启动?视频主要介绍 工具定位、快速启动方法 和 我的构筑思路。我们会直接在 RunningHub 上进行演示,让你第一时间看到实际效果。👉 YouTube 教程: https://youtu.be/OjsHOyPtF0s开始前建议尽量完整地观看视频 —— 把握整体思路会更快上手,也能少走常见弯路。⚙️ 在线体验工作流现在就可以在线体验,无需安装。👉 工作流: https://www.runninghub.ai/post/2018267797146570753/?inviteCode=rh-v1111打开上方链接即可直接运行该工作流,实时查看生成效果。如果觉得效果理想,你也可以在本地进行自定义部署。🎁 粉丝福利: 注册即送 1000 积分,每日登录 100 积分,畅玩 4090 体验 48 G 超级性能!📺 Bilibili 更新(中国大陆及南亚太地区)如果你在中国大陆或南亚太地区,可以通过下方视频查看该工作流的实测效果与构思讲解。📺 B站视频: https://www.bilibili.com/video/BV1mwFLzTELL/我会在 夸克网盘 持续更新模型资源:👉 https://pan.quark.cn/s/20c6f6f8d87b这些资源主要面向本地用户,方便进行创作与学习。

LTX2.3 GGUF Simple i2v + Last Frame 16GB/low vram
diff modelhttps://huggingface.co/unsloth/LTX-2.3-GGUF/blob/main/ltx-2.3-22b-dev-Q4_K_M.gguftext enchttps://huggingface.co/Comfy-Org/ltx-2/blob/main/split_files/text_encoders/gemma_3_12B_it_fp4_mixed.safetensorshttps://huggingface.co/Kijai/LTX2.3_comfy/blob/main/text_encoders/ltx-2.3_text_projection_bf16.safetensorsvaehttps://huggingface.co/Kijai/LTX2.3_comfy/blob/main/vae/LTX23_audio_vae_bf16.safetensorshttps://huggingface.co/Kijai/LTX2.3_comfy/blob/main/vae/LTX23_video_vae_bf16.safetensorshttps://github.com/madebyollin/taehv/blob/main/safetensors/taeltx2_3.safetensorslatent upscalerhttps://huggingface.co/Lightricks/LTX-2.3/blob/main/ltx-2.3-spatial-upscaler-x2-1.1.safetensorslora (needed, do not disable)https://huggingface.co/Kijai/LTX2.3_comfy/blob/main/loras/ltx-2.3-22b-distilled-lora-dynamic_fro09_avg_rank_105_bf16.safetensors
LTX-2 Video Upscale
🎥 YouTube Video TutorialWant to know what this workflow actually does and how to start fast?This video explains what the tool is, how to launch the workflow instantly, and shares my core design logic — no local setup, no complicated environment.Everything starts directly on RunningHub, so you can experience it in action first.👉 YouTube Tutorial: https://youtu.be/gV1mTrJa_kgBefore you begin, I recommend watching the video thoroughly — getting the full context helps you understand the tool faster and avoid common detours.⚙️ RunningHub WorkflowTry the workflow online right now — no installation required.👉 Workflow: https://www.runninghub.ai/post/2010029707667968001?inviteCode=rh-v1111If the results meet your expectations, you can later deploy it locally for customization.🎁 Fan Benefits: Register to get 1000 points + daily login 100 points — enjoy 4090 performance and 48 GB super power!📺 Bilibili Updates (Mainland China & Asia-Pacific)If you’re in the Asia-Pacific region, you can watch the video below to see the workflow demonstration and creative breakdown.📺 Bilibili Video: https://www.bilibili.com/video/BV1ForaBfE8s/☕ Support Me on Ko-fiIf you find my content helpful and want to support future creations, you can buy me a coffee ☕.Every bit of support helps me keep creating — just like a spark that can ignite a blazing flame.👉 Ko-fi: https://ko-fi.com/aiksk💼 Business ContactFor collaboration or inquiries, please contact aiksk95 on WeChat.🎥 YouTube 视频教程想了解这个工作流到底是怎样的工具,以及如何快速启动?视频主要介绍 工具定位、快速启动方法 和 我的构筑思路。我们会直接在 RunningHub 上进行演示,让你第一时间看到实际效果。👉 YouTube 教程: https://youtu.be/gV1mTrJa_kg开始前建议尽量完整地观看视频 —— 把握整体思路会更快上手,也能少走常见弯路。⚙️ 在线体验工作流现在就可以在线体验,无需安装。👉 工作流: https://www.runninghub.ai/post/2010029707667968001?inviteCode=rh-v1111打开上方链接即可直接运行该工作流,实时查看生成效果。如果觉得效果理想,你也可以在本地进行自定义部署。🎁 粉丝福利: 注册即送 1000 积分,每日登录 100 积分,畅玩 4090 体验 48 G 超级性能!📺 Bilibili 更新(中国大陆及南亚太地区)如果你在中国大陆或南亚太地区,可以通过下方视频查看该工作流的实测效果与构思讲解。📺 B站视频: https://www.bilibili.com/video/BV1ForaBfE8s/我会在 夸克网盘 持续更新模型资源:👉 https://pan.quark.cn/s/20c6f6f8d87b这些资源主要面向本地用户,方便进行创作与学习。
LTX-2 2-Image/3-Image NVFP4 First-and-Last-Frame
🎥 YouTube Video TutorialWant to know what this workflow actually does and how to start fast?This video explains what the tool is, how to launch the workflow instantly, and shares my core design logic — no local setup, no complicated environment.Everything starts directly on RunningHub, so you can experience it in action first.👉 YouTube Tutorial: https://youtu.be/DJRhC6IdZVMBefore you begin, I recommend watching the video thoroughly — getting the full context helps you understand the tool faster and avoid common detours.⚙️ RunningHub WorkflowTry the workflow online right now — no installation required.👉 Workflow: https://www.runninghub.ai/post/2009643807456890881?inviteCode=rh-v1111If the results meet your expectations, you can later deploy it locally for customization.🎁 Fan Benefits: Register to get 1000 points + daily login 100 points — enjoy 4090 performance and 48 GB super power!📺 Bilibili Updates (Mainland China & Asia-Pacific)If you’re in the Asia-Pacific region, you can watch the video below to see the workflow demonstration and creative breakdown.📺 Bilibili Video: https://www.bilibili.com/video/BV1vfrNBkEHc/☕ Support Me on Ko-fiIf you find my content helpful and want to support future creations, you can buy me a coffee ☕.Every bit of support helps me keep creating — just like a spark that can ignite a blazing flame.👉 Ko-fi: https://ko-fi.com/aiksk💼 Business ContactFor collaboration or inquiries, please contact aiksk95 on WeChat.🎥 YouTube 视频教程想了解这个工作流到底是怎样的工具,以及如何快速启动?视频主要介绍 工具定位、快速启动方法 和 我的构筑思路。我们会直接在 RunningHub 上进行演示,让你第一时间看到实际效果。👉 YouTube 教程: https://youtu.be/DJRhC6IdZVM开始前建议尽量完整地观看视频 —— 把握整体思路会更快上手,也能少走常见弯路。⚙️ 在线体验工作流现在就可以在线体验,无需安装。👉 工作流: https://www.runninghub.ai/post/2009643807456890881?inviteCode=rh-v1111打开上方链接即可直接运行该工作流,实时查看生成效果。如果觉得效果理想,你也可以在本地进行自定义部署。🎁 粉丝福利: 注册即送 1000 积分,每日登录 100 积分,畅玩 4090 体验 48 G 超级性能!📺 Bilibili 更新(中国大陆及南亚太地区)如果你在中国大陆或南亚太地区,可以通过下方视频查看该工作流的实测效果与构思讲解。📺 B站视频: https://www.bilibili.com/video/BV1vfrNBkEHc/我会在 夸克网盘 持续更新模型资源:👉 https://pan.quark.cn/s/20c6f6f8d87b这些资源主要面向本地用户,方便进行创作与学习。
Non-Distilled High-Quality LXT2 Camera-Controlled Text-to-Video
🎥 YouTube Video TutorialWant to know what this workflow actually does and how to start fast?This video explains what the tool is, how to launch the workflow instantly, and shares my core design logic — no local setup, no complicated environment.Everything starts directly on RunningHub, so you can experience it in action first.👉 YouTube Tutorial: https://youtu.be/DJRhC6IdZVMBefore you begin, I recommend watching the video thoroughly — getting the full context helps you understand the tool faster and avoid common detours.⚙️ RunningHub WorkflowTry the workflow online right now — no installation required.👉 Workflow: https://www.runninghub.ai/post/2009183975582994433?inviteCode=rh-v1111If the results meet your expectations, you can later deploy it locally for customization.🎁 Fan Benefits: Register to get 1000 points + daily login 100 points — enjoy 4090 performance and 48 GB super power!📺 Bilibili Updates (Mainland China & Asia-Pacific)If you’re in the Asia-Pacific region, you can watch the video below to see the workflow demonstration and creative breakdown.📺 Bilibili Video: https://www.bilibili.com/video/BV1vfrNBkEHc/☕ Support Me on Ko-fiIf you find my content helpful and want to support future creations, you can buy me a coffee ☕.Every bit of support helps me keep creating — just like a spark that can ignite a blazing flame.👉 Ko-fi: https://ko-fi.com/aiksk💼 Business ContactFor collaboration or inquiries, please contact aiksk95 on WeChat.🎥 YouTube 视频教程想了解这个工作流到底是怎样的工具,以及如何快速启动?视频主要介绍 工具定位、快速启动方法 和 我的构筑思路。我们会直接在 RunningHub 上进行演示,让你第一时间看到实际效果。👉 YouTube 教程: https://youtu.be/DJRhC6IdZVM开始前建议尽量完整地观看视频 —— 把握整体思路会更快上手,也能少走常见弯路。⚙️ 在线体验工作流现在就可以在线体验,无需安装。👉 工作流: https://www.runninghub.ai/post/2009183975582994433?inviteCode=rh-v1111打开上方链接即可直接运行该工作流,实时查看生成效果。如果觉得效果理想,你也可以在本地进行自定义部署。🎁 粉丝福利: 注册即送 1000 积分,每日登录 100 积分,畅玩 4090 体验 48 G 超级性能!📺 Bilibili 更新(中国大陆及南亚太地区)如果你在中国大陆或南亚太地区,可以通过下方视频查看该工作流的实测效果与构思讲解。📺 B站视频: https://www.bilibili.com/video/BV1vfrNBkEHc/我会在 夸克网盘 持续更新模型资源:👉 https://pan.quark.cn/s/20c6f6f8d87b这些资源主要面向本地用户,方便进行创作与学习。

Triple Depth Mapper for LTXV ControlNet LoRA
This is a work flow. The work flows from a movie (which as you may not know is actually just a shitload of pictures) to another movie. Cept this movie sucks to watch. But you can use it as a source for the appropriate ControlNet models, like LTXV IC Control LoRA (which is why I done made it) or for any other reason, you tard. I don't care.If you do this ahead of time, you don't have to waste resources and/or OOM when cranking out your slop. Prepping your sources usually requires two hands, so maybe wash up first.Just load a video and select the map of your choice.Depth is same as regular depth map, it's just a bunch of them. Read the notes, if I put any in there. It's resource intensive and a bit slow, but the map is just the bee's knees.Pose will give you a funky dancing skeleton. DW Pose NAS is much, much faster than non-NAS.Canny will give you outlines. Super fast.They're all useful for certain things. Depth is good when objects are occluding something behind them, but are far away, for example. DW Pose is helpful because, well that's should be obvious. Canny is good for crazy shapes that need outlines, something to define their shape. There is a small group for pre-encoding a latent as well, in case you want to use is as a guide along with the map. Actually no, ignore that. I put it there to fuck with you. Just use the normal audio, which passes directly through and is saved along with the maps. I.e. do nothing. You don't have to do anything. LTXV is EXTREMELY sensitive to audio if you tickle it in the A-spot - try it out, you will be mazed.Don't forget this part: this is just for making the maps. I did put in some reference nodes to show your stupid brain where to plug in/substitute the saved maps in the actual generation workflow, but you have to connect those dots yourself. Figure it out, eisensteen.I set up two sizes as defaults. The presets can be changed or added to in the auto size group. Change it to whatever you like to use - depth is the only one that really benefits from going really big.When using with LTXV I2V your source image MUST be as close as possible to the source motion map first frame. Composition-wise. You will get very strange stuff happening when they don't- even if you turn the strength way down. So what I do is hop over to one of my T2I workflows that has controlnet and generate a batch from the first frame of my maps. This gives you the best chance of an immediate lock and usually avoids having to drop the nightmare-fuel that is mismatched starts. If you're getting horrifying skin monsters all the time, try doing T2V instead until you have good starting frames.Frame rate is very important here. Make sure that you set the FPS node to match your source. Actually, wait. It's slightly more complicated. If your source is 29.97, you don't want to put that in the FPS node. You would use 30. The VHS loader is NOT forced, if you did force it to treat 29.97 as 30 the count will be messed up. Let it load the native rate and use 30, any discrepancies will be accounted for by the logic - it's usually just one frame +/- Won't be noticable. But if you do it the wrong way it may be, because it might cause duplicate frames or odd dropped ones. So if you're chopping up clips in an editor you don't have to re-encode at a new framerate first, you will just stack errors.The output FRAME COUNT is set up such that it will always conform to LTXV input rules (mod8 +1). It will round down to the nearest allowed frame count for the model.I had a batcher in there for doing folders in both, but I took it out for the moment because, shocker, it's not working.If you put a little effort into preparing your sources properly all of the rest can be automated. Having this done already makes the actual video generation go a LOT faster. Also you can reuse the maps without having to re-map them. Duh.If you don't have custom nodes, please google "why am I complaining about custom nodes? Am I retarded?" Don't listen to an LLM if it tells you that 'you're super smart and you're doing an awesome job - like, pro move bro - you're on the cutting edge!' I guarantee you that it's lying, hallucinating or probably both.If you can't figure out how to use this workflow, sell your computer and go live in a box on the street.

LTX 2.3 ID-LoRA in ComfyUI | Identity-Controlled Video Creator
Creates true-to-life talking avatars with synced voice and visuals.Who it's for: creators who want this pipeline in ComfyUI without assembling nodes from scratch. Not for: one-click results with zero tuning — you still choose inputs, prompts, and settings.Open preloaded workflow on RunComfyOpen preloaded workflow on RunComfy (browser)Why RunComfy first- Fewer missing-node surprises — run the graph in a managed environment before you mirror it locally.- Quick GPU tryout — useful if your local VRAM or install time is the bottleneck.- Matches the published JSON — the zip follows the same runnable workflow you can open on RunComfy.When downloading for local ComfyUI makes sense — you want full control over models on disk, batch scripting, or offline runs.How to use (local ComfyUI)1. Load inputs (images/video/audio) in the marked loader nodes.2. Set prompts, resolution, and seeds; start with a short test run.3. Export from the Save / Write nodes shown in the graph.Expectations — First run may pull large weights; cloud runs may require a free RunComfy account.OverviewWith this identity-aware workflow, you can easily create lifelike talking avatars from a single image, short audio clip, and text input. It combines facial consistency with precise lip-sync and expressive voice transfer. The model maintains the subject’s unique features while blending realistic motion and tone. Ideal for virtual personalities, digital influencers, and character-driven storytelling. This tool simplifies complex generation steps into one unified process for seamless audiovisual output.Important nodes:Key nodes in Comfyui LTX 2.3 ID-LoRA workflowLoraLoaderModelOnly (#5573)Loads the LTX 2.3 ID-LoRA that preserves facial identity. Reduce its weight if you want more creative variance or increase it to lock down likeness more tightly. Pair it thoughtfully with prompt strength so identity and style do not compete. Reference: LTX‑2.3 LoRA usage on the model page. Model cardLTXVReferenceAudio (#5589)Converts your reference audio into conditioning for syllable timing, prosody, and mouth shapes. Feed clean speech for best alignment. If you hear pumping or off‑beat articulation, shorten or simplify the clip rather than boosting strength.LTXVImgToVideoInplace (#5245, also used later)Injects the face image into the latent video stream as a spatial prior. The image‑strength control balances adherence to the photo versus motion freedom. For strong identity with natural movement, keep image strength moderate and let the ID‑LoRA carry likeness.LTXVConditioning (#5621)Packages text conditioning and timing cues for the LTX samplers. Ensure its frame‑rate input matches your output frame rate so motion fields and phoneme timing stay coherent.VHS_VideoCombine (#5218)Muxes frames and audio to the final file. If your audio is slightly longer than frames, enable trimming here to prevent a trailing black tail. For platform compatibility, keep the default H.264 settings unless you have a reason to change them. Node reference: ComfyUI‑VideoHelperSuiteMelBandRoFormerSampler (#5473)Separates vocals from music using a Mel‑band transformer so the generator locks to speech. If sibilants smear or plosives pop, try a different model file from the same family or reduce input loudness. Background reading: arXivNotesLTX 2.3 ID-LoRA in ComfyUI | Identity-Controlled Video Creator — see RunComfy page for the latest node requirements.
LTX2.3 I2V First Last Frame (Infinite Intermediate Frames)
A workflow uses the latest LTX2.3 First and last frame and multi key frames to Generate High Quality Videos.Try the workflow online: https://www.runninghub.ai/post/2039218525709017090Model details are within the workflow.Join Discord for updates and error fixing: https://discord.gg/GTBQYDwSuNVideo guide for the workflow:https://rumble.com/v77yfps-ltx2.3-smooth-first-and-last-frame-video-generation-guide.html
LTX-2 ControlNet in ComfyUI | Depth-Controlled Video Workflow
Sharp control, perfect sync, super clear AI video creation.Who it's for: creators who want this pipeline in ComfyUI without assembling nodes from scratch. Not for: one-click results with zero tuning — you still choose inputs, prompts, and settings.Open preloaded workflow on RunComfyOpen preloaded workflow on RunComfy (browser)Why RunComfy first- Fewer missing-node surprises — run the graph in a managed environment before you mirror it locally.- Quick GPU tryout — useful if your local VRAM or install time is the bottleneck.- Matches the published JSON — the zip follows the same runnable workflow you can open on RunComfy.When downloading for local ComfyUI makes sense — you want full control over models on disk, batch scripting, or offline runs.How to use (local ComfyUI)1. Load inputs (images/video/audio) in the marked loader nodes.2. Set prompts, resolution, and seeds; start with a short test run.3. Export from the Save / Write nodes shown in the graph.Expectations — First run may pull large weights; cloud runs may require a free RunComfy account.OverviewThis ControlNet-powered LTX-2 workflow enables highly accurate video generation guided by explicit structural conditions such as depth maps, canny edges, and human poses. By using ControlNet-style IC LoRA conditioning, it enforces strong spatial and motion constraints across all frames while generating synchronized audio and visuals in a unified latent space. The workflow supports text-to-video, image-to-video, and video-to-video pipelines, allowing creators to precisely control scene structure, movement, and continuity. Its two-stage architecture provides efficient upscaling and optimized memory usage, making it ideal for refined, controllable, and production-ready video synthesis.Important nodes:Key nodes in Comfyui LTX-2 ControlNet workflowLTXVAddGuide (#132)Merges text conditioning and IC LoRA controls into the AV latent, acting as the heart of LTX-2 ControlNet guidance. Adjust only the few controls that matter: choose the control LoRA that matches your path (depth, canny, or pose) and, when available, the image_strength that tunes how tightly the model follows guides. Reference implementation and node behavior are provided by the LTXVideo extension. Docs/CodeLTXVImgToVideoInplace (#149, #155)Injects a first-frame image into the AV latent for consistent scene initialization. Use strength to balance faithfulness to the first frame versus freedom to evolve; keep it lower for more motion and higher for tighter anchors. Bypass it when you want purely text- or control-driven openings. Docs/CodeLTXVScheduler (#95)Drives the denoising trajectory for the unified latent so both audio and video converge together. Increase steps for complex scenes and fine detail; shorten for drafts and quick iteration. Schedule settings interact with guidance strength, so avoid extreme values when guidance is strong. Docs/CodeLTXVLatentUpsampler (#112)Performs the second-stage latent upscaling with the LTX-2 x2 spatial upscaler, improving sharpness with minimal VRAM growth. Use it after the first pass rather than increasing base resolution to keep iterations responsive. Upscaler modelDWPreprocessor (#158)Generates clean human pose keypoints for the pose-control path. Verify detections with the preview; if hands or small limbs are noisy, scale inputs to a moderate max dimension before preprocessing. Provided by the ControlNet auxiliary suite. Repo…NotesLTX-2 ControlNet in ComfyUI | Depth-Controlled Video Workflow — see RunComfy page for the latest node requirements.
LTX-2 ComfyUI Workflow | Real-Time Video Generation Speed
Create real-time videos instantly, faster than any other generator.Who it's for: creators who want this pipeline in ComfyUI without assembling nodes from scratch. Not for: one-click results with zero tuning — you still choose inputs, prompts, and settings.Open preloaded workflow on RunComfyOpen preloaded workflow on RunComfy (browser)Why RunComfy first- Fewer missing-node surprises — run the graph in a managed environment before you mirror it locally.- Quick GPU tryout — useful if your local VRAM or install time is the bottleneck.- Matches the published JSON — the zip follows the same runnable workflow you can open on RunComfy.When downloading for local ComfyUI makes sense — you want full control over models on disk, batch scripting, or offline runs.How to use (local ComfyUI)1. Load inputs (images/video/audio) in the marked loader nodes.2. Set prompts, resolution, and seeds; start with a short test run.3. Export from the Save / Write nodes shown in the graph.Expectations — First run may pull large weights; cloud runs may require a free RunComfy account.OverviewWith the LTX-2 workflow, you can generate videos in real time and refine motion or composition instantly. It helps you test new animation ideas quickly, see results without delay, and streamline your creative process. Designed for interactive video prototyping, this workflow minimizes wait times while maintaining visual precision. Perfect for animation designers, motion artists, and video creators seeking immediate visual feedback. Build, iterate, and evolve video concepts faster than ever.NotesWorkflow 1333 — see RunComfy page for the latest node requirements.
LTX 2.3 ComfyUI: High-Quality Text-to-Video Generator
🚀 Generate cinematic AI videos from text prompts with enhanced scene coherence and film-like quality — powered by LTX 2.3.▶️ Run Directly in Cloud:https://www.runcomfy.com/comfyui-workflows/ltx-2-3-comfyui-workflow-high-quality-ai-video-creator?utm_source=civitai💡 OverviewLTX 2.3 ComfyUI is a text-to-video workflow built on the Lightricks LTX 2.3 video diffusion model. It generates cinematic-style motion scenes from text prompts with enhanced scene coherence and refined transitions for consistent, film-like results.Perfect for designers seeking creative control and realism — supports stylized concept animations and polished storytelling visuals.✨ Key FeaturesText-to-Video: Describe a scene and generate dynamic, visually cohesive video clips.LTX 2.3 22B Model: State-of-the-art video diffusion transformer with advanced motion coherence.Scene Consistency: Refined transitions and stable visual tone across all frames.Fast Iteration: Generate, review, and refine video concepts faster than ever.🚀 Getting StartedWrite your scene prompt — describe the action, mood, and camera movement.Configure video settings — resolution, duration, and frame rate.Generate — the workflow produces a polished MP4 video ready for use.Click the "Run Directly" link above to bypass local setup and test this workflow immediately in your browser.
LTX 2.3 Image to Video: Cinematic Motion Creator in ComfyUI
🚀 Turn still images into fluid, cinematic AI videos with LTX 2.3 — the latest and most capable open-source video model.▶️ Run Directly in Cloud:https://www.runcomfy.com/comfyui-workflows/ltx-2-3-image-to-video-in-comfyui-realistic-motion-workflow?utm_source=civitai💡 OverviewLTX 2.3 Image to Video is a ComfyUI workflow that converts a single image (or a pure text prompt) into smooth, cinematic AI video. Built on the Lightricks LTX 2.3 22B video diffusion transformer, it delivers high visual coherence, strong scene consistency, and polished motion without manual wiring.The graph supports two creative modes: Image to Video with your first frame as a visual anchor, or Text to Video guided entirely by language. It also includes automatic prompt enhancement, latent upscaling for sharper detail, and optional audio decoding so your final render arrives ready to publish.✨ Key FeaturesDual Mode — I2V & T2V: Switch between image-anchored and text-only generation with a single toggle.22B Diffusion Transformer: LTX 2.3's massive model delivers temporally consistent motion and refined visual detail.Automatic Prompt Enhancement: A built-in helper analyzes your image and text, generating a stronger, time-aware prompt draft.Latent Upscaling: Integrated spatial super-resolution doubles sharpness before the final high-resolution sampling pass.Audio Decoding: The LTX Audio VAE decodes audio latents and muxes them with your video frames automatically.🚀 Getting StartedChoose your mode: Toggle between Image to Video or Text to Video.Set your prompt: Describe the scene action. Use time-aware verbs like "camera pushes forward" or "leaves swirl in wind."Configure video settings: Set width, height, duration, and frame rate for your target platform.Generate: The workflow samples a low-res latent video, upscales it, decodes frames + audio, and outputs a ready-to-publish MP4.Click the "Run Directly" link above to bypass local setup and test this workflow immediately in your browser.
LTX-2 First Last Frame: Controllable Video & Audio Generation
🚀 Create flawless, audio-synced cinematic video transitions from just a start and end frame.▶️ Run Directly in Cloud:https://www.runcomfy.com/comfyui-workflows/ltx-2-first-last-frame-in-comfyui-audio-visual-motion-control?utm_source=civitai💡 OverviewLTX-2 First Last Frame is a powerful ComfyUI workflow tailored for creators who demand precise cinematic control. Define your starting frame and your ending frame, and the pipeline will seamlessly generate the motion between them—complete with synchronized audio and visuals in a single pass.By conditioning on both boundaries (with an optional guiding middle frame), the workflow perfectly preserves your subject's identity, framing, and lighting. It’s the ultimate tool for executing narrative beats, flawless scene transitions, and complex camera movements where temporal continuity and audio sync are an absolute must.✨ Key FeaturesAbsolute Motion Control: Lock in your first and last frames; the workflow handles the smooth transition in between without identity loss.1-Pass Audio & Video: Utilizes the LTXV Audio VAE to generate perfectly synchronized sound effects, dialogue, or ambience alongside your visual action.Dynamic Camera Trajectories: Fully compatible with camera LoRAs, allowing you to easily execute Dolly In/Out, Jib Up/Down, and Static shots.Integrated 2X Upscale: Features a built-in spatial upscaling pass to cleanly resolve complex lighting, refine background elements, and deliver crisp, high-fidelity micro-details.🚀 Getting StartedModel Setup: The core engine is LTX-2 19B (dev). (Note: For machines under 2x Large specs, please ensure the fp8 safetensors model is selected to avoid out-of-memory errors.)Prompting: Describe the scene action in your positive prompt. List any unwanted characteristics in the negative prompt.Configure Control: Upload your start and end images. Fine-tune the first_strength and last_strength nodes to dictate how strictly the workflow adheres to your frame references.Generate: Execute the prompt. The workflow will base sample an AV latent, run a targeted upscale, and automatically mux the decoded frames into a polished, ready-to-use MP4 video.Click the "Run Directly" link above to bypass local setup and test this workflow immediately in your browser.
Granny's LTX-2.3 I2V Voice Reference
The workflow generates video starting from given image as first frame and... makes the character speak sentence in prompt using voice given in 10 sec sample.The workflow was tested on recent version of ComfyUI and recent versions of nodes. RTX 5090, PyTorch 2.9.0, Python 3.13.11.This is not for the begginers. Make female speak male voice is pretty hard, but low resolution and good prompt helps. So, good scenario for using the workflow is to take only audio output and inject to the video in high resolution. Female to female could work easily.I tried some voice cloning technics with different models, but everytime i got the speech more or less "out of context". Now i can apply the speech perfectly matching to the action.So, there's no need to train lora with specific voice anymore.

(Ultimate Consistency Stable Version) Ltxv+2.3 Wensheng Video Auto Prompt Edition + Top-Tier Amplification V1
You can click on the link below and try it out directly. If the effect is good, you can deploy it locally https://www.runninghub.cn/post/2029899398246834177/?inviteCode=rh-v1121Fan benefits, register to get 1000 points, daily login 100 points, play 4090! Experience the super power of 48G!B-site video: https://www.bilibili.com/video/BV1UXPxz2EVXKnowledge Planet: https://t.zsxq.com/7F90AGraphic tutorial: https://t.zsxq.com/lNK8vThe workflow is very simple to use, and I have uploaded a tutorial on how to use it on YouTube. You can try it out and follow the tutorial and Civitai's workflow to easily reproduce the results. Thank you. If you have any other questions, please leave a comment in the comment sectionThis tutorial is very important, not watching it will surely lead to a lot of problems! Watch the video tutorial before trying !!!! Very important! Especially a key point at the end!

(Ultimate Consistency Stable Version) Ltxv+2.3 Image-to-Video Auto Prompt Edition + Top-Tier Zoom V1
You can click on the link below and try it out directly. If the effect is good, you can deploy it locally https://www.runninghub.cn/post/2029876978643374081/?inviteCode=rh-v1121Fan benefits, register to get 1000 points, daily login 100 points, play 4090! Experience the super power of 48G!B-site video: https://www.bilibili.com/video/BV1UXPxz2EVXKnowledge Planet: https://t.zsxq.com/7F90AGraphic tutorial: https://t.zsxq.com/lNK8vThe workflow is very simple to use, and I have uploaded a tutorial on how to use it on YouTube. You can try it out and follow the tutorial and Civitai's workflow to easily reproduce the results. Thank you. If you have any other questions, please leave a comment in the comment sectionThis tutorial is very important, not watching it will surely lead to a lot of problems! Watch the video tutorial before trying !!!! Very important! Especially a key point at the end!
LTX Video 2.3 Image to video Triple Stage Sampling Best Quality
Good quality LTX Image 2 video workflow for comfyui. Working fine on 4090 +96gb RAM.
LTX-2.3 (newest LTX) using distilled GGUF - I2V
Version 3.0 has been updated to use LTX 2.3LTX 2.3 should provide some enhancements such as sharper videoBetter audioEtc..The normal models are HUGE, can't be used by most people.This workflow used GGUF for model and text endcocder, gemma.Trying to keep footprint small, but its getting hard to do. **************LTX 2.3 VERSION*************https://huggingface.co/Lightricks/LTX-2.3/tree/main (upscaler)https://huggingface.co/QuantStack/LTX-2.3-GGUF/tree/main/LTX-2.3-distilled (main gguf)https://huggingface.co/Kijai/LTX2.3_comfy/tree/main (vae, text projector)./models/text_encodersgemma-3-12b-it-Q2_K.gguf (this is only 4GB for low vram)ltx-2.3_text_projection_bf16.safetensors./models/unet (DISTILLED version, distilled only needs 8 steps)LTX-2.3-distilled-Q5_K_S.gguf (Distilled version provides benefits for low vram)./models/vae (2.3)LTX23_audio_vae_bf16.safetensorsLTX23_video_vae_bf16.safetensors./models/latent_upscale_models (2.3)ltx-2.3-spatial-upscaler-x2-1.0.safetensorsModels are in a Subgraph.
Rebels LTX-2.3 Dev (GGUF)
UPDATED TO VERSION 2VERSION 2 removes the textenhance node to rid the workflow of the terrible time consuming encoding. also provided a secondary workflow inside that gives the correct distilled model settings all in 1 workflow!PRO-TIP: if you have at least 24gb of COMBINED memory (8gb vram + 16gb ram)you can fit Kijais fp8 scaled model. i tested it and its WAY better than the gguf formats. worth a try!I HIGHLY RECOMMEND UPDATING YOUR BAT FILE WITH THESE FLAGS:--lowvram --disable-xformers --use-pytorch-cross-attention --reserve-vram 2 --disable-smart-memory(these flags will help with the text encoder tricking the push back onto cpu and will burn your vram as priority first)__________________________________________________________________________________________________LOW VRAM workflow for the LTX-2.3 DEV gguf!NOTE: the workflow is set to 20 steps by default with the distill lora. if you dont use the distill lora, youll need 40 to 50 steps.You can remove the textenhance node if you dont want to wait for token generation!workflow is set to run both vaes and text encoder on cpu. if this is too slow for you, swap to main device on vaes and default on text encoder and that will speed it up but you may encounter OOMs because of it.WARNING! GENERATION TIMES WILL BE EXTREMELY LONG! The Gemma text encoder generates tokens and this process takes VERY long... like over an hour in some cases. You CAN run the text encoders on your gpu but if you have anything less than 10gb itll probably OOM. I recommend chaining the Gemma API node in and generating an API key so you can save VRAM and time by encoding through the cloud. (ITS FREE AND EASY TO SET UP)I HIGHLY RECOMMEND UPDATING YOUR BAT FILE WITH THESE FLAGS:--lowvram --disable-xformers --use-pytorch-cross-attention --reserve-vram 2 --disable-smart-memory(these flags will help with the text encoder tricking the push back onto cpu and will burn your vram as priority first)FILES:OPTIONAL Kijais fp8 Scaled (requires load diffusion model node instead of unet loader node and replaces the gguf entirely. )https://huggingface.co/Kijai/LTX2.3_comfy/tree/main/diffusion_modelsDEV gguf (distilled ggufs are in the repo as well)https://huggingface.co/unsloth/LTX-2.3-GGUF/tree/main(Unsloth is usually the best quants. They use a special quantization format which keep precision high! get the UD version)Gemma 3_12B FP4 text encoderhttps://huggingface.co/Comfy-Org/ltx-2/blob/main/split_files/text_encoders/gemma_3_12B_it_fp4_mixed.safetensorsAudio VAEhttps://huggingface.co/Kijai/LTX2.3_comfy/blob/main/vae/LTX23_audio_vae_bf16.safetensorsVideo VAEhttps://huggingface.co/Kijai/LTX2.3_comfy/blob/main/vae/LTX23_video_vae_bf16.safetensorsText Projection text encoderhttps://huggingface.co/Kijai/LTX2.3_comfy/tree/main/text_encodersDistill Lorahttps://huggingface.co/Lightricks/LTX-2.3/blob/main/ltx-2.3-22b-distilled-lora-384.safetensorsSpatial Upscaler (latent upscale models folder)https://huggingface.co/Lightricks/LTX-2.3/blob/main/ltx-2.3-spatial-upscaler-x1.5-1.0.safetensors
Granny's LTX-2.3 Video To Audio
Workflow generates audio from video using LTX-2.3 model.The workflow is tested on recent ComfyUI version and recent versions of nodes with configuration PyTorch 2.9.0+Cu130, Python 3.13.11, RTX5090, Windows 11.The workflow is optimized for input videos in 1280x720 resolution and 25 fps.
LTX 2.3 Workflow ( T2V & I2V )
Hey guys i have made a video on this please check it out for more information
LTX-2 Image Audio to Video
This workflow takes an Image and an audio track as input to generate a video.Important NoticeUpdate ComfyUI and KJ Nodes. A lot of the code has been updated in the last few days.Include --reserve-vram 1 in your launch option to avoid OOM.If you have no lipsync, try ensuring that your audio track is in stereo format. fix suggested by @thomasdimitri563 Models to download (LTX2.3)Place in models/diffusion_modelshttps://huggingface.co/Kijai/LTX2.3_comfy/blob/main/diffusion_models/ltx-2.3-22b-dev_transformer_only_fp8_scaled.safetensorsPlace in models/lorashttps://huggingface.co/Lightricks/LTX-2.3/blob/main/ltx-2.3-22b-distilled-lora-384.safetensorsPlace in models/text_encodershttps://huggingface.co/Comfy-Org/ltx-2/resolve/main/split_files/text_encoders/gemma_3_12B_it_fp4_mixed.safetensorshttps://huggingface.co/Kijai/LTX2.3_comfy/blob/main/text_encoders/ltx-2.3_text_projection_bf16.safetensorsPlace in models/vaehttps://huggingface.co/Kijai/LTX2.3_comfy/blob/main/vae/LTX23_audio_vae_bf16.safetensorshttps://huggingface.co/Kijai/LTX2.3_comfy/blob/main/vae/LTX23_video_vae_bf16.safetensorsModels to download (V3)Place in models/diffusion_modelshttps://huggingface.co/Lightricks/LTX-2/resolve/main/ltx-2-19b-distilled-fp8.safetensorsPlace in models/text_encodershttps://huggingface.co/Comfy-Org/ltx-2/resolve/main/split_files/text_encoders/gemma_3_12B_it_fp4_mixed.safetensorsPlace in models/lorashttps://huggingface.co/Lightricks/LTX-2-19b-IC-LoRA-Detailer/resolve/main/ltx-2-19b-ic-lora-detailer.safetensorshttps://huggingface.co/Lightricks/LTX-2-19b-LoRA-Camera-Control-Static/resolve/main/ltx-2-19b-lora-camera-control-static.safetensors
Friendly LTX-2 T2V+I2V+Lipsync
Welcome to my 💫🎦 Friendly LTX-2 T2V+I2V+LipsyncLTX-2.3 better in everything! Coming soon...✨ Less mess, more magicUniVibe - Lipsync all-in one version with HQ TTS VibeVoice model is released.New v1.2 with simplified model loading, with quality and perfomance improvements.LTX-2 is a new video generation model with 19b parameters under the hood. This is the first DiT-based (Diffusion Transformer) foundation model that generates synchronized audio and video simultaneously in a single pass! It supports native 4K resolution at up to 50 FPS, providing cinematic-grade fidelity suitable for professional VFX and film production and it is capable of generating clips up to 10–20 seconds with consistent style and motion.💻 System requirements:Minimum system requirements for 540p i2v and 720p t2v:RTX 3000-s, 8GB+ VRAM, 45GB+ RAM, 8-core processor, SSD, latest ComfyUI🚀 Low VRAM optional optimization:For systems with low VRAM use --reserve-vram ComfyUI parameter in run_nvidia_gpu.bat: --reserve-vram 4 (or other number in GB).📌 Detailed tips and links to models in the workflow✨ Workflow features:Extremely user-friendly interfaceMaximum performance and optimization from 8GB of VRAM: GGUF or 8-step distilled model with fp4 or fp8 text encoder + MultiGPU memory optimizationAll-in-one: i2v, t2v, and interpolationConvenient one-click mode switchingGeneration time setting in secondsLora support (up to 3)Detailed tips and links to all necessary modelsManual random seed for complete control over generations🤗🙏🏼 Thanks to Lightricks TeamOriginal repo — GitHub
Weird Science LTX-2 ComfyUI TI2V / I2V Workflow by Electroverted
I'm aging myself, but the movie Weird Science is an 80s comedy about a couple of lonely, horny, high school boys, who add components into a computer in order to make the ultimate waifu. It's a prequel to The Breakfast Club (the events leading up to weekend detention), Terminator (before Bill Paxton's character fights the T-800) and Iron Man (Robert Downey Jr plays Tony Stark, a high school). If historians recognize that Christopher Columbus discovered America, then historians will recognize that John Hughes, Kelly LeBrock and, most of all, high school boys discovered A.I. img2waifu. If reality imitates art, then your waifus are about to come to life.This LTX-2 workflow specializes in image2video for midrange to lower-midrange computers. I can run this on my 3 year old 8 GB RTX 3060 32 GB RAM system with relatively fast outputs compared to Wan. If you have a beefier system, other workflows might have better quality.Read the overview on the left for models, custom nodes and tips. A quick summary: distilled GGUF checkpoints, optional LoRAs, and 5 custom nodes. Read the usage on the right for more tips.
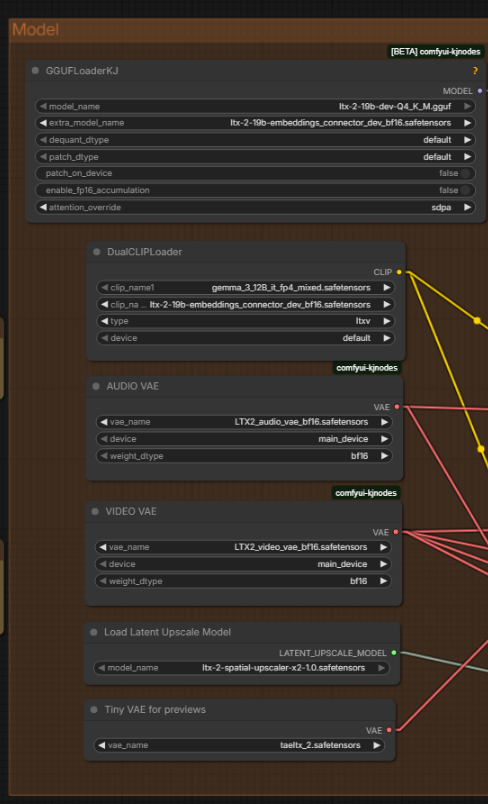
LTX-2 19B GGUF 12GB ComfyUI Workflows 5 TOTAL! t2v/i2v/v2v/ia2v/ta2v
IF YOU ARE WONDERING WHAT V2 IS OR YOU'RE HERE BECAUSE OF MISMATCHES AFTER UPDATING COMFY THE FIX IS IN!UPDATE KJNODES AND COMFY!!!!!WE NOW PUT THE EMBEDDINGS INTO THE MODEL LOADER AND THE CLIP BUT IT IS ONLY LOADED ONCE! DOES NOT USE MORE MEMORY!UPDATE KJNODES AND COMFY!!!!!THIS WAS A NECESSARY CHANGE AFTER COMFY REORGANIZED WHERE THE EMBEDDING MODEL WOULD LOAD INTO. REQUIRED UPDATE!PLEASE TAKE NOTE OF NEW DEV+LORA COMBO! WE NOW USE FP4 GEMMA TEXT ENCODER!!!! CHECK MODELS!!! WE NOW HAVE PREVIEWS USING TINY VAE!!! CHECK MODELS!!!! CHECK MODELS!!! DID I MENTION TO CHECK ALL YOUR MODELS!!! DO EEEEEEET!WE ALSO HAVE THE LORAS SETUP CORRECTLY AND THERE ARE SOME FUN ONES OUT ALREADY! NODE IS READY TO GO FOR YOU!5 TOTAL GGUF 12GB WORKFLOWS!t2v, i2v, v2v extend, ta2v, ia2v!Hello everyone! This workflow has come a long way since 1.0 actually. It doesn't seem like it when you first look but, boy this has been a project for me!Here we have quite a few workflows for LTX-2 using GGUF and running on at least 12GB VRAM and 48GB system ram. First we have your typical t2v and i2v workflows. Second we now have two new audio driven workflows! ta2v which is supply a text prompt ONLY and some audio get a neat generated video with your audio! The other is an ia2v where you supply an image and an audio file and it lip-syncs up nicely. I tried to keep everything as simple as possible.Then the one I like the most v2v extend. Feed ltx2 a few seconds of video, create a prompt to continue the video and watch the magic happen!!I got done with the workflows, I now need to get all the info out there but I wanted to get these into the wild so everyone can start having fun with them!I HAVE CREATED TWO ENHANCEMENT NODES FOR THE AUDIO!!YOU WILL NOTICE 2 NEW NODES TOWARD THE END OF THE WORKFLOW FOR AUDIO ENHANCEMENT. CLICK THE BLUE LINK BELOW FOR MY GITHUB PAGE, INSTALLATION INSTRUCTIONS, AND USEAGE NOTES!URABEWE-COMFYUI-AUDIOTOOLS
LTX2 I2V 🏃Motion & 🫦 Lip sync to your own 🔊 + SEEDVR2 Upacaler
Note: If you have ANY issues with nodes not downloading, read the notes or reach out. There's nothing that special about any of them that aren't core modules.⛔⚠️🛑✋ Read the notes completly before using. Most common install and node problems are listed in the directionsInstagram: https://www.instagram.com/synth.studio.models/Buy me a☕ https://ko-fi.com/lonecatoneThis represents hundreds of hours of work. If you enjoy it, please 👍like, 💬 comment , and feel free to ⚡tip 😉也有中文说明This is a 12gb VRam or more workflow.Features:Allows you to use your own audio track for🫦 lip sync, preserving voicesEasy setup and useMotion adjustment for more dynamic videosMultimodal guider for fine tuning audio to video dynamicsPrompt generation from an imagePrompt enhancementHandles both Normal and NSFW generation也有中文说明This is stright up one of the most badasss labor intensive workflows I've ever made. Please give me feedback on what does or does not work and the setting you guys use.
ltx2-图生视频-image to video
Video tutorial: 1. Last imageHow to use2. Fill in the prompt (the video effect you want)3. Enter the length of the video.4. Enter the video length in seconds.The video's longer side is 1024 pixels, and a 6-second video takes approximately 2 minutes to generate.We recommend trying it out online before downloading; it's completely free!Online experience address: https://www.runninghub.ai/post/2020703327746531330/?inviteCode=rh-v1058
lltx2-视频首尾帧-Video first and last frames
Video tutorial: How to use1. Upload the first frame image2. Upload the last frame image3. Enter the length of the video.4. Enter the video length in seconds.The video's longer side is 1024 pixels, and a 6-second video takes approximately 2 minutes to generate.It is recommended to experience the effect online before downloading, completely free! Online experience address:https://www.runninghub.ai/post/2019971390018953218/?inviteCode=rh-v1058

(Bfs+Klein Edition) Ltx-2 Video Face Swap V1
You can click on the link below and try it out directly. If the effect is good, you can deploy it locally https://www.runninghub.cn/post/2018540820999184385/?inviteCode=rh-v1121Fan benefits, register to get 1000 points, daily login 100 points, play 4090! Experience the super power of 48G!B-site video: https://www.bilibili.com/video/BV12cFiztEh3Knowledge Planet: https://t.zsxq.com/7F90AGraphic tutorial: https://t.zsxq.com/lNK8vThe workflow is very simple to use, and I have uploaded a tutorial on how to use it on YouTube. You can try it out and follow the tutorial and Civitai's workflow to easily reproduce the results. Thank you. If you have any other questions, please leave a comment in the comment sectionThis tutorial is very important, not watching it will surely lead to a lot of problems! Watch the video tutorial before trying !!!! Very important! Especially a key point at the end!

(First Frame Upload Version) Ltx-2 Video Face Swap V1
You can click on the link below and try it out directly. If the effect is good, you can deploy it locally https://www.runninghub.cn/post/2019433627276288001/?inviteCode=rh-v1121Fan benefits, register to get 1000 points, daily login 100 points, play 4090! Experience the super power of 48G!B-site video: https://www.bilibili.com/video/BV12cFiztEh3Knowledge Planet: https://t.zsxq.com/7F90AGraphic tutorial: https://t.zsxq.com/lNK8vThe workflow is very simple to use, and I have uploaded a tutorial on how to use it on YouTube. You can try it out and follow the tutorial and Civitai's workflow to easily reproduce the results. Thank you. If you have any other questions, please leave a comment in the comment sectionThis tutorial is very important, not watching it will surely lead to a lot of problems! Watch the video tutorial before trying !!!! Very important! Especially a key point at the end!
LTX2.0 - First and Last Frames
LTX2.0 optimizes the workflow, hoping you'll like it. You can download it to your local device for testing. You can also log in to the online platform.Registration gives 1000 computing power points, and 100 computing power points are given every day.My Runninghub homepage [Invitation code: rh-v1445] [Get 1000 computing power points by binding]https://www.runninghub.ai/user-center/1900163965408722945/userPost?inviteCode=rh-v1445
LTX2_FirstFrame-LastFrame
User friendly with minimalism style, no useless nodes. Workflow use special nodes:- LTX Gemma API Text Encode- LTX Multimodal Guider- CacheDiT LTX-2 Accelerator1) To use this workflow, you need to register on LTX oficial page (full instruction inside workflow) to receive a free api key. This process is easier than you think.2) CacheDiT LTX-2 Accelerator - Speeds up LTX-2 generation almost twice.2) To install missing nodes use (Manager -> Install missing Custom Nodes)3) No need to use Text Encoder model4) other instructions inside workflow
LTX 2 + Qwen 3 TTS Workflow
ALL the Models links are in the description of this video

LTX2.0 first and last frames to video【new】
More of my works and workflows are on RunningHub-a treasure trove for Al image & video creation!Hundreds of fascinating and practical Al apps are shared daily by global ComfyUl developers here, perfect forboth fun and productivity. Simply click on this link to register and use the model matching workflow https://www.runninghub.ai/post/2009910509788733441/?inviteCode=rh-v1408claim 1000 RH Coins andgenerate tons of images/videos for FREE!

LTX2.0-Image to Video
"More of my works and workflows are on RunningHub-a treasure trove for Al image & video creation!Hundreds of fascinating and practical Al apps are shared daily by global ComfyUl developers here, perfect forboth fun and productivity. Simply click on this link to register and use the model matching workflow https://www.runninghub.ai/post/2008764920220880897/?inviteCode=rh-v1408 claim 1000 RH Coins andgenerate tons of images/videos for FREE!

QwenTTS LTX2.0 character speaking
"More of my works and workflows are on RunningHub-a treasure trove for Al image & video creation!Hundreds of fascinating and practical Al apps are shared daily by global ComfyUl developers here, perfect forboth fun and productivity. Simply click on this link to register and use the model matching workflow https://www.runninghub.ai/post/2017601157362884610/?inviteCode=rh-v1408claim 1000 RH Coins andgenerate tons of images/videos for FREE!
![LTX2.0 Audio Lip Sync [Digital Human/Singing/Film and Television]](https://image.civitai.com/xG1nkqKTMzGDvpLrqFT7WA/3f23e36b-fe63-4c4e-b776-4f11879b0df8/original=true/119801977.jpeg)
LTX2.0 Audio Lip Sync [Digital Human/Singing/Film and Television]
"More of my works and workflows are on RunningHub-a treasure trove for Al image & video creation!Hundreds of fascinating and practical Al apps are shared daily by global ComfyUl developers here, perfect forboth fun and productivity. Simply click on this link to register and use the model matching workflow https://www.runninghub.ai/ai-detail/2012923256919035906/?inviteCode=rh-v1408claim 1000 RH Coins andgenerate tons of images/videos for FREE!
LTX2 Easy First Last Frame
LTX2 Easy First and Last Frame with LORA managerThis is a modified version of the standard distilled LTX template.use Comfyui_TTP_ToolsetAfter installing ComfyUI_TTP_Toolset, change its version, select nightly, or it may not work.Use this button to add LORA

LTX2.0 first and last frames lip-sync
LTX2.0 new feature, start and end frames for lip-syncing, with more controllable characters."More of my works and workflows are on RunningHub-a treasure trove for Al image & video creation!Hundreds of fascinating and practical Al apps are shared daily by global ComfyUl developers here, perfect forboth fun and productivity. Simply click on this link to register and use the model matching workflowhttps://www.runninghub.ai/post/2016871878190702594/?inviteCode=rh-v1408claim 1000 RH Coins andgenerate tons of images/videos for FREE!LTX2首尾帧+对口型LTX2.0 First and Last Frames lip-synchttps://www.runninghub.ai/post/2016871878190702594/?inviteCode=rh-v1408LTX2+QwenTTS+对口型QwenTTS LTX2.0 character speakinghttps://www.runninghub.ai/post/2017601157362884610/?inviteCode=rh-v1408LTX2音频对口型:LTX2.0 Audio Lip Sync [Digital Human/Singing/Film and Television]https://www.runninghub.ai/post/2011770027745222658/?inviteCode=rh-v1408LTX2首尾帧:LTX2.0 [First and Last Frame]https://www.runninghub.ai/post/2009910509788733441/?inviteCode=rh-v1408LTX2图生视频:Image to Videohttps://www.runninghub.ai/post/2008764920220880897/?inviteCode=rh-v1408
LTX-2 pose control + Z_Turbo
Optimized for rtx 5090/4090User friendly. Workflow use special nodes:- DWposeDeluxe Estimator - LTX Gemma API Text Encode - LTX Multimodal Guider- AIO Aux Preprocessor1) To use this workflow, you need to register on LTX oficial page (full instruction inside workflow) to receive a free key. This process is easier than you think. 2) To install missing nodes use (Manager -> Install missing Custom Nodes)3) Uses models: ltx-2-19b-distilled.safetensors or ltx-2-19b-distilled-fp8.safetensors / IC LoRA - Union-Control / Z-image turbo models4) other instructions inside workflow
LTX-2 Pose Image Audio to Video
Pose, Image, Audio to Video.v1: uses distilled model, faster inference but can result in plastic looking skinv2: uses dev model, longer inference, result in more natural looking skin use --reserve-vram 1 launch options if you are facing OOM issues. Tested on 16GB vram, 64GB system ram, 1600 x 900 resolution, 121 frames.
Rebels LTX-2 Dev (GGUF)
note: there is a bug on civitai where you cannot see total number of downloads or likes. trust me its getting downloaded. comments are also not appearing for some reason. comment on my youtube video if you have any issues/questions.MY PC SPECS (for comparison):(RTX 3070+I-7) 8gb VRAM + 16gb System RAM = 24gb in total. it works pretty well for such high memory requirements.LINKSDev GGUF (pick a lower quant than your vram requirement, the total workflow requirements are HUGE)https://huggingface.co/unsloth/LTX-2-GGUF/tree/mainText Encoder (runs alongside the second encoder in dual clip loader gguf node)https://huggingface.co/GitMylo/LTX-2-comfy_gemma_fp8_e4m3fn/blob/main/gemma_3_12B_it_fp8_e4m3fn.safetensorsembeddings connector (runs in dual clip loader gguf node with gemma encoder)https://huggingface.co/Kijai/LTXV2_comfy/blob/main/text_encoders/ltx-2-19b-embeddings_connector_dev_bf16.safetensorsDistill LoRA (for upsampling later in workflow)https://huggingface.co/Lightricks/LTX-2/blob/main/ltx-2-19b-distilled-lora-384.safetensorsDETAIL LoRA (adds fidelity to lower resolution generations. trust me it helps.)https://huggingface.co/Lightricks/LTX-2-19b-IC-LoRA-Detailer/blob/main/ltx-2-19b-ic-lora-detailer.safetensorsvaes (audio AND video)audiohttps://huggingface.co/Kijai/LTXV2_comfy/blob/main/VAE/LTX2_audio_vae_bf16.safetensorsvideohttps://huggingface.co/Kijai/LTXV2_comfy/blob/main/VAE/LTX2_video_vae_bf16.safetensorslatent upsampler (place in latent_upscale_models folder)https://huggingface.co/Lightricks/LTX-2/blob/main/ltx-2-spatial-upscaler-x2-1.0.safetensorsIMPORTANT!!!!you need the following custom nodes:-KJ Nodes (available in custom nodes manager, update and use nightly)-Comfyui-GGUF nodes (available in custom nodes manager, update and use nightly)-a custom node from VantageWithAI named "Vantage GGUF Unet Loader" nodethis node is experimental but more efficient than the regular unet GGUF nodes. (there is a PR pull missing from the GGUF nodes at the moment and until it is merged fully the node wont work without updating it in your command prompt yourself. i dont suggest as it is highly unusable. trust me, use the Vantage node.)TO GET THE VANTAGE NODES, open a command prompt in your custom nodes folder and copy in this command and hit enter:git clone https://github.com/vantagewithai/Vantage-Nodes.git(i removed the "cd comfyui/custom_nodes" portion from the youtube video tutorial as its not needed)use this command once its finished:cd Vantage-Nodespip install -r requirements.txtthis installs the nodes fully. restart comfyui and you drag in my workflow and you have a fully functioning LTX-2 workflow!I HIGHLY RECOMMEND UPDATING YOUR BAT FILE WITH THESE FLAGS:--lowvram --disable-xformers --use-pytorch-cross-attention --reserve-vram 2 --disable-smart-memorythis workflow is very resource intense. even for the lowest quant my pc struggled until i lowered resolution to 480p. i suggest editing your bat file in notepad and just adding the flags to the code line that contains the "--windows-standalone" code and just save the file as a copy and use that one for LTX-2 ONLY. (rename it that if it helps you remember) instructions on how to do it are in the youtube video if you dont know how!TUTORIAL VIDEO
LTX 2.3 basic GGUF 720p workflow
This is same as default WF in ComfyUI, but it uses GGUF custom node. Basically, you can insert images, audio, and video into any frame, so anything is possible.T2V, S2V, V2V, I2V First, last, middle frame.voice clone: You can input a few seconds of audio, and then crop those same few seconds after the process is complete.reference image: input a starting image and then instruct it to perform a completely different action. (However, the character descriptions remain the same.) Yes, this is what's called a failed I2V. Again, crop the initial image.extend video: input the images and audio extracted from the video. It will be extended for the remaining length.GGUF custom node: https://github.com/city96/ComfyUI-GGUF(Please update your GGUF node and ComfyUI to the latest versions.)LTX2.3 and other: https://huggingface.co/unsloth/LTX-2.3-GGUF/tree/mainorLTX2.3 GGUF: https://huggingface.co/QuantStack/LTX-2.3-GGUF/tree/main/LTX-2.3-distilledVAE: https://huggingface.co/Kijai/LTX2.3_comfy/tree/main/vaeupscale model: https://huggingface.co/Lightricks/LTX-2.3/tree/maintext encoder:gemma3 GGUF: https://huggingface.co/unsloth/gemma-3-12b-it-GGUF/tree/mainembedding: https://huggingface.co/Kijai/LTX2.3_comfy/tree/main/text_encodersPlace the text encoder-related files here: ComfyUI\models\text_encodersaudio vae is here: ComfyUI\models\checkpointsupscale model is here: ComfyUI\models\latent_upscale_modelsUse the distilled model and distilled-embedding, or use the dev model and dev-embedding with distilled-lora.T2V: set bypass image onI2V: set bypass image offYou can bypass upscale node for lowres.Try starting with a lower length (perhaps 9).