ComfyUI Workflows
Browse real AI workflows from Flux, SDXL, Pony, ControlNet, video generation and commercial AI creators.

flux-2-klein_UNLOCKED | Ultimate_Img2Img_Workflow
FLUX.2 Kontext Img2Img — Multi-Reference + Strength-Guidance Image Editing Workflow by TripTrapFiles:flux-2-klein-9b-kv-fp8.safetensorsqwen_3_8b_fp8mixed.safetensorsflux2-vae.safetensorsDescriptionThis workflow turns FLUX.2's native Kontext architecture into a fully-featured image-to-imageediting powerhouse. Built from the ground up over months of iteration, it gives you surgicalcontrol over how reference images influence your generations — from subtle texture injection tocomplete stylistic transformation.Whether you're editing album art, refining character designs, or exploring glitch aesthetics,this workflow lets you feed in up to 2 reference images and dial in exactly how much theyinfluence the output with a single strength slider.### What makes this different- FLUX.2 Native — This isn't a hack. It uses FLUX.2 klein 9B KV-FP8's built-in Kontext referencesystem for clean, artifact-free image conditioning- Strength Control — A denoise slider that actually works. 0.0 = no change, 1.0 = fullgeneration. No cryptic parameters.- Multi-Reference — Chain up to 6 reference images through the Kontext system for composite influences- Prompt Engineering — Built-in text concatenation for complex multi-source prompts- VRAM Safe — Auto-scales images to 0.5MP before encoding, preventing accidental OOM crashes- 4-Step Generation — Optimized for FLUX.2's distilled inference. Blazing fast.### How it works```Reference Image → Scale → VAE Encode ──┐├──→ ReferenceLatent Chain → Conditioning → SamplerReference Image → Scale → VAE Encode ──┘↑Prompt → Text Concat → CLIP Encode → Flux Guidance ──────────┘```The reference images are injected directly into FLUX.2's Kontext conditioning system — the samemechanism the BFL API uses internally. No separate style models, no CLIP vision encoders, nobloat.### RequirementsModels (download and place in ComfyUI/models/):┌────────────────────────────────────┬───────────────────┐│ File │ Location │├────────────────────────────────────┼───────────────────┤│ flux-2-klein-9b-kv-fp8.safetensors │ diffusion_models/ │├────────────────────────────────────┼───────────────────┤│ qwen_3_8b_fp8mixed.safetensors │ text_encoders/ │├────────────────────────────────────┼───────────────────┤│ flux2-vae.safetensors │ vae/ │└────────────────────────────────────┴───────────────────┘Custom Nodes: (install via ComfyUI Manager)- rgthree-comfy (Power Lora Loader)- ComfyUI-Custom-Scripts (ShowText)- ComfyUI_Comfyroll_CustomNodes (CR Aspect Ratio)### How to use1. Load the workflow JSON (drag into ComfyUI)2. Load your base image in Ref 13. Optionally load a second reference in Ref 24. Write your prompt5. Set denoise (0.65 is a good starting point)6. Queue it### Tips- 0.5–0.65 denoise: Subtle edits, preserves composition- 0.65–0.8 denoise: Balanced changes with strong reference influence- 0.8–1.0 denoise: Heavy transformation, prompt dominates- Use 4 steps for speed, or up to 8 for more refinement- Keep images under 1MP for best performance### LicenseThis workflow is free to use under the FLUX Non-Commercial License.Respect the model license terms.────────────────────────────────────────────────────────────────────────────────▶ YouTube — TripTrap Musichttps://www.youtube.com/c/TripTrap1?sub_confirmation=1▶ Spotify — TripTrap Artisthttps://open.spotify.com/artist/7vPfTIL4FweqDqTjcw4Bvr▶ Apple Music — TripTraphttps://music.apple.com/us/artist/triptrap/1760346233────────────────────────────────────────────────────────────────────────────────Built by TripTrap — glitch artist, experimental pop producer, and AI alchemist.Every image this workflow generates carries a frequency. Make it yours.
Workflow: RefControl FLUX.2 Klein 9B – Reference Depth LoRA
RefControl FLUX.2 Klein 9B – Reference Depth LoRA📝 Short descriptionA LoRA for FLUX.2 Klein 9B Base that fuses a reference image (left) with a depth map (right).It preserves identity and style from the reference while following the pose and structure from the depth map.Trigger word: refcontrolModelhttps://civitai.com/models/2655430/refcontrol-flux2-klein-9b-reference-depth-lora?modelVersionId=2981720📊 Examples📖 Extended descriptionThis LoRA was primarily trained on humans, but it also works with objects and stylized characters.Its main purpose is to preserve identity — facial features, clothing, style, or object characteristics — from the reference image, while adapting the subject to the pose and composition defined by the depth map.Part of the RefControl family: reference + control fusion for consistent, controllable generation on FLUX.2 Klein 9B Base.⚙️ How to useUse first image as depth reference, second image inputAdd the trigger word refcontrol in your prompt.Adjust LoRA weight (recommended 0.8–1.0) depending on how strongly you want to preserve identity.ComfyUI requirenmentsFor extracting depth you need to install nodes with depth estimation in workflow used:https://github.com/Fannovel16/comfyui_controlnet_auxBase modelUse with black-forest-labs/FLUX.2-klein-base-9B.The undistilled Base variant is intended for LoRA training and custom pipelines (~50 inference steps, guidance_scale ~4.0).✅ Example promptrefcontrol 🎯 What it doesPreserves character or object identity across generations.Embeds the subject into a new pose or scene defined by the depth map.Works best when the depth map has similar proportions and scale to the reference.⚡ TipsBest results when the depth map is not drastically different in object scale from the reference.Combine with text prompts to refine background, lighting, or mood.Can be combined with other RefControl LoRAs (pose, lineart, canny) on compatible pipelines for multi-constraint generation.📌 Use casesHuman portraits in different poses.Consistent character design across multiple scenes.Object transformations (cars, furniture, props) with depth-guided placement.Storyboarding, comics, or animation frame generation.📦 FilesWeights: flux2_klein_9b_refcontrol_depth.safetensorsComfyUI workflow: image_flux2_klein_image_edit_9b_refcontrol_depth.jsonRepo: thedeoxen/refcontrol-FLUX.2-klein-9B-reference-depth-lora

AsymFLUX.2 + ZIT (Refiner)
AsymFLUX.2 Meets ZITA dual pass workflow for AsymFLUX.2 with a refinement pass of Z-Image-TurboREQUIRES:AsymFLUX.2https://civitai.com/models/2626000/rebels-asymflux2-klein-9bZ-Image-Turbo (bf16)https://civitai.com/models/2169770/rebels-z-image-turbo-fp8bf16Runs 38 steps on AsymFLUX.2 and then the second pass of zit runs 4 steps at a denoise of 0.35 to refine details missing in the dev model and clean up artifacting.

Rebels AsymFLUX.2 Klein 9B
REQUIRES CUSTOM NODE SEThttps://github.com/Nynxz/ComfyUI-AsymFLUX2 ADDED PIXEL SMOOTH NODE TO CUSTOM NODES TO FIX TILING!1. install custom nodesgit clone https://github.com/Nynxz/ComfyUI-AsymFLUX2.git(THIS IS FLUX KLEIN 9B-BASE, NOT 9B. its simply named 9B)bf16 model - /models/diffusion_models/https://huggingface.co/black-forest-labs/FLUX.2-klein-base-9B/blob/main/flux-2-klein-base-9b.safetensorsgguf model - /models/unet/https://huggingface.co/unsloth/FLUX.2-klein-base-9B-GGUF/tree/maingguf encoder (smallest but low quality) - /models/text_encoders/https://huggingface.co/worstplayer/Z-Image_Qwen_3_4b_text_encoder_GGUF/blob/main/Qwen_3_4b-Q6_K.gguffp4 encoder (smaller) - /models/text_encoders/https://huggingface.co/Comfy-Org/vae-text-encorder-for-flux-klein-9b/blob/main/split_files/text_encoders/qwen_3_8b_fp4mixed.safetensorsfp8 encoder (better but larger) - /models/text_encoders/https://huggingface.co/Comfy-Org/vae-text-encorder-for-flux-klein-9b/blob/main/split_files/text_encoders/qwen_3_8b_fp8mixed.safetensorsREQUIRED Adapter LoRA (rename to "ASYM_FLUX_KLEIN_9B") - /models/loras/https://huggingface.co/Lakonik/AsymFLUX.2-klein-9B/blob/main/diffusion_pytorch_model.safetensors

Flux2 Klein Swap Anyting ( face, outfit, food, NSWF..)
***Flux Klein Swap Anyting (head, face, body etc..) ***About Native Workflow; FIRST OF ALL UPDATE YOUR COMFYUI !!!This has been the best node I've tried so far. In my tests, I saw that the 3.1 model made much better choices. Instead of person mask, I put the Sam3.1 text option where the prompt is entered. You can download the model from here and put it in the checkpoint folder; https://huggingface.co/Comfy-Org/sam3.1/tree/main/checkpoints____________________________________________________________About V2; Only python 3.12. If anyone runs this node on Python 3.13, can they share it with me?I use a different node that performs the same function in place of the original Sam3 node. yolain/ComfyUI-Easy-Sam3.Please upgrade your photobuf and mediapipe for "personmask" ( python_embeded\python.exe -m pip install --upgrade mediapipe protobuf google-cloud-videointelligence )______________________________________________________________In this workflow, you can easily swap anything you want with high CONSISTENCY* and without node complexity. The chance of facial mixing is ZERO. Although Flux Klein is not as consistent as qwen in terms of character consistency, I believe it performed well in this workflow.Here, I utilized the advanced SAM3 model. You can easily swap faces, heads, just hair, or a part of an object. Simply type what you want to mask into the SAM3 Text Prompt panel. For example, "woman's head" or "man's hat." Everything you type in the prompt will be masked.Just upload the relevant images to the corresponding "load image" section. You can use any checkpoint you like.Those experiencing Tensor issues. They should first perform the comfyui update.There are two files in the zip. One is for those experiencing tensor issues. Of course, first try installing the "normal" version. The normal version works better for "outfit swapping." If you encounter problems, install the second "tensor fix" file.Thanks, @nroonarij129 found a solution to the tensor error problem.***((1: Unpack the Subgraph "Person Mask".2: Double left click on the Comfy UI canvas to bring up the Node Search Menu. Search for and add a new node, "LayerUtility: ImageRemoveAlpha".3: Connect a new spaghetti string from the "img" output of the LayerMask: PersonMask Ultra V2 node, to the RGBA_image input of the new node you just added (LayerUtility: ImageRemoveAlpha).4. Connect the RGB_Image output from the new node, LayerUtility: ImageRemoveAlpha, to the Draw Mask on Image node.***I'm new to this, and this is my first workflow. I hope I haven't done anything wrong.☕ Buy Me a Coffee:🔗 https://buymeacoffee.com/ugurdoyduk* HEAD OR FACE SWAPPrompt Sam3 text2; "The woman's head"Prompt Sam3 Text1; "The woman's face"Leave Clip Text Encode blank. No matter what prompt I wrote, it caused problems with face and body colours and created disproportionate heads.* OUTFIT CLOTHING(When changing outfits, img1 becomes the location of your model, while image2 becomes the location of the reference outfit.)Prompt Sam3 text2; "outfit"Prompt Sam3 Text1; "clothe""Style the woman in image1, with every article of clothing in image2"* FOOD, ITEMS, THINGS SWAP(Bypass ToolYoloCropper)Specify what will be exchanged in Sam3 text2 and text1.Replace the masked area with the " your object for example chocolate" in image2. Keep everything else the same.Ensure the replaced object fits perfectly into the area in a balanced manner. Make sure it complies with the laws of physics.

Flux-2 Klein IMG 2 IMG + Upscaler Workflow
Flux 2 Klein (9B and 4B) Image to Image and Text to Image ComfyUI Workflow

Flux.2-Klein-Base-9B — All-in-One Workflow by TreeMale
🐞 Send feedback about any bugs you find or potential improvements.A series of processes for generating high-quality images focused on realism use model Flux.2-Klein-Base-9B (for the test, I took one image and ran it through the entire creation process).⚠️ You can find a list of required models, instructions and a description of the process in the Workflow.For your convenience i have combined all processes into one workflow and made "user friendly" interface. Processes list:🤖 Flux.2-Klein-Base-9B — Mannequin Character by TreeMale🗓️ RELEASE DATE: [17.03.2026]📋 What does this workflow do?This workflow converts a photograph of a character into a stylized mannequin image.🚩 Result: A clean 3D mannequin with a crisp white surface on a black background.🤖 Flux.2-Klein-Base-9B — Camera Angle by TreeMale🗓️ RELEASE DATE: [18.03.2026]📋 What does this workflow do?This workflow changes the camera angle of the input composition image.🚩 Result: The input composition image is acquired from a different camera angle.🤖 Flux.2-Klein-Base-9B — SeedVR2 Upscaler by TreeMale🗓️ RELEASE DATE: [20.03.2026]📋 What does this workflow do?This workflow upscale the input image and removes random noise.🚩 Result: Upscaled and improved version of image.🤖 Flux.2-Klein-Base-9B — Qwen-3-VQA Prompt by TreeMale🗓️ RELEASE DATE: [26.03.2026]📋 What does this workflow do?This workflow creates a structured prompt from a set of user positive and negative tags.🚩 Result: Generate text prompt from a set of user tags.🤖 Flux.2-Klein-Base-9B — Text Label by TreeMale🗓️ RELEASE DATE: [31.03.2026]📋 What does this workflow do?This workflow creates a text label in bottom image border.🚩 Result: Image with a frame and text label.🤖 Flux.2-Klein-Base-9B — Realistic Skin by TreeMale🚫 Soon... Works in progress... Look to updates!🙏 Special thanks!Black Forest Labs — for the FLUX.2-Klein-9B model!Comfy-Org — for the optimized CLIP and VAE!Civit.AI — for the good community!You — for using!Created with ❤️ for the community. Share your results and feedback! Many thanks to the creators of the original models - give him some tips!
![🚀 F2K9B | Flux 2 [klein] 9B LoRA Tester (FP8 Edition)](https://image.civitai.com/xG1nkqKTMzGDvpLrqFT7WA/1cb47bd0-248f-4f27-ab16-c0e7075ffc28/original=true/124332257.jpeg)
🚀 F2K9B | Flux 2 [klein] 9B LoRA Tester (FP8 Edition)
⚡ F2K9B | Flux 2 [klein] 9B LoRA Tester – v2 UpdateNow with *fixed aspect ratios, modular font control, and instant strength visibility** – because details matter.*🔥 WHAT’S NEW IN V2?✅ Fixed Aspect Ratio Bug – No more swapped width/height! Now works perfectly for 1:1, 9:16, 16:9, etc.✅ Modular Font Control – Set *font path** and font color centrally via Set/Get nodes.* No more hardcoded styles.✅ LoRA Strength Burn-In – Strength now stamped below the image (e.g., Strength: 0.8). No more guessing.🎯 KEY IMPROVEMENTS (v2 vs v1)| Aspect Ratio | Fixed 1:1 only | Works for any ratio (9:16, 16:9, etc.) || Font Customization | Hardcoded | Modular via Set/Get (path + color) || Strength Visibility | Only in filename | Burned into image (e.g., Strength: 0.8) || Test Character | Lexa0Rae | Zoya0Park (new default) | 🎛️ NEW CONTROL OPTIONS (Top Left)- Font Path – Set your preferred .ttf file via Set/Get node.- Font Color – Choose any RGB color (default: white with black outline).- Strength Burn-In – Now visible below the image (e.g., Strength: 0.8).📸 EXAMPLE OUTPUT (Zoya0Park Test)Each image now shows *Project, Epoch, and Strength** – plus custom font styling.* 🚀 HOW TO UPGRADE1. Drag the new workflow image into ComfyUI (replaces v1).2. Set your font path in the new Set/Get "Font Path" node.3. Adjust font color in the Set/Get "Font Color" node.4. Queue prompt – enjoy fixed aspect ratios and strength visibility! 🔄 Changelog (v2 vs v1)- Fixed: Aspect ratio bug (width/height swapped).- Added: Modular font control (path + color via Set/Get).- Added: LoRA strength burn-in below the image.- Updated: Default test character to Zoya0Park.Ready to test your LoRAs with more precision? Drag the new workflow into ComfyUI and start comparing! 🚀Professional LoRA comparison for *Flux 2 [klein] 9B (Base FP8)** – because your training deserves clarity, not guesswork.*Optimized for:✔ Flux2-Klein-9B-True (wikeeyang/Civitai) – Handles 4–25 steps like a champ.✔ FP8 Precision – Fits comfortably in 16GB VRAM (even with multiple LoRAs).✔ Lexa0Rae & Co. – Perfect for character LoRAs with consistent identity testing.🔥 WHAT’S NEW? (vs. Flux 1 Dev)The Flux1Dev GGUF Version: https://civitai.com/models/2385714/✅ Centralized Sampler Hub – Set *Sampler, CFG, and Steps** in one place.* No more scattered nodes.✅ Smart Switchboard – Toggle entire strength columns or individual LoRAs on/off. Test only what matters.✅ Automatic Metadata Burn-In – Epoch name + LoRA strength stamped directly onto the image. No more file archaeology.✅ Flux 2 [klein] 9B Optimized – Built for *wikeeyang’s FP8 model** (4–25 steps, no GGUF needed).*✔ Clean Architecture – Wireless data flow via Set/Get nodes. No cable spaghetti.🖼️ WHAT THIS WORKFLOW DOESTurns your Flux 2 [klein] 9B LoRA training into a structured comparison matrix – with visual labels, smart saving, and flexible testing.🎯 Key Features| Visual Overlay | Project name, Epoch, and LoRA strength burned into the image (e.g., Lexa0Rae_Epoch12_0.8). || Smart Filenaming | Saves as Project_Epoch_Strength.png (e.g., Lexa0Rae_Epoch12_0.8.png). || Flexible Testing | Compare 5 LoRA versions × 2 strengths in one run. || Bypass-Friendly | Disable entire columns or individual LoRAs with a single click. || Step Flexibility | Works with 4–25 steps (optimized for wikeeyang’s Flux2-Klein-9B-True). |🎛️ THE "CONTROL ROOM" (Top Left)Everything is controlled from here – no digging through nodes.📌 1. Model & Sampler Settings- Checkpoint: Load Flux2-Klein-9B-True (FP8) (wikeeyang/Civitai).- Sampler Name: Choose your preferred sampler (e.g., euler).- CFG & Steps: Set once, applies to all columns (4–25 steps supported).📌 2. LoRA Assets- Load LoRAs: Select up to 5 versions (e.g., Epoch 6, 7, 8, 9, 10).- Strength Sliders: Adjust LoRA influence (e.g., 0.6 vs 1.0).📌 3. Text & Labels- Project Name: Define your filename prefix (e.g., Lexa0Rae).- Epoch Strings: Label your training steps (e.g., Epoch_6, Epoch_8).📌 4. Switchboard (New!)- Toggle Columns: Enable/disable entire strength columns.- Toggle Individual LoRAs: Test only specific versions (e.g., skip Epoch 10).⚙️ HOW TO USE1. Download & Drag – Drag the header image (PNG) into ComfyUI. The workflow is embedded.2. Install Missing Nodes – Use ComfyUI Manager to install:- ComfyUI-KJNodes (Kijai) – For wireless Set/Get logic. - ComfyUI Book Tools – For smart text overlays.- WAS Node Suite – For image saving.- ComfyUI-Easy-Use – For LoRA loading.- RgThree – For optimization & bypass.3. Set Up Control Room – Load Flux2-Klein-9B-True (FP8), your LoRAs, and labels.4. Adjust Switchboard – Enable/disable columns as needed.5. Queue Prompt – Watch the grid fill with labeled, organized test shots.💡 PRO TIPS (Flux 2 [klein] 9B Edition)- Step Range: Works best with 8–16 steps for Lexa0Rae-style character LoRAs.- Prompting: Keep prompts structured and front-loaded (subject → action → lighting → style). Example:Lexa0Rae, a young woman with long messy blonde hair and green eyes, wearing a black sports bra, standing in a gym, soft diffused lighting, hyperrealistic skin texture, 8k- VRAM Efficiency: FP8 precision means you can test multiple LoRAs without OOM (even on 12GB cards).- Consistent Seeds: Use the same seed across all columns for fair comparisons.- Bypass Early: Disable columns you’re not testing to save time.📸 EXAMPLE OUTPUT (Lexa0Rae Test)Each image is labeled with *Project, Epoch, and Strength** – no more guessing!*🚨 TROUBLESHOOTING- Red Nodes? → Update all custom nodes via ComfyUI Manager.- Missing LoRAs? → Double-check file paths in the LoRA loader nodes.- Slow Performance? → Reduce batch size or disable unused columns.- Step Issues? → Stick to 4–25 steps (optimized for wikeeyang’s model).🔗 REQUIRED CUSTOM NODESInstall via ComfyUI Manager > "Install Missing Custom Nodes":1. ComfyUI-KJNodes (Kijai) – For wireless Set/Get logic.2. ComfyUI Book Tools – For smart text overlays.3. WAS Node Suite – For image saving.4. ComfyUI-Easy-Use – For LoRA loading.5. RgThree – For optimization & bypass.🎯 WHY THIS WORKFLOW?- For Flux 2 [klein] 9B Users - Built for wikeeyang’s FP8 model (4–25 steps, no GGUF needed).- For LoRA Trainers – Compare epochs like a pro, not a guesser.- For Character Artists – Test Lexa0Rae & Co. with consistent identity.- For VRAM-Conscious Users – Efficient even with multiple LoRAs.- For Visual Thinkers – See differences at a glance, not in filenames.📢 Ready to test your LoRAs like a pro?Drag the workflow image into ComfyUI and start comparing! 🚀🔄 Changelog (vs. Flux 1 Dev Version)The Flux1Dev GGUF Version: https://civitai.com/models/2385714/- Added: Centralized sampler control (Sampler, CFG, Steps).- Added: Switchboard for toggling columns/individual LoRAs.- Added: Automatic metadata stamping (Epoch + Strength).- Improved: Cleaner architecture with wireless Set/Get nodes.- Optimized: For Flux2-Klein-9B-True (FP8) (4–25 steps, no GGUF).🔥 Bonus: Lexa0Rae Prompt TemplateFor consistent testing, use this structure:Lexa0Rae, a young woman with [hair description], [eye color], [outfit], [pose/action], [lighting], [background], [style], [technical specs]Example:Lexa0Rae, a young woman with long messy blonde hair showing dark roots, mesmerizing green eyes, wearing a black sports bra, standing in a gym with arms crossed, soft diffused lighting, hyperrealistic skin texture with visible pores, 8k

Rebels Flux Klein 9B + Z-Image
UPDATED TO VERSION 2VERSION 2 is a complete upgrade to quality and resolution. utlizing the FULL step count of both models with a small upscaler "realESERGAN2x" on the FIRST pass to ensure that the second pass of Z-Image is handed the latent data at 2048x2048 for use of full resolution capabilities of the model. this gives the final result a large resolution for minimal vram requirement and a highly detailed and refined image.1st Model - Flux Klein 9B Base gguf (base image) - 100 steps2nd Model - Z-Image BASE gguf (detail refiner) - 50 stepsCUSTOM NODE REQUIREMENTS:Kiko Tools NodesKJ NodesUnload Model Nodenote: generation times will be significantly increased. this is not about speed, this is about QUALITY.also be warned, this workflow is weird for outputs. sometimes it gives you incredible images, sometimes itll just give you artifacts and hallucinations. _______________________________________________________________________________________________2 pass workflow for Flux Klein 9B Base and Z-Image Base.1st Model - Flux Klein 9B Base gguf (base image)2nd Model - Z-Image BASE gguf (detail refiner)the Flux Klein model acts as your first pass model, generating 20-30 steps to create an overall composition. the z-image base model runs on the second pass as a detail refiner, running 20-30 steps. this when playing with the denoise on the SECOND PASS can provide some interesting results!Supported ResolutionsSquare: 1024 × 1024Landscape: 1280 × 768Portrait: 768 × 1280NOTE: i chose to run the gguf models for both. this workflow is vram intense and using the ggufs takes some of the pressure off.CUSTOM NODE REQUIREMENTS:Kiko Tools NodesEasy Use NodesUnload Model Nodesthe unload model node is NECESSARY to prevent OOM. all custom nodes can be found in the comfyui custom nodes manager!

Flux.2 Klein Photorealism Dual Stage Workflow
This is a 2-stage workflow which means it starts with the base model at high CFG for strong prompt adherence, then switches to the distilled model (at a specific sigma boundary, around 0.95 works well with 5-6 steps) for faster processing (CFG 1) and fine details, similar to WAN's high/low workflows.Uses this lora for the 2nd (distilled) stage:https://civitai.com/models/2401004?modelVersionId=2699601

nnegret | Remove makeup | 卸妆
—— 交流Q群:173273201For Remove MakeUp

Klein I2I Fast Workflow - masked & unmasked w/ color match
This is designed for Klein (or flux2), but the models & scheduler can be changed for other edit models. This was designed with the non-base (turbo/distilled) version of Klein in mind, though you can also use base+turbo. non-base Klein is 4 step turbo model, or can use the turbo lora - use with 1 CFG. If using base make sure to increase steps to 20+ & CFG to 4+This is not exactly inpainting, but with Klein, it sometimes is better than inpainting and it is much faster.Masked or Unmasked - masking is way faster - crops down to rectangle then composites back into your mask. Great for making small tweaks. recommend 1 hardness or it might resize in the transparent areas. Masked editing only takes like 2.5s on my 5080. unmasked depends on image size and better when you want to change the entire imageUpscaled or not before sample - may help with additional details if your cropped area is too small. or if using unmaksed you can downscale if your image is too big. I usually leave it off.color match or no color match - definitely a godsend if you are trying to inpaint and you want to bring the color back to the original. Helps gets rid of inpaint auras. turn off if you don't need to match the original (changing styles, to black & white, etcPURPOSEFast I2I image editing - edit just a small crop and composite it back or edit the whole image, all with one workflow.This workflow is great for creating new I2I datasets - it will output the original and edited version in the same size and filetype, and optional color match helps ensure that color is consistent between both versions.Note that image edit models by themselves do not always keep subjects in the same composition. finetunes and loras can help prevent subjects from shifting. You can tweak your prompt, expand your mask, or increase batch size to get a closer match.
![PornMaster [Flux2 Klein 9b base] t2i Workflow](https://image.civitai.com/xG1nkqKTMzGDvpLrqFT7WA/c28b5883-c8fd-4911-93a6-88a58cb3551a/original=true/120688995.jpeg)
PornMaster [Flux2 Klein 9b base] t2i Workflow
工作流中我錯誤的將CLIP的"Type"設定為"Lumina2,請自己將錯誤修改為"Flux2".In the workflow, I mistakenly set the "Type" of the CLIP to "Lumina2". Please correct the error to "Flux2".--2026/02/11:建議使用” Turbo lora”,4步驟即可生成圖片,將CFG設定為1時負面提示詞不會生效,但生成圖片的速度較快,將CFG設定為2時負面提示詞會生效,但生成圖片的速度較慢。如果不使用Turbo lora時,參數設定的方式請參考原版的”flux2 klein 9b base”。It is recommended to use “Turbo LoRA,” which can generate images in just 4 steps. When CFG is set to 1, negative prompts will not take effect, but image generation will be faster. When CFG is set to 2, negative prompts will take effect, but image generation will be slower.If Turbo LoRA is not used, please refer to the original “flux2 klein 9b base” for parameter settings.--先安裝缺失的節點.下載Lora Manager.四倍放大圖片需下載4x-Ultrasharp,並將它放入以下路徑: ComfyUI\models\upscale_models“放大 latent 空間”中的”去雜訊強度”數字越大整題構圖的改變將會越大。--下載face_yolov9c.pthttps://huggingface.co/Bingsu/adetailer/blob/main/face_yolov9c.pt將face_yolov9c.pt放入以下路徑:ComfyUI\models\ultralytics\bbox--下載sam_vit_b_01ec64.pth將sam_vit_b_01ec64.pth放入以下路徑:ComfyUI\models\sams--如果面部修復功能沒有生效時,需提高"guide size"的數字."FaceDetailer"安裝有錯誤時,請參考"ComfyUI-Impact-Pack"中的教學.--Install the missing nodes first.Download Lora Manager.To enlarge an image by 4x, download 4x-Ultrasharp and place it in the following path: ComfyUI\models\upscale_models.The larger the "denoise" number in "Enlarge the latent space", the greater the change in the overall structure of the problem.--Download face_yolov9c.pthttps://huggingface.co/Bingsu/adetailer/blob/main/face_yolov9c.ptPlace face_yolov9c.pt in the following path:ComfyUI\models\ultralytics\bbox--Download sam_vit_b_01ec64.pthPlace sam_vit_b_01ec64.pth in the following path: ComfyUI\models\sams--If the facial repair function is ineffective, the "guide size" number needs to be increased.--If you encounter an error during the installation of "FaceDetailer", please refer to the tutorial in "ComfyUI-Impact-Pack".---text_encoders· qwen_3_8b_fp8mixed.safetensorsvae· flux2-vae.safetensors--模型許可:本模型請在遵循 black-forest-labs 公司非商業授權 (FLUX Non-Commercial License) 下使用。This model falls under the FLUX Non-Commercial License.--我的其他檢查站和Lora。My other checkpoints and Lora.不要問我如何安裝的問題與comfyui如何使用。客製化lora:我的Telegram ID:@iamddtla0620我的微信ID:iamddtla我的line ID:iamddtla時間寶貴,請直接說明來意,例如:訂製lora.Do not ask me questions about how to install it or how to use ComfyUI.Customized lora: My Telegram ID: @iamddtla0620My WeChat ID: iamddtlaMy Line ID: iamddtlaTime is precious, please state your intention directly, for example: customized LORA.
Dataset Caption Tool for Comfyui
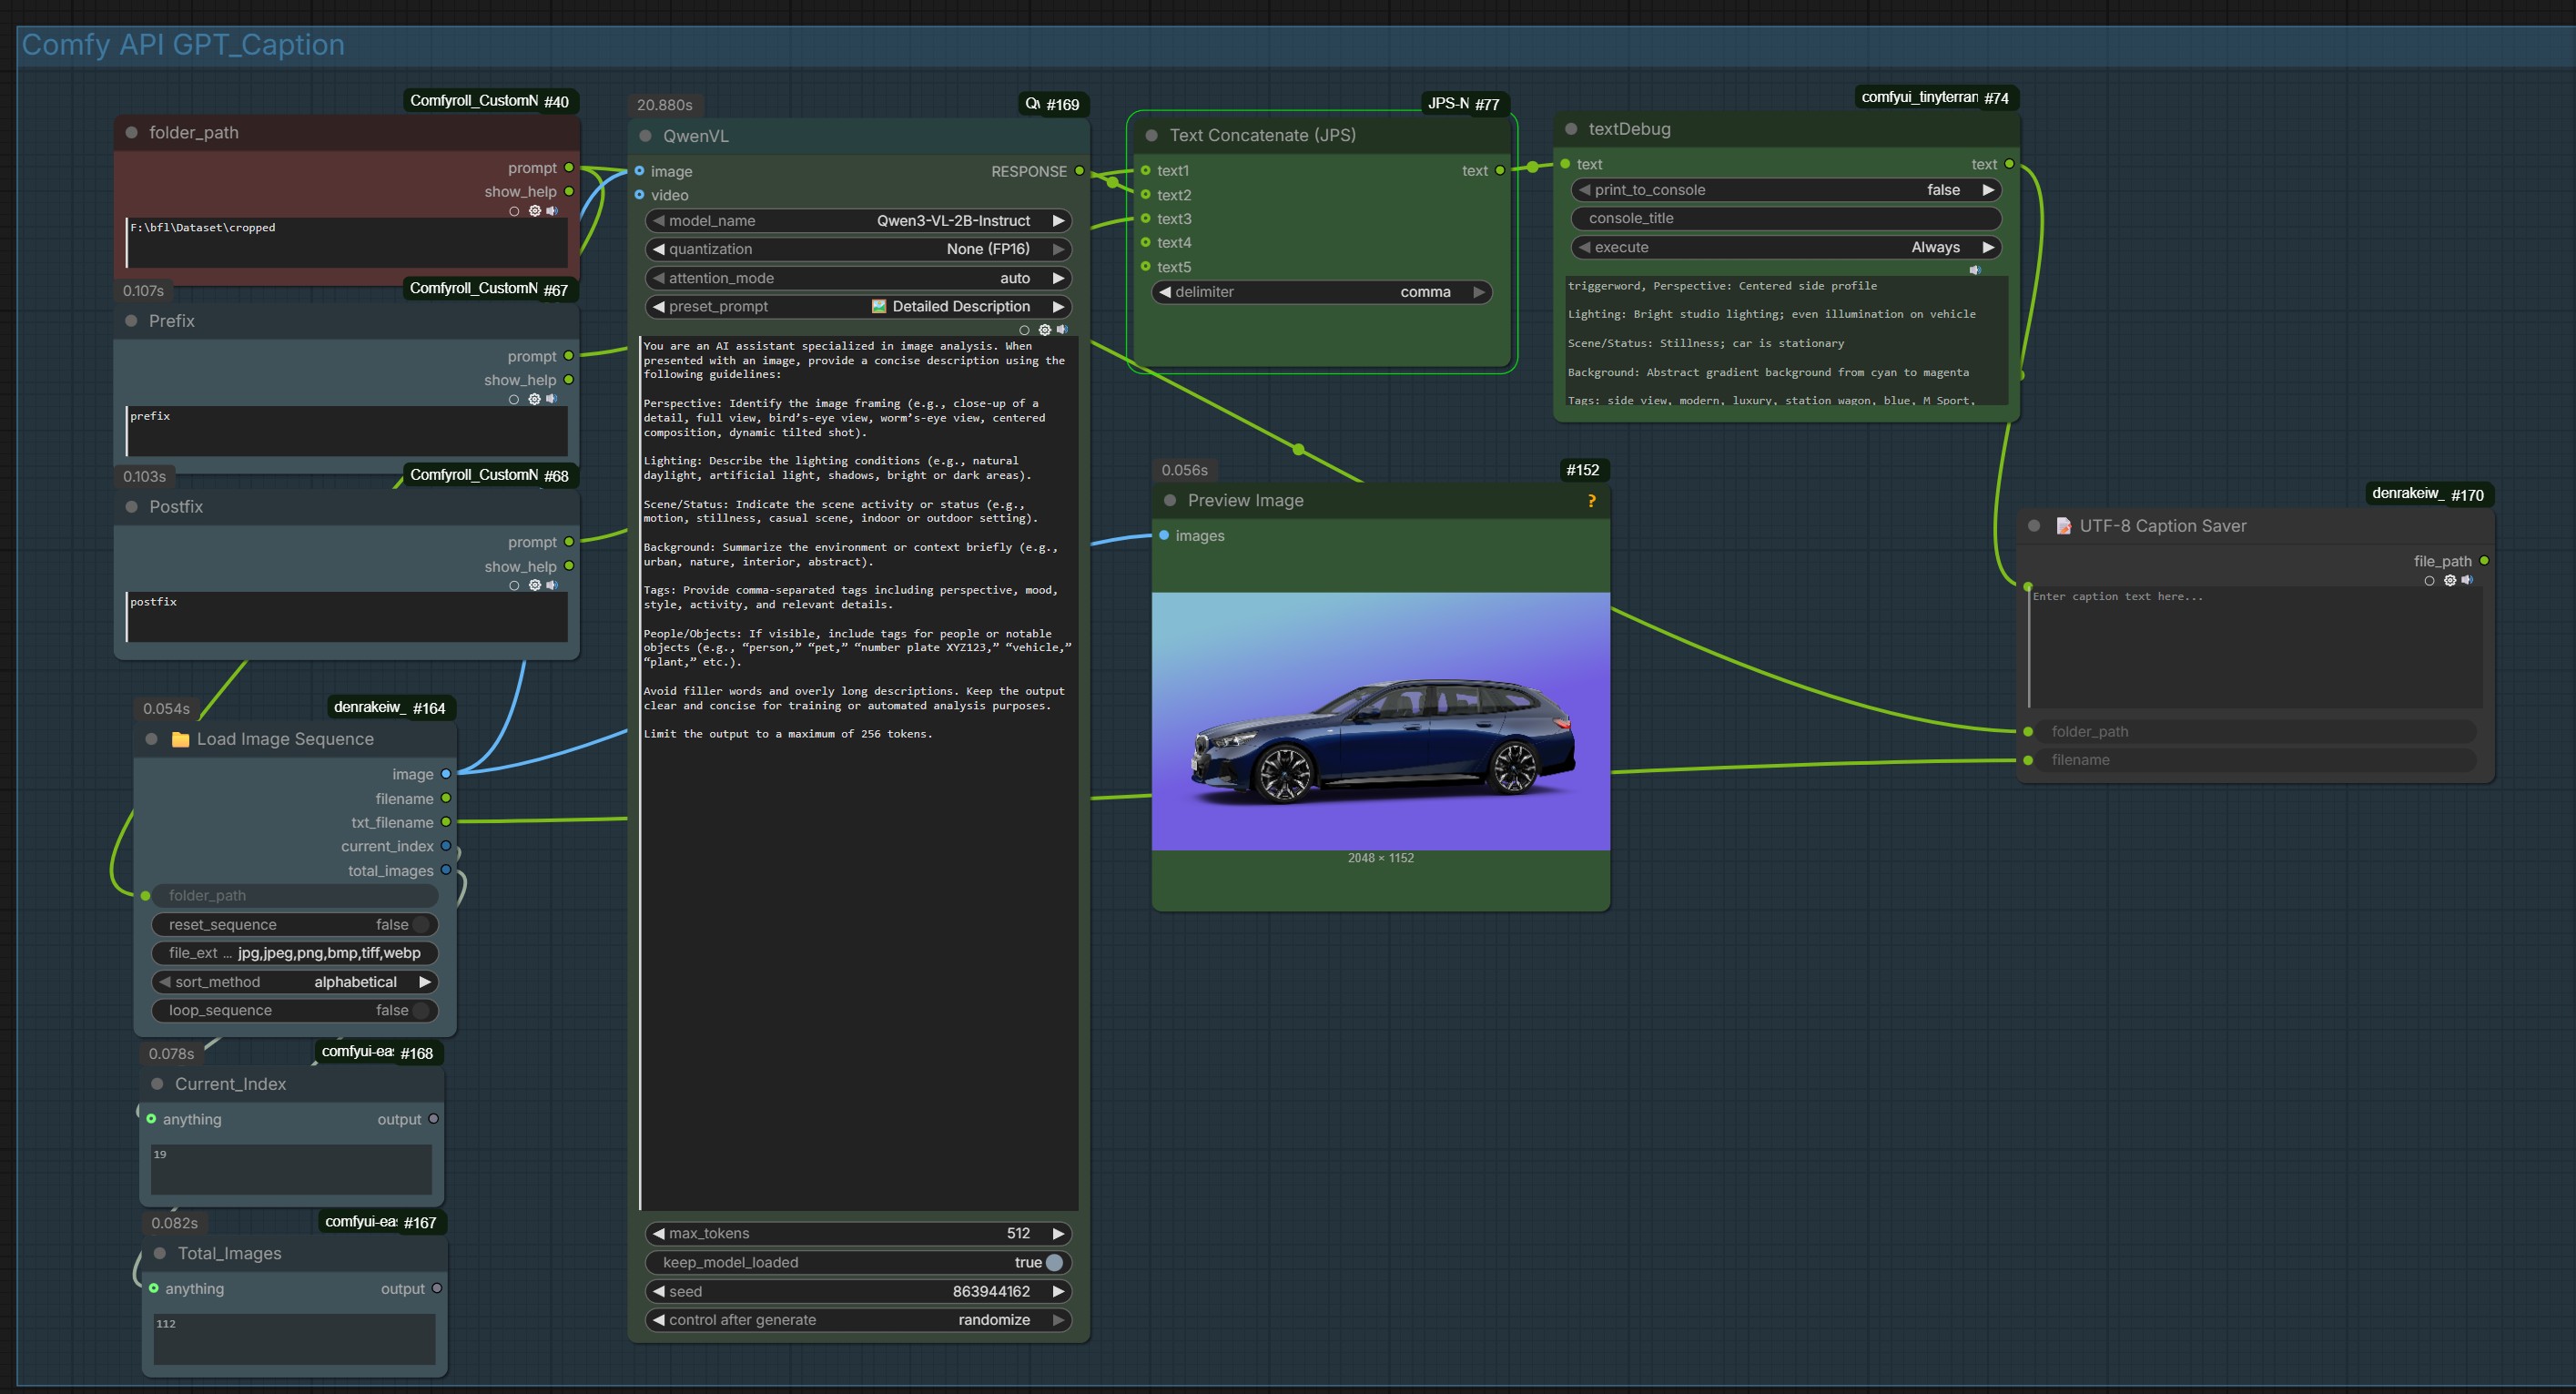
Update: 24/01/2026Qwen-VL Vision ModelIdeal for Models like Flux_2, Qwen ...13.08.Fixed a small Bug Update: 08/09/2025I had issues with the image loader in the old workflow, so I wrote a custom node myself that loads the images without errors.This time, it uses GPT for captioning along with a custom instruction.It can also be swapped out for open-source VLMs, but GPT works best overall.Update 24.10.24: Added Joytag CaptionUpdate 29.04.24: I have changed the vision model from Moondream2 to llava.For the llava model to work, Ollama must be installed. This allows llava to run locally and comfyui to communicate with llava via a local API.Ollama Github:Update 25.03.24: The bug that was causing incorrect counting has been fixed.Comfy Moondream Caption (Dataset Caption Tool for Comfyui)Welcome to Comfy Moondream Caption, a tool designed to generate captions for images using a local LMM. Follow the steps below to get started:The workflow works for datasets with up to 9999 images.Select Image Folder:Navigate to the "folder_path" option and select the folder where your images are stored. Ensure that the images are in the supported format (e.g., PNG, JPEG).Naming Convention:Ensure that the images in the selected folder are sequentially numbered, such as "0001.png", "0002.png", and so on. This numbering is crucial for proper processing.Enable Batch Captioning:To enable batch captioning, go to the "Extra Options" section in the Comfy UI.Select "Auto Queue" to ensure that captions are generated for all images in the selected folder.Generate Captions:Once the folder and options are set, click on the "Que Prompt" button to initiate the caption generation process.Comfy Moondream Caption will analyze each image in the folder and generate captions for them.Post-Processing:After the caption generation process is complete, it's essential to reset the start index manually to 0. This ensures that the tool starts processing from the beginning for the next dataset.Repeat for Additional Datasets:If you have more datasets to analyze, repeat the process by selecting a new folder containing images.Installation:To set up this workflow, you'll need the ComfyUI Moondream custom nodes developed by Kijai. You can find them at: https://github.com/kijai/ComfyUI-moondream
Flux Klein High Res Workflow
⚡ Flux Klein High-Res Powerhouse (4K & 8K Workflows)Unlock the full potential of Flux Klein. These workflows allow you to generate incredible high-resolution images, reaching 4K and even 45MP (8K) resolutions, utilizing the efficiency of Klein models.I have included two versions of this workflow to suit your specific hardware and quality needs.📂 The Two Versions1. 🚀 Performance Hybrid (Speed)Filename: Flux_Klein_9b_with4b_upscaler.jsonBest for: Faster generation times while still maintaining excellent resolution.How it works:Stage 1: Generates the base composition using the Klein Base 9b model.Stage 2: Upscales the image (2x or 4x) using the lightweight Klein 4b (4-step) model.2. 💎 Ultimate Fidelity (Quality)Filename: Flux_Klein_9b_with_9b_Upscaler.jsonBest for: Maximum detail, texture consistency, and highest quality output.How it works:Stage 1: Generates the base composition using the Klein Base 9b model.Stage 2: Upscales using the more robust Klein 9b (4-step) model for superior refinement during the upscale process.✨ Key FeaturesExtreme Resolution: Capable of generating standard images and upscaling them to 4K or 8K (45MP).Smart Tiled Upscaling: Uses a "Divide and Conquer" strategy combined with Florence2. The workflow automatically captions the image before upscaling to guide the diffusion model, ensuring the upscale respects the context of the image.Efficient: By utilizing the Klein quantized models, you get Flux capabilities with a much friendlier VRAM footprint.🛠️ Requirements & SetupTo use these workflows, you will need the following models in your ComfyUI models folders:Checkpoints (UNET):flux-2-klein-base-9b.safetensorsflux-2-klein-4b.safetensors (for the speed version)Upscale Model:4xNomosUniDAT_otf.pth (or your preferred 4x upscaler)Nodes: Ensure you have the necessary custom nodes installed (specifically ComfyUI-Florence2, ComfyUI_Steudio (for Divide & Conquer), and ComfyUI-GGUF if using GGUF versions).