ComfyUI Workflows
Browse real AI workflows from Flux, SDXL, Pony, ControlNet, video generation and commercial AI creators.

FLUX-GGUF-Multi-LoRA-dAIver-v1.5 – Optimized Low-VRAM Multi-LoRA Workflow for Flux.1 Dev (GGUF)
Optimized Low-VRAM Multi-LoRA Workflow for Flux.1 Dev (GGUF)Another new, refined and enhanced workflow by Experimental_dAIverThis workflow delivers the full power of Flux.1 Dev in GGUF format, specially optimized for GPUs with less than 8 GB VRAM, like my RTX 4050 with only 6 GB. The integrated CacheDiT_Model_Optimizer and PatchSageAttentionKJ (both optional!) provide a noticeable speed boost with almost no quality loss. Full NdSuperLoraLoader support for easy multi-LoRA stacking with automatic trigger-word integration, the intuitive selectLatentSizePlus aspect-ratio and resolution selector, plus a complete SEEDVR2 Video Upscaler Subgraph (base provided by @LumaRift) for stunning high-resolution results complete this elegant and highly flexible setup.Version 1.5 is my first public release and brings significant improvements in speed, usability, multi-LoRA handling and upscaling quality — while remaining extremely VRAM-efficient (tested on RTX 4050 with only 6 GB).Key features in v1.5:NdSuperLoraLoader with full multi-LoRA support, auto-fetch trigger words and easy strength controlselectLatentSizePlus — intuitive aspect-ratio and resolution selector with beautiful presets (including golden-ratio-friendly options) plus easy orientation swapFull SEEDVR2 Video Upscaler Subgraph — powerful DiT-based high-end upscaler that delivers stunning 4K+ results with intelligent resolution handling, Lab color correction and temporal settings. Works exceptionally well on still images too, producing superior detail and coherenceImproved workflow organization, expanded notes with recommended settings, and more robust saving options via SaveImageExtendedCacheDiT and SageAttention integration for optimized Flux performance on low-VRAM hardwareRequired Custom NodesComfyUI-GGUF - https://github.com/city96/ComfyUI-GGUF - UnetLoaderGGUF + CLIPLoaderGGUFnd-super-nodes - https://github.com/HenkDz/nd-super-nodes - NdSuperLoraLoader with tags, trigger words & beautiful UIsave-image-extended-comfyui - https://github.com/thedyze/save-image-extended-comfyui - Advanced saving with metadata & dynamic filenamesComfyUi-MzMaXaM - https://github.com/MzMaXaM/ComfyUi-MzMaXaM - selectLatentSizePlusComfyUI-SeedVR2_VideoUpscaler - https://github.com/numz/ComfyUI-SeedVR2_VideoUpscaler - SEEDVR2 Video Upscaler SubgraphModels & Downloads (exact paths)The following list explains the base models I am most frequently using with this workflow. The list as well explains where to put each file after you downloaded it.1. Main Model (Flux.1 Dev GGUF):File: flux1-dev-Q5_1.gguf (or any other GGUF quant you prefer – Q4, Q5, Q6 or Q8 all work well)Download: https://huggingface.co/city96/FLUX.1-dev-gguf/resolve/main/flux1-dev-Q5_1.ggufTarget folder: ComfyUI/models/diffusion_models/ (or Flux/ subfolder)2. Text Encoder (CLIP)File: t5xxl_fp8_e4m3fn.safetensors + clip_l.safetensors (standard Flux pair)Download t5xxl: https://huggingface.co/comfyanonymous/flux_text_encoders/resolve/main/t5xxl_fp8_e4m3fn.safetensors Download clip_l: https://huggingface.co/comfyanonymous/flux_text_encoders/resolve/main/clip_l.safetensorsTarget folder: ComfyUI/models/clip/ or ComfyUI/models/text_encoders/3. VAEFile: ae.safetensorsDownload: https://huggingface.co/Comfy-Org/flux1-dev/resolve/main/split_files/vae/ae.safetensorsTarget folder: ComfyUI/models/vae/4. Upscalers4× Upscaler: 4x-UltraSharp → https://civitai.com/models/116225/4x-ultrasharp1× Skin-Contrast Upscaler: 1xSkinContrast-High-SuperUltraCompact.pth → https://huggingface.co/notkenski/upscalers/blob/main/1xSkinContrast-High-SuperUltraCompact.pthTarget folder: ComfyUI/models/upscale_models/5. LoRAs (for NdSuperLoraLoader – full multi-LoRA support)Any Flux-compatible LoRA (.safetensors)Target folder: ComfyUI/models/loras/6. SEEDVR2 Models (for the high-end upscaler subgraph – optional but recommended)DiT Model: seedvr2_ema_3b-Q8_0.ggufVAE: ema_vae_fp16.safetensorsDownload from the official ComfyUI-SeedVR2_VideoUpscaler repository or Hugging Face and place in the folders required by the custom node.Recommended SettingsSampler: Euler or Euler ancestral Scheduler: Simple, Normal or Beta Steps: 20–40 CFG Scale: 1.0 Flux Guidance: 3–6 Shift: 4–7 Resolution: freely selectable via the selectLatentSizePlus node (many golden-ratio-friendly presets included, swap orientation with one click)How to use the workflowLoad the JSON in ComfyUI.Select your desired aspect ratio and resolution in the selectLatentSizePlus node (enable swap_orientation if needed).Enter your prompt in the Positive Prompt node (the NdSuperLoraLoader will automatically pull trigger words from your LoRAs).(Optional) Load one or more Flux-compatible LoRAs into the NdSuperLoraLoader – strengths and triggers are handled elegantly.Generate. The first stage produces a high-quality base image.(Optional) Run the SEEDVR2 upscaler subgraph for beautiful 2–4× upscales or even video. It works great on still images too.The SaveImageExtended node gives you full control over filenames, metadata and folder structure.You can bypass the entire upscaler group if you just want fast test generations. The workflow also works with regular .safetensors Flux checkpoints – simply replace the UnetLoaderGGUF and DualCLIPLoader with the standard nodes.This is a clean, powerful and future-proof base for all your Flux.1 Dev work – whether you want fast single-LoRA portraits, complex multi-LoRA scenes or high-end upscaled output. I’ve been using it daily on my 6 GB card and it feels snappy and reliable.Huge thanks to WikkedAI for the original WikkedZITv4 foundation and to the creators of CacheDiT, SageAttention, NdSuperLoraLoader, selectLatentSizePlus and SeedVR2 for making low-VRAM Flux so enjoyable.If you have questions, feedback or want to share your results – I’m always happy to hear from you in the comments. Enjoy the workflow and happy creating!

FLUX Power LoRA + ControlNet Pose + Face Detailer (Simple)
FLUX Power LoRA + ControlNet + Face Detailer (Simple)A clean and beginner-friendly FLUX workflow focused on realistic character generation.After testing numerous community workflows, I created this version with one goal in mind: keeping things simple while maintaining high-quality results.This workflow combines the tools I use most often for character photography and LoRA showcase generation:FLUX DevPower LoRA LoaderFlux ControlNetFace DetailerVRAM CleanupThe workflow is designed to be easy to understand, easy to modify, and practical for everyday use without unnecessary complexity.Ideal ForCharacter LoRAsPortrait PhotographyLifestyle ImagesFashion PhotographySocial Media ContentShowcase ImagesNotesA Face Detailer node is included and highly recommended for medium-distance and full-body generations. It helps maintain facial consistency and preserves smaller details that can become less defined at greater distances.This is the workflow used for many of the images featured on my IdentityLabs profile.Feel free to customize it and make it your own.

FLUX.1 Dev PiD Direct 4K Image Generation Workflow
Watch the full video first if you want to understand how this FLUX.1 Dev + PiD workflow works in practice. The video shows how a 1024 base image can be generated and then pushed into a PiD-based 4K enhancement lane, how the native baseline compares with the enhanced result, and how to launch the workflow online without building a local ComfyUI setup.This ComfyUI workflow is designed for FLUX.1 Dev 4K image generation using PiD as the high-resolution enhancement stage. Its main purpose is to create a strong FLUX.1 Dev base image first, capture the correct intermediate latent state, and then send it into a PiD 2K-to-4K refinement pipeline for sharper, richer, and more detailed final output.The workflow is built around flux1-dev-fp8.safetensors as the main checkpoint. It uses a 1024×1024 base latent, CLIP text encoding, FluxGuidance, PiDTextPrompt, PiDKSamplerCapture, PiDPrepare, PiDSample, PiDFinalize, VAEDecode, and SaveImage. The graph also includes a native FLUX output lane and a PiD enhanced output lane, making it useful for direct comparison between the standard generation result and the 4K-enhanced version.The first part of the workflow is the FLUX.1 Dev base generation. The prompt is written into PiDTextPrompt and then passed into the positive prompt encoder. FluxGuidance is set to 3.5, while CFG is set to 1.0, which is important because FLUX Dev does not use the negative prompt in the same way as older CFG-heavy models. The workflow note also makes this clear: for FLUX Dev and Schnell, CFG should stay at 1.0 because negative prompting is ignored when CFG is 1.0.The sampling stage uses PiDKSamplerCapture instead of a normal KSampler. This node generates the native FLUX latent while also capturing a PiD-ready latent at the selected capture step. In this workflow, the setup uses 28 steps, Euler sampler, simple scheduler, denoise 1.0, and capture_step 26. This is a practical setting because it allows the base image to develop enough structure before the PiD stage receives the captured latent.After the base latent is captured, PiDPrepare converts it into a PiD-compatible preparation object. The workflow is configured for the FLUX backbone, 2kto4k PiD checkpoint type, scale 4, auto download enabled, and cleanup after prepare enabled. Then PiDSample runs the high-resolution PiD pass with 4 PiD steps, CFG scale 1.0, fixed seed, aggressive cleanup, and sequential block offload. Finally, PiDFinalize converts the sampled PiD result into the enhanced final image.Compared with ordinary FLUX generation, this workflow is not just a simple upscale. It uses a dedicated PiD refinement pass to improve detail density, texture clarity, and high-resolution visual structure. Compared with traditional external upscalers, it is more integrated into the generation pipeline because it starts from the captured model latent and uses the original caption as part of the PiD preparation logic.This workflow is suitable for fantasy key art, cinematic illustrations, character posters, concept art, product-style visuals, high-detail portraits, game art, premium social media covers, RunningHub showcases, and Civitai workflow publishing.Main features:FLUX.1 Dev 4K image generation workflow1024 base latent generation routeFLUX.1 Dev fp8 checkpoint supportFluxGuidance 3.5 configurationCFG 1.0 FLUX-style setupPiDTextPrompt unified prompt inputPiDKSamplerCapture intermediate latent capture28-step Euler / simple base samplingCapture step 26 for PiD preparationPiDPrepare FLUX backbone supportPiD 2K-to-4K enhancement routePiDSample with 4 PiD stepsSequential block offload and aggressive cleanupNative baseline and enhanced output comparisonSuggested workflow:Start by writing a strong visual prompt with a clear subject, environment, style direction, lighting, and detail target. Keep the base latent at 1024×1024 for the first test, then run the native FLUX lane to confirm that the composition is correct. If the base result is weak, adjust the prompt before entering PiD. Once the native image has the right structure, let PiDKSamplerCapture send the captured latent into PiDPrepare and PiDSample. Use the native saved image as your baseline and the PiD finalized image as your enhanced 4K output. If the final result is too heavy or unstable, keep PiD steps at 4 and rely on cleanup / offload settings instead of forcing more aggressive parameters.⚙️ RunningHub WorkflowTry the workflow online right now — no installation required.👉 Workflow: https://www.runninghub.ai/post/2059961777689030657?inviteCode=rh-v1111If the results meet your expectations, you can later deploy it locally for customization.🎁 Fan Benefits: Register to get 1000 points + daily login 100 points — enjoy 4090 performance and 48 GB super power!📺 Bilibili Updates (Mainland China & Asia-Pacific)If you’re in the Asia-Pacific region, you can watch the video below to see the workflow demonstration and creative breakdown.📺 Bilibili Video: https://www.bilibili.com/video/BV1tsVH6kEBJ/☕ Support Me on Ko-fiIf you find my content helpful and want to support future creations, you can buy me a coffee ☕.Every bit of support helps me keep creating — just like a spark that can ignite a blazing flame.👉 Ko-fi: https://ko-fi.com/aiksk💼 Business ContactFor collaboration or inquiries, please contact aiksk95 on WeChat.⚙️打开下方链接即可在线体验,无需安装。👉 工作流: https://www.runninghub.ai/post/2059961777689030657?inviteCode=rh-v1111如果觉得效果理想,你也可以在本地进行自定义部署。🎁 粉丝福利: 注册即送 1000 积分,每日登录 100 积分,畅玩 4090 体验 48 G 超级性能!📺 Bilibili 更新(中国大陆及南亚太地区)如果你在中国大陆或南亚太地区,可以通过下方视频查看该工作流的实测效果与构思讲解。📺 B站视频: https://www.bilibili.com/video/BV1tsVH6kEBJ/我会在 夸克网盘 持续更新模型资源:👉 https://pan.quark.cn/s/20c6f6f8d87b这些资源主要面向本地用户,方便进行创作与学习。

Flux Professional Grade Workflow (High or Low VRAM)
Note: If you have ANY issues with nodes not downloading, read the notes or reach out. There's nothing that special about any of them that aren't core modules.⛔⚠️🛑✋ Read the notes completly before using. Most common install and node problems are listed in the directions也有中文说明A complete user and troubleshooting guide inclusing a list of common error messages can be found here https://civitai.com/articles/24678/how-to-use-my-workflows-a-comprehensive-breakdownInstagram: https://www.instagram.com/synth.studio.models/Buy me a☕ https://ko-fi.com/lonecatoneThis represents hundreds of hours of work. If you enjoy it, please 👍like, 💬 comment , and feel free to ⚡tip 😉V9.0Major overhaul of controlnetyou no longer need to reset the switchesAdded the ability to use original image ratiosCan use the Aspect Ratio node, or...can switch the size to match teh iage ratio all the way through the entire workflowCompletly reworked the brains 🧠Added a sigma multiplierReworked the detailer daemon so it isn't always just a "bypassed" nodeAdded my B&W◼️🔲+ Color 🌈 Suiteallows you to micromask down to hair fibersselect an item by naming it (or several)The item will mask and turn the rest of the image B&W.Complete control over the fade, color match, and saturationAdded the option to color match to the original imagetweaked the settings for more precise matchingUpdated Notes 📝 throughout.Ver 6.0Updraded Main areaAdded Qwen Prompt assistUpgraded Hi rez fixMassive overhaul of Detailer SuiteMassive overhaul of Post Production SuiteAdded Optical realismAdded Lens FXAdded Clarity FXImproved Bloom FilterImproved Image adjustVER4.0:Image to image capabilities with Controlnet & Prompt assistShakker Union V2.0 Controlnet with canny, depth, openpose, and others.Sage AttentionDraft mode: so you can make changes down the line without having to regenerateDetailer DaemonHi rez fix using Ultimate Upscaler for professional resultsFace, eyes, hands, and expression detailersSEEDVR2 UpscalerMassive Post Processing Suite也有中文说明

Flux/SDXL Workflow v1.0
My new image generation workflow. Designed to allow for many varied styles of images with only changing the text prompts. This is a Flux.1 D initial generation, with a SDXL Upscale and refinement, both in ComfyUI and a final img2img refinement pass in Forge. Initial image generation and refinement in ComfyUI on a 5060 Ti takes about 56 seconds and the final refinement pass in Forge, on a 3060 Ti takes just over a minute. If anyone has any suggestions, let me know. ThanksPS. CyberRealistic V 1.0 for initial Flux pass and IntoRealismUltra Amateur 4.0 for second and third SDXL passes.

Lora tester - various 6 Epochs / 3 prompts • ComfyUI
This ComfyUI workflow is ideal when you've generated or downloaded a LoRa model to test different prompts and find the perfect epochs for your future use.This is especially useful because it can serve as a recommended guide by including these tests in your LoRa file and on your model's page published on CivitAI.**I tested the workflow with Flux1 + Flux1 Lora but you can ajust that workflow for other models.

【FLUX】MEGAPACK
✨ FLUX — Workflow MEGAPACK — Simple WorkflowHere you will find all my workflows for FLUX. The easiest way is to copy this folder to ComfyUI\user\default\workflows.✔️ What's included :TXT to IMGIMG to IMGINPAINTOUTPAINTKONTEXTControlNetUpscalerLoRA tester⚠️ IMPORTANT — Nodes 2.0 RequiredThis workflow is built for the Nodes 2.0 (Vue) interface of ComfyUI. If you don't enable it, the workflow may have display problems.How to activate Nodes 2.0:Open ComfyUIGo to Settings (⚙️ icon, bottom-left)Find "Use Nodes V2 (Vue)" and toggle it ONRefresh the pageLoad the workflowIf you prefer the classic interface, check out my Legacy version of this workflow instead (link).📦 Custom Node RequiredOnly one custom node to install:👉 ComfyUI-UmeAiRT-ToolkitInstall via ComfyUI Manager (search "UmeAiRT") or use the UmeAiRT Auto-Installer.The Toolkit packages everything internally — upscaler, face detailer, metadata saver. No other custom nodes needed.📂 Files you need (in manual version)Model : flux1-dev-fp8.safetensors or flux1-dev-fp16.safetensorsin ComfyUI\models\diffusion_modelsFILL Model : flux1-fill-dev-fp8.safetensors or flux1-fill-dev-fp16.safetensorsin ComfyUI\models\diffusion_modelsKONTEXT Model : flux1-kontext-dev-fp8-e4m3fn.safetensorsin ComfyUI\models\diffusion_modelsCLIP : clip_l.safetensorsin ComfyUI\models\clip📂Files for GGUF version :Model : Q8, Q6, Q5, Q4, Q3in ComfyUI\models\unetFILL Model : Q8, Q6, Q5, Q4, Q3in ComfyUI\models\unetKONTEXT Model : G8, G5, G4in ComfyUI\models\unetCLIP : Q8, Q6, Q5, Q4, Q3in ComfyUI\models\clip📂Common FilesText encoder : t5xxl_fp8_e4m3fn.safetensors or ViT-L-14-TEXT-detail-improved-hiT-GmP-TE-only-HF.safetensorsVAE : ae.safetensorsin ComfyUI\models\vae

【FLUX】ControlNet
✨ FLUX — ControlNet — Simple WorkflowA clean, all-in-one FLUX image-to-image ControlNet workflow built entirely with the UmeAiRT Toolkit for ComfyUI.Only 8 nodes. No spaghetti wires. Just load your model, write your prompt, and hit generate.⚠️ IMPORTANT — Nodes 2.0 RequiredThis workflow is built for the Nodes 2.0 (Vue) interface of ComfyUI. If you don't enable it, the workflow may have display problems.How to activate Nodes 2.0:Open ComfyUIGo to Settings (⚙️ icon, bottom-left)Find "Use Nodes V2 (Vue)" and toggle it ONRefresh the pageLoad the workflowIf you prefer the classic interface, check out my Legacy version of this workflow instead (link).🎯 FeaturesImage-to-Image generationAutomatic download of models in auto versionBuilt-in SeedVR2 upscaler — high-quality tiled upscaling (toggleable on/off) Slower than a classic upscaler, but significantly better qualityFull metadata embedding — your images are saved with all generation parameters, ready for online publishing and remixing3 LoRA slots — with individual on/off toggles and strength control and you can connect as many other lora modules to each other for as many LoRA as you want.📦 Custom Node RequiredOnly one custom node to install:👉 ComfyUI-UmeAiRT-ToolkitInstall via ComfyUI Manager (search "UmeAiRT") or use the UmeAiRT Auto-Installer.The Toolkit packages everything internally — upscaler, face detailer, metadata saver. No other custom nodes needed.📂 Files you need (in manual version)for "base" version :Model : flux1-dev-fp8.safetensors or flux1-dev-fp16.safetensorsin ComfyUI\models\diffusion_modelsCLIP : clip_l.safetensorsin ComfyUI\models\clipfor GGUF version :Model : Q8, Q6, Q5, Q4, Q3in ComfyUI\models\unetCLIP : Q8, Q6, Q5, Q4, Q3in ComfyUI\models\clipCommon Files :Text encoder : t5xxl_fp8_e4m3fn.safetensors or ViT-L-14-TEXT-detail-improved-hiT-GmP-TE-only-HF.safetensorsVAE : ae.safetensorsin ComfyUI\models\vaeFlux ControlNet Union : Shakker-LabsFLUX1-dev-ControlNet-Union-Pro.safetensorsin ComfyUI\models\controlnet

【FLUX】UPSCALE
✨ FLUX — UltimateSD Upscale — Simple WorkflowA clean, all-in-one FLUX UltimateSD Upscale workflow built entirely with the UmeAiRT Toolkit for ComfyUI.Only 6 nodes. No spaghetti wires. Just load your model, write your prompt, and hit generate.⚠️ IMPORTANT — Nodes 2.0 RequiredThis workflow is built for the Nodes 2.0 (Vue) interface of ComfyUI. If you don't enable it, the workflow may have display problems.How to activate Nodes 2.0:Open ComfyUIGo to Settings (⚙️ icon, bottom-left)Find "Use Nodes V2 (Vue)" and toggle it ONRefresh the pageLoad the workflowIf you prefer the classic interface, check out my Legacy version of this workflow instead (link).📦 Custom Node RequiredOnly one custom node to install:👉 ComfyUI-UmeAiRT-ToolkitInstall via ComfyUI Manager (search "UmeAiRT") or use the UmeAiRT Auto-Installer.The Toolkit packages everything internally — upscaler, face detailer, metadata saver. No other custom nodes needed.📂 Files you need (in manual version)for "base" version :Model : flux1-dev-fp8.safetensors or flux1-dev-fp16.safetensorsin ComfyUI\models\diffusion_modelsCLIP : clip_l.safetensorsin ComfyUI\models\clipfor GGUF version :Model : Q8, Q6, Q5, Q4, Q3in ComfyUI\models\unetCLIP : Q8, Q6, Q5, Q4, Q3in ComfyUI\models\clipCommon Files :Text encoder : t5xxl_fp8_e4m3fn.safetensors or ViT-L-14-TEXT-detail-improved-hiT-GmP-TE-only-HF.safetensorsVAE : ae.safetensorsin ComfyUI\models\vae

Lora tester - various Strenght / prompts • ComfyUI
This ComfyUI workflow is ideal when you've generated or downloaded a LoRa model to test different prompts and find the perfect strength for your future use.This is especially useful because it can serve as a recommended guide by including these tests in your LoRa file and on your model's page published on CivitAI.**I tested the workflow with Flux1 + Flux1 Lora but you can ajust that workflow for other models.

【FLUX】LoRA TESTER
✨ FLUX — LoRA Tester — Simple WorkflowA clean, all-in-one FLUX LoRA Tester workflow built entirely with the UmeAiRT Toolkit for ComfyUI.Only 8 nodes. No spaghetti wires. Just load your model, write your prompt, and hit generate.⚠️ IMPORTANT — Nodes 2.0 RequiredThis workflow is built for the Nodes 2.0 (Vue) interface of ComfyUI. If you don't enable it, the workflow may have display problems.How to activate Nodes 2.0:Open ComfyUIGo to Settings (⚙️ icon, bottom-left)Find "Use Nodes V2 (Vue)" and toggle it ONRefresh the pageLoad the workflowIf you prefer the classic interface, check out my Legacy version of this workflow instead (link).🎯 FeaturesText-to-Image generationAutomatic download of models in auto versionBuilt-in SeedVR2 upscaler — high-quality tiled upscaling (toggleable on/off) Slower than a classic upscaler, but significantly better qualityFull metadata embedding — your images are saved with all generation parameters, ready for online publishing and remixing4x5 LoRA slots — with individual on/off toggles and strength control and you can connect as many other lora modules to each other for as many LoRA as you want.📦 Custom Node RequiredOnly one custom node to install:👉 ComfyUI-UmeAiRT-ToolkitInstall via ComfyUI Manager (search "UmeAiRT") or use the UmeAiRT Auto-Installer.The Toolkit packages everything internally — upscaler, face detailer, metadata saver. No other custom nodes needed.📂 Files you need (in manual version)for "base" version :Model : flux1-dev-fp8.safetensors or flux1-dev-fp16.safetensorsin ComfyUI\models\diffusion_modelsCLIP : clip_l.safetensorsin ComfyUI\models\clipfor GGUF version :Model : Q8, Q6, Q5, Q4, Q3in ComfyUI\models\unetCLIP : Q8, Q6, Q5, Q4, Q3in ComfyUI\models\clipCommon Files :Text encoder : t5xxl_fp8_e4m3fn.safetensors or ViT-L-14-TEXT-detail-improved-hiT-GmP-TE-only-HF.safetensorsVAE : ae.safetensorsin ComfyUI\models\vae

【FLUX】OUTPAINT
✨ FLUX — Outpaint — Simple WorkflowA clean, all-in-one FLUX Outpaint workflow built entirely with the UmeAiRT Toolkit for ComfyUI.Only 8 nodes. No spaghetti wires. Just load your model, write your prompt, and hit generate.⚠️ IMPORTANT — Nodes 2.0 RequiredThis workflow is built for the Nodes 2.0 (Vue) interface of ComfyUI. If you don't enable it, the workflow may have display problems.How to activate Nodes 2.0:Open ComfyUIGo to Settings (⚙️ icon, bottom-left)Find "Use Nodes V2 (Vue)" and toggle it ONRefresh the pageLoad the workflowIf you prefer the classic interface, check out my Legacy version of this workflow instead (link).🎯 FeaturesText-to-Image generationAutomatic download of models in auto versionBuilt-in SeedVR2 upscaler — high-quality tiled upscaling (toggleable on/off) Slower than a classic upscaler, but significantly better qualityFull metadata embedding — your images are saved with all generation parameters, ready for online publishing and remixing3 LoRA slots — with individual on/off toggles and strength control and you can connect as many other lora modules to each other for as many LoRA as you want.📦 Custom Node RequiredOnly one custom node to install:👉 ComfyUI-UmeAiRT-ToolkitInstall via ComfyUI Manager (search "UmeAiRT") or use the UmeAiRT Auto-Installer.The Toolkit packages everything internally — upscaler, face detailer, metadata saver. No other custom nodes needed.📂 Files you need (in manual version)for "base" version :Model : flux1-fill-dev-fp8.safetensors or flux1-fill-dev-fp16.safetensorsin ComfyUI\models\diffusion_modelsCLIP : clip_l.safetensorsin ComfyUI\models\clipfor GGUF version :Model : Q8, Q6, Q5, Q4, Q3in ComfyUI\models\unetCLIP : Q8, Q6, Q5, Q4, Q3in ComfyUI\models\clipCommon Files :Text encoder : t5xxl_fp8_e4m3fn.safetensors or ViT-L-14-TEXT-detail-improved-hiT-GmP-TE-only-HF.safetensorsVAE : ae.safetensorsin ComfyUI\models\vae

【FLUX】INPAINT
✨ FLUX — Inpaint — Simple WorkflowA clean, all-in-one FLUX Inpaint workflow built entirely with the UmeAiRT Toolkit for ComfyUI.Only 8 nodes. No spaghetti wires. Just load your model, write your prompt, and hit generate.⚠️ IMPORTANT — Nodes 2.0 RequiredThis workflow is built for the Nodes 2.0 (Vue) interface of ComfyUI. If you don't enable it, the workflow may have display problems.How to activate Nodes 2.0:Open ComfyUIGo to Settings (⚙️ icon, bottom-left)Find "Use Nodes V2 (Vue)" and toggle it ONRefresh the pageLoad the workflowIf you prefer the classic interface, check out my Legacy version of this workflow instead (link).🎯 FeaturesText-to-Image generationAutomatic download of models in auto versionBuilt-in SeedVR2 upscaler — high-quality tiled upscaling (toggleable on/off) Slower than a classic upscaler, but significantly better qualityFull metadata embedding — your images are saved with all generation parameters, ready for online publishing and remixing3 LoRA slots — with individual on/off toggles and strength control and you can connect as many other lora modules to each other for as many LoRA as you want.📦 Custom Node RequiredOnly one custom node to install:👉 ComfyUI-UmeAiRT-ToolkitInstall via ComfyUI Manager (search "UmeAiRT") or use the UmeAiRT Auto-Installer.The Toolkit packages everything internally — upscaler, face detailer, metadata saver. No other custom nodes needed.📂 Files you need (in manual version)for "base" version :Model : flux1-fill-dev-fp8.safetensors or flux1-fill-dev-fp16.safetensorsin ComfyUI\models\diffusion_modelsCLIP : clip_l.safetensorsin ComfyUI\models\clipfor GGUF version :Model : Q8, Q6, Q5, Q4, Q3in ComfyUI\models\unetCLIP : Q8, Q6, Q5, Q4, Q3in ComfyUI\models\clipCommon Files :Text encoder : t5xxl_fp8_e4m3fn.safetensors or ViT-L-14-TEXT-detail-improved-hiT-GmP-TE-only-HF.safetensorsVAE : ae.safetensorsin ComfyUI\models\vae

【FLUX】IMG to IMG
✨ FLUX — Image to Image — Simple WorkflowA clean, all-in-one FLUX image-to-image workflow built entirely with the UmeAiRT Toolkit for ComfyUI.Only 8 nodes. No spaghetti wires. Just load your model, write your prompt, and hit generate.⚠️ IMPORTANT — Nodes 2.0 RequiredThis workflow is built for the Nodes 2.0 (Vue) interface of ComfyUI. If you don't enable it, the workflow may have display problems.How to activate Nodes 2.0:Open ComfyUIGo to Settings (⚙️ icon, bottom-left)Find "Use Nodes V2 (Vue)" and toggle it ONRefresh the pageLoad the workflowIf you prefer the classic interface, check out my Legacy version of this workflow instead (link).🎯 FeaturesImage-to-Image generationAutomatic download of models in auto versionBuilt-in SeedVR2 upscaler — high-quality tiled upscaling (toggleable on/off) Slower than a classic upscaler, but significantly better qualityFull metadata embedding — your images are saved with all generation parameters, ready for online publishing and remixing3 LoRA slots — with individual on/off toggles and strength control and you can connect as many other lora modules to each other for as many LoRA as you want.📦 Custom Node RequiredOnly one custom node to install:👉 ComfyUI-UmeAiRT-ToolkitInstall via ComfyUI Manager (search "UmeAiRT") or use the UmeAiRT Auto-Installer.The Toolkit packages everything internally — upscaler, face detailer, metadata saver. No other custom nodes needed.📂 Files you need (in manual version)for "base" version :Model : flux1-dev-fp8.safetensors or flux1-dev-fp16.safetensorsin ComfyUI\models\diffusion_modelsCLIP : clip_l.safetensorsin ComfyUI\models\clipfor GGUF version :Model : Q8, Q6, Q5, Q4, Q3in ComfyUI\models\unetCLIP : Q8, Q6, Q5, Q4, Q3in ComfyUI\models\clipCommon Files :Text encoder : t5xxl_fp8_e4m3fn.safetensors or ViT-L-14-TEXT-detail-improved-hiT-GmP-TE-only-HF.safetensorsVAE : ae.safetensorsin ComfyUI\models\vae

【FLUX】TXT to IMG
✨ FLUX — Text to Image — Simple WorkflowA clean, all-in-one FLUX text-to-image workflow built entirely with the UmeAiRT Toolkit for ComfyUI.Only 8 nodes. No spaghetti wires. Just load your model, write your prompt, and hit generate.⚠️ IMPORTANT — Nodes 2.0 RequiredThis workflow is built for the Nodes 2.0 (Vue) interface of ComfyUI. If you don't enable it, the workflow may have display problems.How to activate Nodes 2.0:Open ComfyUIGo to Settings (⚙️ icon, bottom-left)Find "Use Nodes V2 (Vue)" and toggle it ONRefresh the pageLoad the workflowIf you prefer the classic interface, check out my Legacy version of this workflow instead (link).🎯 FeaturesText-to-Image generationAutomatic download of models in auto versionBuilt-in SeedVR2 upscaler — high-quality tiled upscaling (toggleable on/off) Slower than a classic upscaler, but significantly better qualityFull metadata embedding — your images are saved with all generation parameters, ready for online publishing and remixing3 LoRA slots — with individual on/off toggles and strength control and you can connect as many other lora modules to each other for as many LoRA as you want.📦 Custom Node RequiredOnly one custom node to install:👉 ComfyUI-UmeAiRT-ToolkitInstall via ComfyUI Manager (search "UmeAiRT") or use the UmeAiRT Auto-Installer.The Toolkit packages everything internally — upscaler, face detailer, metadata saver. No other custom nodes needed.📂 Files you need (in manual version)for "base" version :Model : flux1-dev-fp8.safetensors or flux1-dev-fp16.safetensorsin ComfyUI\models\diffusion_modelsCLIP : clip_l.safetensorsin ComfyUI\models\clipfor GGUF version :Model : Q8, Q6, Q5, Q4, Q3in ComfyUI\models\unetCLIP : Q8, Q6, Q5, Q4, Q3in ComfyUI\models\clipCommon Files :Text encoder : t5xxl_fp8_e4m3fn.safetensors or ViT-L-14-TEXT-detail-improved-hiT-GmP-TE-only-HF.safetensorsVAE : ae.safetensorsin ComfyUI\models\vae

Flux 1. Dev + Lora T2I
2 workflow for Flux 1 Dev using lora1. lora with a custom clip node2. lora with a standard clip node

Flux 1. Dev + 2 Loras + Detailler + Upscale
Workflow allows you to work with lora, adjust its strength, adjust the strength of promt, the ability to connect another lora, and if desired, you can further refine even more lora.1. stage of creating an image using industrial materials.2. stage adding details to the image.3. stage upscale and small color scheme.You can enable bypass and just generate images, for this you need to disable everything that comes after decode vae and the first saving of the image

🎬 FLUX2 PORTRAIT — Cinematic Realism Workflow | fp8 Optimized | 1024×1024 | Zero CFG
> "The most consistent cinematic portrait results I've ever gotten from FLUX."This is a clean, battle-tested ComfyUI workflow built around the KREA FLUX2 Dev model (fp8_scaled) — designed from the ground up for photorealistic, cinematic portrait generation at 1024×1024. No CFG hacks. No LoRA stacking required. Just pure FLUX power.━━━━━━━━━━━━━━━━━━━━━━━━━━━━━━⚡ WHY THIS WORKFLOW IS DIFFERENT━━━━━━━━━━━━━━━━━━━━━━━━━━━━━━✅ Uses BasicGuider — FLUX's native CFG-free guidance (no distortion, no oversaturation)✅ SamplerCustomAdvanced pipeline — full control over noise, sigmas & sampler✅ fp8 e4m3fn precision — runs on 8GB+ VRAM, no quality loss✅ Dual CLIP (clip_l + t5xxl) — maximum prompt adherence✅ Euler sampler + Simple scheduler @ 20 steps — fast, sharp, consistent✅ Randomized seed by default — infinite variation, zero repetition━━━━━━━━━━━━━━━━━━━━━━━━━━━━━━📦 REQUIRED MODELS (place in correct folders)━━━━━━━━━━━━━━━━━━━━━━━━━━━━━━| File | Folder ||------|--------|| flux1-krea-dev_fp8_scaled.safetensors | /models/unet/ || clip_l.safetensors | /models/clip/ || t5xxl_fp8_e4m3fn.safetensors | /models/clip/ || flux2-vae.safetensors | /models/vae/ |━━━━━━━━━━━━━━━━━━━━━━━━━━━━━━🖥️ SYSTEM REQUIREMENTS━━━━━━━━━━━━━━━━━━━━━━━━━━━━━━- VRAM: 8GB minimum (12GB+ recommended for comfort)- ComfyUI: Latest version- Python: 3.10+- No extra custom nodes needed — 100% native ComfyUI nodes━━━━━━━━━━━━━━━━━━━━━━━━━━━━━━✏️ STARTER PROMPT (edit the CLIPTextEncode node)━━━━━━━━━━━━━━━━━━━━━━━━━━━━━━📌 Tips for your own prompts:- Lead with the shot type: "close-up portrait", "cinematic headshot", "golden hour photo"- Add lighting: "soft box lighting", "rembrandt lighting", "neon backlight" - Add lens feel: "85mm f/1.4", "shallow depth of field", "bokeh background"- Keep it under 120 tokens — FLUX's T5 encoder handles detail natively━━━━━━━━━━━━━━━━━━━━━━━━━━━━━━⚙️ TUNING GUIDE━━━━━━━━━━━━━━━━━━━━━━━━━━━━━━| Parameter | Default | Range | Effect ||-----------|---------|--------|--------|| Steps | 20 | 15–30 | Higher = sharper details || Resolution | 1024×1024 | 768–1280 | Keep aspect ratio native || Scheduler | simple | simple / karras | Simple = cleaner portraits || Sampler | euler | euler / dpm++ | euler = most consistent |━━━━━━━━━━━━━━━━━━━━━━━━━━━━━━🔁 WORKFLOW ARCHITECTURE━━━━━━━━━━━━━━━━━━━━━━━━━━━━━━UNETLoader ──► BasicGuider ──►DualCLIPLoader ──► CLIPTextEncode ──► BasicGuider │VAELoader ──────────────────────────► VAEDecode ──► SaveImage ▲RandomNoise ──► │KSamplerSelect ──► SamplerCustomAdvanced ──►BasicScheduler ──►EmptyLatentImage ──►━━━━━━━━━━━━━━━━━━━━━━━━━━━━━━❓ FAQ━━━━━━━━━━━━━━━━━━━━━━━━━━━━━━Q: Can I add a LoRA?A: Yes! Add a LoRALoader node between UNETLoader and BasicGuider. Portrait LoRAs work great.Q: Can I change resolution?A: Yes, edit the EmptyLatentImage node. Keep total pixels near 1024×1024 (≈1MP).Q: Why no negative prompt?A: FLUX with BasicGuider is CFG-free — negative prompts don't apply. FLUX just works.Q: My images look washed out?A: Make sure you're using flux2-vae.safetensors. The wrong VAE kills colors.━━━━━━━━━━━━━━━━━━━━━━━━━━━━━━💬 SHARE YOUR RESULTS!━━━━━━━━━━━━━━━━━━━━━━━━━━━━━━Drop your generations in the images tab. I feature the best ones! ⭐If this workflow saved you time, a 👍 and ⭐ mean the world.Questions? Drop them in the comments — I reply to everything.— socialtechie7

Flux.1 Dev: GGUF The "Smart-Render" Pipeline (v4.0)
🚀 Flux.1 Dev: The "Smart-Render" Pipeline (v4.0)Optimized for 16GB VRAM Cards (e.g., RTX 4080 Super) Current Version: v4.0 (The Architecture Overhaul)Stop wasting time rendering high-res images just to check a prompt. This workflow introduces a "Smart-Render Logic" that separates creative iteration from final production. It mimics a professional 3D studio workflow: Work in Proxy, Render in Final.🆕 WHAT'S NEW IN v4.0?⚡ 50% Draft Scaling: The Draft Mode now automatically scales resolution to 50%. This makes prompt testing lightning fast.🖐️ 5-Stage Detailer Stack: Expanded from 3 to 5 slots. Now includes dedicated slots for Face, Hand, Person, and two slots for Anatomical/Feature enhancement (perfect for NSFW or highly detailed character work).🎞️ The Analog Finish: A new post-processing chain combining Sharpening (before grain) and Film Grain (anti-banding) for a non-plastic, photorealistic look.👁️ Visual Dev Station: A 3-monitor comparison setup inside the workflow to check "Raw vs. Detailer" and "Detailer vs. Grain" instantly.💡 THE LOGIC: The "Red Button"I designed this workflow around a single Boolean Switch (The Big Red Button). It completely reconfigures the internal pipeline based on your goal.🔴 FALSE = DRAFT MODE (Speed Focus)Resolution: Automatically scaled to 50% (via Aspect Ratio).Model: Loads the fast Q4 GGUF (Quantum 4).Pipeline: Bypasses Upscalers, Detailers, and Grain.Save Path: Sorts images into a ..._LowRes folder.Goal: Instant iteration. Check your composition, lighting, and seed in seconds.🟢 TRUE = FINAL MODE (Quality Focus)Resolution: Full 100% Output.Model: Loads the heavy Q8 GGUF (Quantum 8) for maximum fidelity.Pipeline: Activates the full chain: Upscale (x2) -> 5x Detailer Stack -> Analog Finish.Save Path: Sorts images into a ..._Final folder.Goal: Production-ready export for Civitai, ArtStation, or Print.ℹ️ Why this works: As proven in testing, the Q4 and Q8 models are structurally almost identical. You can compose in Draft (Q4) and trust that the Final (Q8) render will keep the exact same pose and expression, just with much higher texture fidelity.🛠 KEY FEATURESHybrid GGUF Loading: Automatically swaps models in RAM to save VRAM headroom.Non-Blocking Bus: You can turn off individual Detailers (e.g., disable Hand Detailer) without breaking the chain.Smart Folder System: Automatically names files based on your Project and Topic inputs.16GB VRAM Optimized: Runs smoothly on 4080-class cards by managing memory efficiently between the Upscaler and the Detailer Stack.📦 REQUIREMENTS (Download Checklist)Please read the Notes inside the workflow!Checkpoints: You need TWO GGUF files of your preferred Flux model (e.g., CyberRealistic Flux).*Q4_k_s.gguf (for Draft)*Q8_0.gguf (for Final)CLIP/VAE: Standard Flux files (t5xxl_fp8, clip_l, ae).Detailer Models: face_yolov8m.pt, hand_yolov8s.pt, person_yolov8m-seg.pt (placed in /models/ultralytics).Custom Nodes: If you see red nodes, simply use ComfyUI Manager -> Install Missing Custom Nodes.📜 Update Historyv4.0: Major Logic Update (50% Draft Res), 5-Stack Detailer, Analog Finish.v3.0: Introduced Person/Face Detailer separation.v2.0: Added Hand Detailer & Image Compare.v1.0: Initial Q4/Q8 Switch Logic.Happy Creating! If this workflow saves you time, please leave a review and share your results! 🎨
Flux Workflow (Level 1) for Beginners | ComfyUI
🪖 Flux BootcampA starter workflow designed to be very beginner friendly. No long intro. Let's get you generating. 🫡🧰 Step 1: Download the Workflow Files👉 Download Level 1 and unzip itDrag and drop the json file into ComfyUI🔧 Step 2: Install Missing Custom NodesWhen the popup appears, click "Open Manager"Install all the nodes thereIf some nodes don’t install, use the Old Manager option in the top-rightFrom there, click "Install Missing Custom Nodes" and install them there💡 Pro Tip: If workflow is blank, press period on your numpad to frame all nodes into view📦 Step 3: Download the ModelsIn the workflow right after the first Noodletron note, follow the manual download guide:🔁 Want more power?Level 2 has:Get it on my Patreon (free no paywall) if you're ready to level up:👉 🚨 Flux Level 1 and 2 Just Dropped – Free Workflow & Guide below ⬇️If I don't work in Patreon, I don't get support. I put level 1 on here as a compromise. This is the best I can do without cutting myself off from people who would support me. 🙏🌌 Bonus: Na’vi Avatar LoRAI also made a custom Avatar-inspired Flux LoRA:Get it here:👉 Avatar Flux LoRA – For Na'vi Characters🆘 Need help?If you run into any issues or just want to share your results, hop into the Discord. I’m always happy to see what people create with these workflows.👉 Maxed Out Server👍 And if this post helped, a like is super appreciated. It helps more people find it and lets me know to keep making these.– Max

F1D | Ultimate Flux GGUF LoRA Tester
🧪 F1D | Ultimate Flux GGUF LoRA TesterStop guessing which Epoch was the best! This workflow turns the chaos of LoRA training into a clean, professional comparison matrix. Designed for Flux (GGUF) users who need efficiency, structure, and visual clarity.🖼️ WHAT THIS WORKFLOW DOES:It generates a comparison grid for your LoRA training steps (Epochs).Visual Documentation: Automatically stamps the Epoch Name and Project Name directly onto the image pixels (bottom bar). No more wondering "Is this Epoch 6 or 7?".Smart Filenaming: Saves files with Project_Epoch_Strength automatically.Wireless Architecture: No cable spaghetti! Uses "Set/Get" nodes to transmit data cleanly.🎛️ THE "CONTROL ROOM" (Top Left)Everything is controlled from one central hub on the left side:Load Checkpoint: Select your Flux GGUF model (Q8/Q4 etc.).Load Assets: Select your LoRA files for the test columns.Set Text: Input your Project Name & Epoch Labels once – they sync to all overlays!⚙️ HOW TO USE:Download & Drag: Simply drag the Header Image (PNG) of this post into ComfyUI. The workflow is embedded inside the image!Install Missing Nodes: Use ComfyUI Manager to install the required packs (see below).Setup Control Room: Load your GGUF Checkpoint and the LoRA versions you want to test in the "Control Room" (Top Left).Set Strength: Adjust the Sliders located directly above each image column to test specific strengths (e.g., 0.8 vs 1.0).Queue Prompt: Watch the grid fill up with labeled, organized test shots.📦 REQUIRED CUSTOM NODES:Please install these via ComfyUI Manager > "Install Missing Custom Nodes"ComfyUI-GGUF (City96) - Essential for Flux GGUFComfyUI-KJNodes (Kijai) - For Set/Get Wireless logicComfyUI Book Tools - For the Smart Text OverlaysWAS Node Suite - For IO & SavingComfyUI-Easy-Use - For efficient LoRA loadingRgThree - For Optimization & Mute/Bypass💡 PRO TIP: Because this workflow uses GGUF Models, it is highly VRAM efficient. You can test multiple LoRA versions without running OOM on 12GB/16GB cards (depending on Quantization).

ComfyUI-NebulaPromptManager-FLUX
Nebula Prompt Manager is a ComfyUI custom node designed to manage prompts and variables for FLUX workflows.It allows saving, loading, and reusing prompt setups as project files.FeaturesPositive Prompt managementNegative Prompt management5 typed variables (string / int / float)Project-based storageJSON prompt memory systemSeparate outputs for workflowsOutputsPositiveNegativeVariable_1Variable_2Variable_3Variable_4Variable_5InstallationCopy into:ComfyUI/custom_nodes/Restart ComfyUIProject Storage<ComfyUI Root>/Nebula-Image-Manager/UsageAdd Nebula Prompt Manager nodeCreate new projectSave prompts and variablesLoad anytimeConnect outputs to FLUX workflowsGitHubhttps://github.com/Konohamaru04/ComfyUI-NebulaPromptManager

Style-Shift_FLUX1-uso- I2I
Workflow overview:Load content -> Load style -> Load models -> Prep -> Diffuse -> Save -> Optional upscaleLoad the source image you want to restyle at the top, then load the style references in the lower two image nodes. Then you're good to go. Maybe you'll want to tweak the text prompt and batch size to suit your use case.issue:The USO process can do significant changes to change the style and it often also takes some liberty with the composition, changing the zoom, removing items, moving arms, etc. I found about one in nine of the generations is a good match to the source image while the rest will have various You can add a prompt to improve the chances the pose is right. For example without prompt lots of distorted poses and limbs, only one or two are good:Simple prompt, still some deformities, but much better odds, more like 4 or 5 good ones:I recommend two style images but you could bypass the second image load and uso node if you just want to use one.Bonus upscale and refine stepThe resample tends to refine details and can fix small problems if your lucky (odd fingers, transitions, etc). Enable the last group to upscale the image x2, add in a bit of noise, and then resample. Optional choose mode allows you to filter out the dud generations. You might want to play with the denoise, and reduce it if the resample is changing more than you want. Bump it up if you like what it's doing but too high and you're just starting from scratch. If ram runs out try making the resample sampler slice the image 2/2, slower but usually works.Runtime: approx 15min on a 4060 Ti (16g) to generate a batch of 9

Retouch | Realistic skin
This workflow is for portrait retouching, with the function of repairing skin blemishes while restoring the skin's texture.No LoRA models of any kind are required; only the FLUX model needs to be loaded.Of course, I have already deployed this workflow on the RH platform, and you can try it out right now.link: Retouch | Realistic skin - RunningHub AI AppsOpen the link: https://www.runninghub.ai/?inviteCode=unskapu0.Register and get 500 RH coins, and you can generate a large number of images and videos for free!For more practical workflows, please visit my homepage:Tfeed Creator Profile | Civitai

Automatic Hand Fixer - Auto Masking One-Click Workflow for Perfect Hands (Flux Fill)
⚡ Flux Fill Automatic Hand Fixer Workflow ⚡WF Features:✨ True One-Click Operation (Load Image & Run) || Universal Image Support || Auto-Hand Detection || Multi Hand Fix || Smart Masking Engine || Flux Fill Precision || Zero Manual Painting 👀We’ve all been there: You have the perfect shot, but the hands look like a pile of spaghetti or a bunch of sausages. Whether it was generated with SDXL, Pony, Flux, Z-Image, any other model or even if it's an old legacy render – fixing hands has always been a manual struggle.This workflow changes the game. It doesn't matter where your image came from, this is the final polish every creator needs in their toolkit.✨ What makes it special?This isn't just another inpainting setup. It’s a fully automated surgical strike on bad anatomy.Universal Compatibility: Works with any input image, regardless of the original model or source.Auto-Detection Magic: A specialized node identifies hands and generates a precise mask automatically. No more clumsy manual painting!Flux Fill Power: It utilizes the state-of-the-art Flux Fill logic to redraw hands with incredible realism, correct finger counts and matching textures.My countless tests have shown that we have a success rate of 80-90% on the first attempt.The Workflow is simple: Drag & Drop. Hit Run. Watch the magic happen. Perfect for those who value quality but hate wasting time on tedious masking.🚀 What do you need to get started right away?This Workflow - just download it, unzip the file and load the *.json into ComfyUIFlux Fill Model: flux1-fill-dev-fp8.safetensors (place in \models\diffusion_models\)Clip Text Encoder File 1: clip_l.safetensors (place in \models\clip\)Clip Text Encoder File 2: t5xxl_fp16.safetensors (place in \models\clip\)The VAE file: ae.safetensors (place in \models\vae\)If you used FLUX before then you already have the VAE and both text encoder files and don't need to download them again. But if you prefer more details you can try out the UltraFlux-v1 VAE file.If you run a GPU with low VRAM you can also use the FP4 Flux Fill Model and the FP8 Version of the t5xxl Text Encoder.🚨 Make sure you use the latest stable ComfyUI Core version. Also don't forget to update the ComfyUI Frontend package manually and your Custom Nodes via ComfyUI Manager. Otherwise compatibility problems may occur and the workflow is not working properly.This version of the workflow was made with the following packages:ComfyUI Core v0.3.77ComfyUI Frontend v1.36.9ComfyUI Manager v3.39Python Version 3.12.10PyTorch Version 2.8.0+cu128All latest versions of the custom nodes listed belowPlease ensure that you use at least these versions. Otherwise, I cannot provide support if something is not working for you.❓ Do I need some special nodes to run this workflow?The nodes inside this workflow are common nodes. If ComfyUI still indicates a missing node just install it via ComfyUI Manager and restart briefly.Custom nodes used in this workflow:rgthree-comfyComfyUI-Flux-ContinuumHandFixer💡 Usage Tips:Plug & Play: You really don't need to configure much. Just drag and drop the image and hit "Run".Prompting: Don't tell the AI what to do (e.g. "fix bad hands"). Tell it what you want to see! Use prompts like "perfect female hand" or "perfect hands with red nails". Keep it simple and descriptive.You can play around and test with the guidance, steps and denoise values:>>> Guidance range: 30-50 (35-40 works best)>>> Steps range: 20-35 (25-30 is the sweet spot)>>> Denoise range: 0.9-1.0 (0.95 is the best value for me)Performance: Higher resolution input images will take more time to process.Multi-Hand Support: Yes, it detects and fixes multiple hands automatically!If you have ideas for optimization / new feature requests or just wanna say "thanks" feel free to leave a post in the comment section. If you have questions about this workflow, feel free to reach out to me on Discord anytime!💕 Don't forget to spread some love - hit the like button and follow me (also on Ko-Fi) to not miss any new updates and more workflows like this one! 👍If you like these workflows you can also buy me a coffee! ☕Have fun and feel free to post your fixed images in the gallery below! I would like to see what you do with this workflow!😊

Change the model and clip to GGUF, use two LORAs, and create a workflow that resembles the RX-93 Nu Gundam.
Change the model and clip to GGUF, use two LORAs, and create a workflow that resembles the RX-93 Nu Gundam.All you need to prepare is a GGUF model, two LoRa models, and a node.

Gundam Mecha Battlefield workflow2
Gundam generation workflow: A workflow that allows you to enter positive and negative prompts.

Seamless texture Tiling - Inpaint Offset Flux Fill
Never Found a good workflow for this.Creates a Transition between image xy borders to make every texture tileable.Offsets base texture image by 1/2 , creates a cross mask that is inpainted by flux fill.This is experimental and doesnt work with some textures which are not homogenous enough.Please feel free to improve. Values have to be adapted to texture. Fine textures need a small mask width and vice versa....Upscaling ist probaly better done with flux dev , as flux fill isnt the best model for that...Standard size is 1024*1024 upscaled 2x . Edit if you like.VRam needed about 16gb i guess. Feel free to use a quantized version or gguf flux fill if you dont have that much vram....Dont complain , if you dont have all the nodes. You will have to install them :)

Gundam Mecha Battlefield workflow
Model used: flux1-dev-Q8.gguf LoRA: Gundam.safetensors (0.70) + gundam-lora2.safetensors (0.20) Features: Supports negative prompts, high resolution 1232x1232, 50 steps, Guidance 4.0 This is a workflow for generating high-quality Gundams (SEED series/UC series) using Flux GGUF. Gundam Mecha LoRA1 https://civitai.com/models/2276066/gundam-mecha-lora-seed-and-uc-style Gundam Mecha LoRA2 https://civitai.com/models/2276097/gundam-mecha-lora2-seed-and-uc-style If you have one Flux model, you can use either Fp8 or GGUF, but we recommend GGUF Q8.

Flux + Ultimate SD Upscale + FaceDetailer
A Flux workflow with optional Ultimate SD Upscale and FaceDetailer.Upscale and FaceDetailer can be toggled on/off as needed.
Raz's Toolbox (Workflow and simple ComfyUI tools)
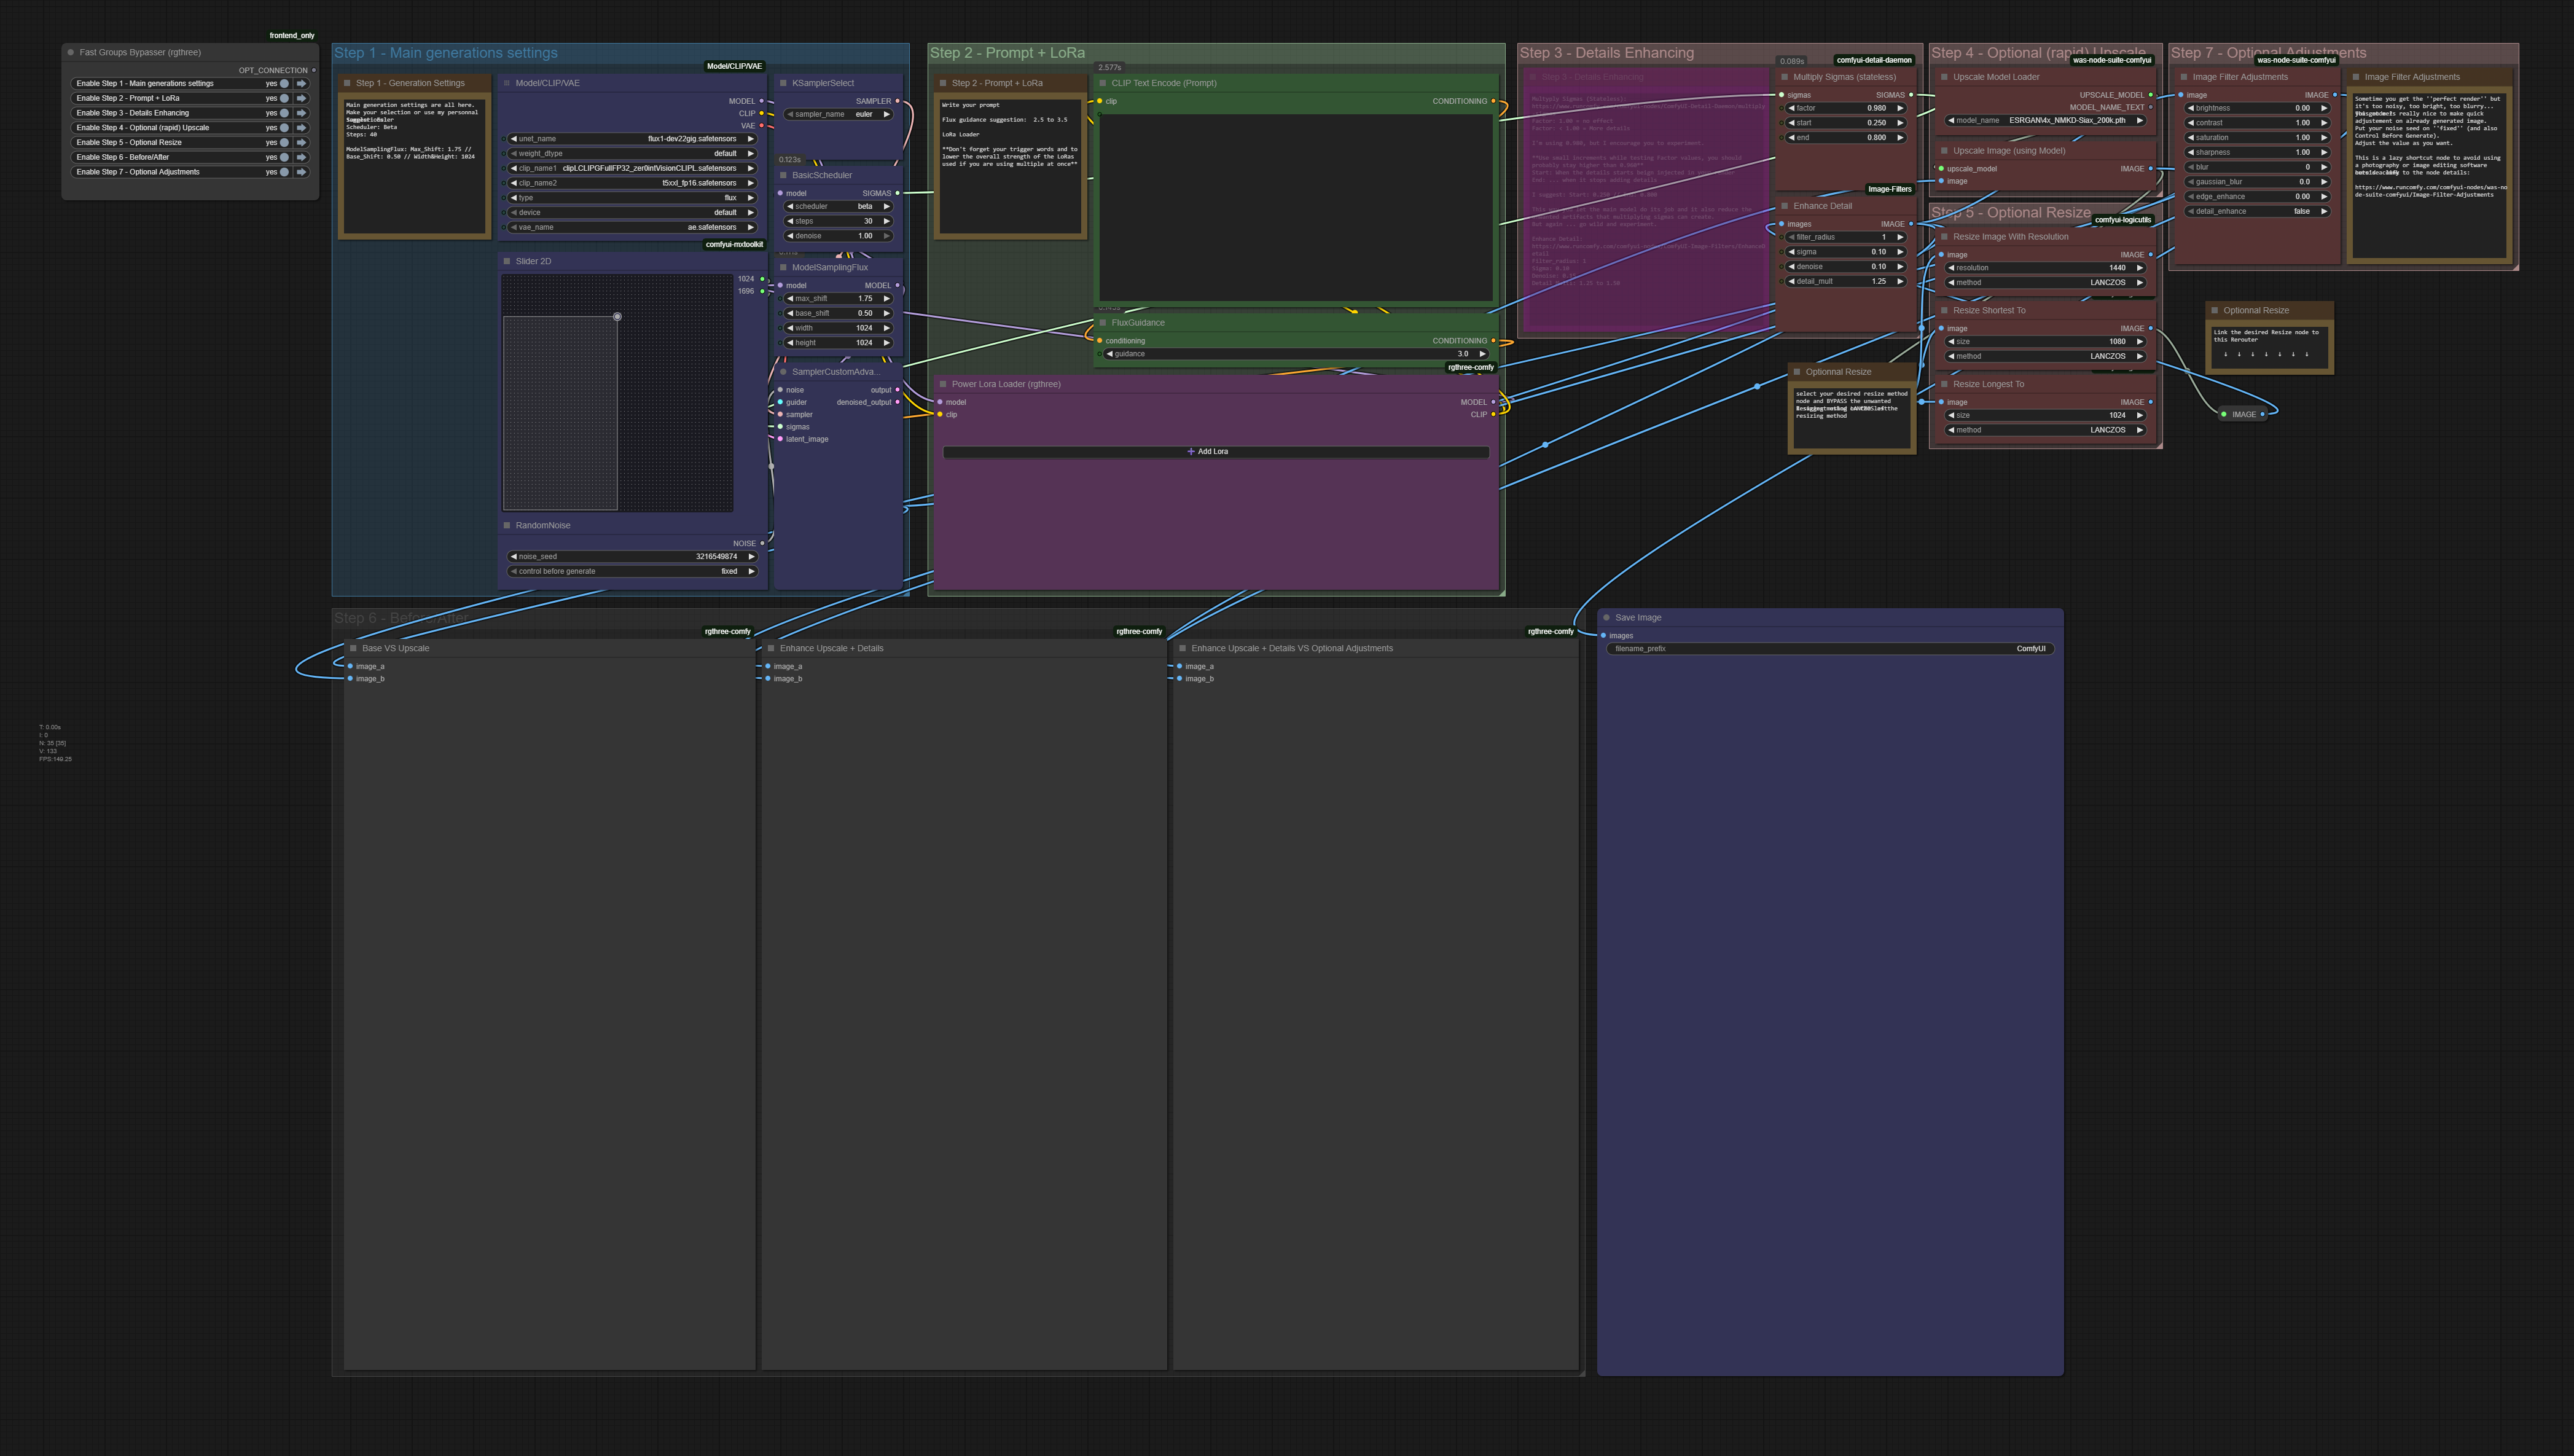
🔧 Raz’s ToolboxA modular collection of ComfyUI workflows and utility toolsBuild it your way. Break it your way. Improve it your way.Raz’s Toolbox is not a “one-button magic workflow.” It’s a set of modular, plug-and-play tools designed for people who like to experiment, customize, and push their renders further without sacrificing speed or simplicity.Each component can be used on its own or combined with others. You can merge them into your current workflow, replace specific nodes, or Frankenstein the whole thing until it screams. Everything is structured to be easily swappable, labeled clearly, and documented with notes based on how I personally use them.🎯 Core PhilosophyKeep it simpleMake it faster, not heavierLet the user decide how far to push itEncourage experimentation, not restrictionThis is meant for people who like control over their workflow, not for those chasing zero-click automation. Ideal for creators who build, test, train LoRAs, tweak batches, or just want more consistency without adding 10+ minutes per render.🔍 Modular “Choose Your Setup” StyleYou can:✔ Add a single node block to your existing workflow✔ Swap whole step sections (e.g., detail refining, upscale branch)✔ Stack multiple tweaks and build your own version✔ Or use the fully assembled example workflows as a starting point🚀 Ready To ExperimentTake what you need. Ignore what you don't. Test, break, improve.Raz’s Toolbox is here to give you building blocks, not rules.

ComfyUI — Flux.1 Advanced
Hello there and thanks for checking out this workflow!What's new in v27? : Major rework with new SubGraphs to streamline and compact the workflow even more, removal of outdated/broken nodes + fixes and optimizations all over!—Purpose—Built to provide an advanced, versatile and modular workflow for Flux with focus on efficiency, structure and information.It comes with many notes explaining node settings and recommendations, as well as general guides from instructions to troubleshooting.—Features—Convenient loaders for all common versions of Flux and Clip modelsFull metadata; recognized by CivitAILoRA supportSageAttention, EasyCache + Model Compile accelerationControlNet with Union supportFlux Tools LoRAs Canny + Depth (alt. to CNet based on LoRA)Flux Redux (similar to IPAdapter)PuLID (SVDQuant version only)Wildcard promptingInstallation and download guide for models and nodesmultiple passes with optional upscales— 1st : Detail Daemon + Variation Seed— 2nd : DD. + Tiled Diffusion / UltimateSDUpscale— ADetailer with dedicated LoRA Loader— Inpainting—Custom Nodes—ComfyUI-CrystoolsComfyUI-Custom-ScriptsComfyUI-Detail-DaemonComfyUI-GGUFComfyUI-Image-SaverComfyUI-Impact-PackComfyUI-Impact-SubpackComfyUI-Inspire-PackComfyUI-KJNodesComfyUI-mxToolkitComfyUI-nunchaku — SVDQuant version onlyComfyUI-TiledDiffusionComfyUI_Comfyroll_CustomNodescomfyui_controlnet_auxComfyUI_UltimateSDUpscalecg-use-everywherergthree-comfywas-node-suite-comfyuiAll of which can be installed through the ComfyUI-Manager—Troubleshooting—If nodes show up red (failing to load), check the 'Install Missing Custom Nodes' tab of the ComfyUI Manager for the missing node packs and install them.Please check if all custom node packs load properly after installing, i.e. no (IMPORT FAILED) messages next to any of them in the console upon ComfyUI startup.Always reload/drag'n'drop the original, downloaded workflow file into ComfyUI to reload an intact version of the workflow.→ The last opened workflow that appears on startup shows a cached version of the workflow, "remembering" group nodes that failed due to missing nodes as failed, keeping them broken even after having everything installed correctly.—Thanks—The workflow would not be possible as is without these custom node packs. If you want to support the custom node creators, give them a ⭐ on their github repos! Thank you!Feel free to ask questions, share improvements and suggestions in the comment section!Let me know if you encounter confusing points I can elaborate on in the next update!
🙇🏻♂️ BRAINLESS FLUX FLOW 👨🏻💻
¡BING BONG!🏴☠️ upvote 🏴☠️🎉 A T2I FLUX.1 D WORKFLOW! ™ 🎉Are other workflows broken and difficult to install?Is your 8GB+ Graphics Card ready for some action?First time using Flux, or ComfyUI? Use This! (👍🏻)ComfyUI (Native)https://www.comfy.org/download~ Yours Truly, dgen (⏱️160s~ images w/ 4060ti)Features..Easy-to-Use Resolution Presets!Negative Prompt for SFW!Native Upscaling Integration!FaceDetailer for Better Faces!LoraLoader for LoRA Simplicity!Ultralytics for BBOX & SEGM models!Install Steps..Install ComfyUIDownload WorkflowExtract Workflow (.zip)"Workflow" -> "Open""Manager" -> "Install Custom Nodes"Install Dependencies (links below!)Install a Flux.1 D model (fuxCapacity, unstableEvolution)"Edit" -> "Refresh Node Definitions" or "Restart ComfyUI"Dependencies:*/models/checkpoints/YOUR FAVORITE FLUX.1 D MODEL*/models/ultralytics/bbox/face_yolov8m.pt*/models/vae/flux_vae.safetensors*/models/text_encoders/clip_g.safetensors*/models/text_encoders/clip_l.safetensors*/models/text_encoders/t5xxl_fp8_e4m3fn.safetensors*/models/sams/sam_vit_b_01ec64.pthHow to Use:Type what you want to see in Main PromptLook at "Resolution Size" nodeSet "Preset User" preferred resolutionSet "BasicScheduler" steps (12-32)Set "KSamplerSelect" sampler_nameSet "Image Saver Simple" extension (webp, jpeg)Hit the "Queue" buttonModifying the Workflow:Performance: Bypass "Ultralytics" + "SAMLoader"Performance: BasicScheduler "Steps" set from 12-32Performance: FaceDetailer settings (Used for Ultra/SAM)Performance: SageAttention is possible; set it up yourselfEaster Egg: ComfyUI (Kijai - EasyWAN)https://github.com/Zuntan03/EasyWanVideo
Nunchaku Render & Edit
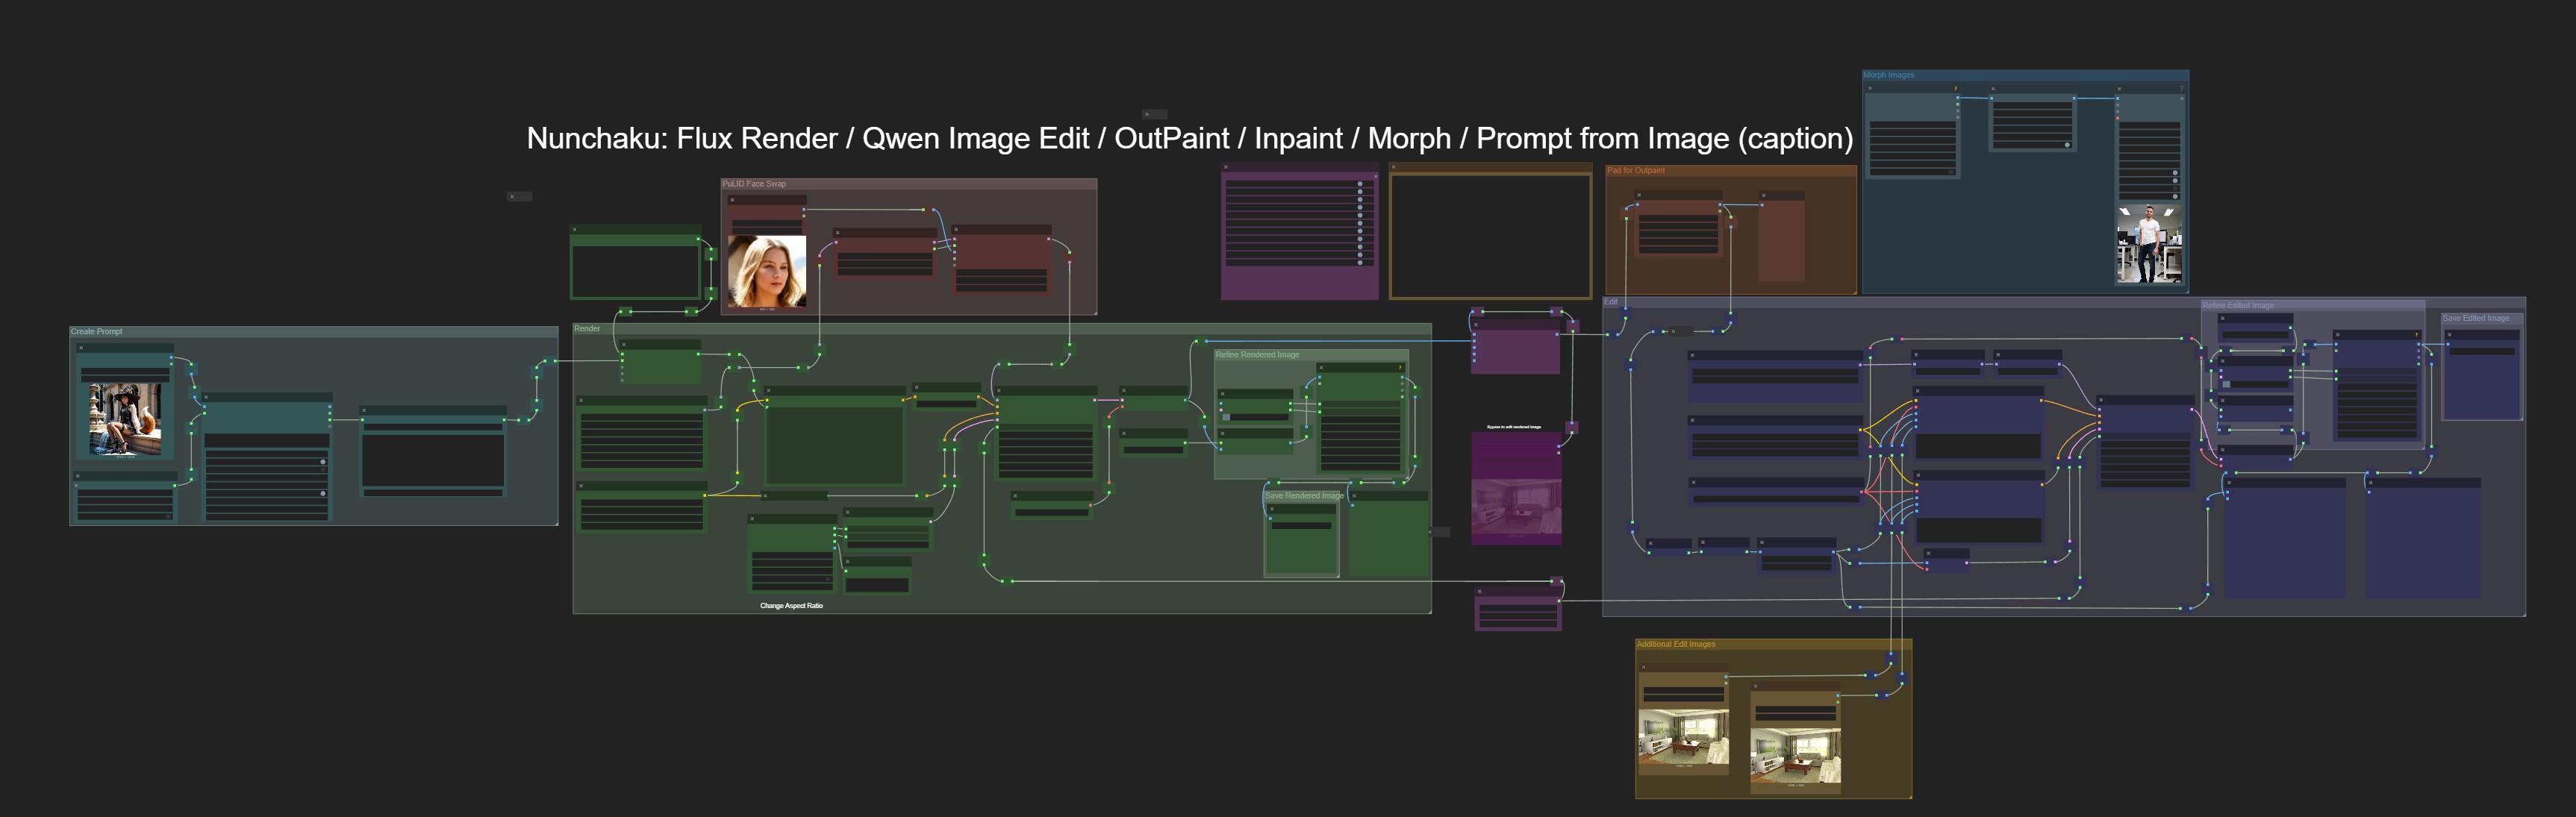
A simple and readable ComfyUI workflow integrating Nunchaku Flux, PuLID, and Qwen-Image-Edit for seamless face injection, image-to-image, and text-guided refinements.Includes:🔧 Flux-based base model pipeline with CFGNorm + AuraFlow sampling🧠 Qwen Image Edit+ conditioning for multi-image prompts🪞 PuLID v2 face preservation and re-targeting⚙️ Easy-Use seed + cache management📈 One-click upscaling and clean GPU memory stepsIdeal for cinematic portraits, photoreal restyling, or iterative refinement workflows.Dependencies: ComfyUI-Nunchaku, ControlAltAI Nodes, rgthree, Easy-Use, core ≥ 0.3.66.
Style Transfer - Theme Fixed [Dual Style Reference Images] uso
This is a workflow that can maintain the original image's composition while combining the styles of two reference images to redraw a new imageUsage1. Upload the original image and the style reference image2. Fill in the prompt words [can be left blank]You can click on 【Test Effect】 and see the result within about 2 minutes. If you are satisfied with the effect, you can then download the workflow to deploy locally!
Style Transfer - Theme Fixed [Single Reference Image] uso
This is a workflow that can maintain the original image composition while redrawing in the style of the reference image1. Upload the original image and the style reference imageUsage2. Fill in the prompt words [can be left blank]You can click [Test Effect] and it only takes about 1 minute to see the result. If you are satisfied with the effect, you can download the workflow to deploy locally!

OneReward Object Removal
🎥 YouTube Video TutorialWant to know what this workflow actually does and how to start fast?This video explains what the tool is, how to launch the workflow instantly, and shares my core design logic — no local setup, no complicated environment. Everything starts directly on RunningHub, so you can experience it in action first.👉 YouTube Tutorial:https://youtu.be/rN0VDqWHHw0Before you begin, I recommend watching the video thoroughly — getting the full context helps you understand the tool faster and avoid common detours.⚙️ RunningHub WorkflowTry the workflow online right now — no installation required.👉 Workflow:https://www.runninghub.ai/post/1989974232891355137/?inviteCode=rh-v1111If the results meet your expectations, you can later deploy it locally for customization.🎁 Fan Benefits:Register to get 1000 points + daily login 100 points — enjoy 4090 performance and 48 GB super power!📺 Bilibili Updates (Mainland China & Asia-Pacific)If you’re in the Asia-Pacific region, you can watch the video below to see the workflow demonstration and creative breakdown.📺 Bilibili Video:https://www.bilibili.com/video/BV1EJCdBFEuP/☕ Support Me on Ko-fiIf you find my content helpful and want to support future creations, you can buy me a coffee ☕.Every bit of support helps me keep creating — just like a spark that can ignite a blazing flame.👉 Ko-fi:https://ko-fi.com/aiksk💼 Business ContactFor collaboration or inquiries, please contact aiksk95 on WeChat。🎥 YouTube 视频教程想了解这个工作流到底是怎样的工具,以及如何快速启动?视频主要介绍 工具定位、快速启动方法 和 我的构筑思路。我们会直接在 RunningHub 上进行演示,让你第一时间看到实际效果。👉 YouTube 教程:https://youtu.be/rN0VDqWHHw0开始前建议尽量完整地观看视频 —— 把握整体思路会更快上手,也能少走常见弯路。⚙️ 在线体验工作流现在就可以在线体验,无需安装。👉 工作流:https://www.runninghub.ai/post/1989974232891355137/?inviteCode=rh-v1111打开上方链接即可直接运行该工作流,实时查看生成效果。如果觉得效果理想,你也可以在本地进行自定义部署。🎁 粉丝福利:注册即送 1000 积分,每日登录 100 积分,畅玩 4090 体验 48 G 超级性能!📺 Bilibili 更新(中国大陆及南亚太地区)如果你在中国大陆或南亚太地区,可以通过下方视频查看该工作流的实测效果与构思讲解。📺 B站视频:https://www.bilibili.com/video/BV1EJCdBFEuP/我会在 夸克网盘 持续更新模型资源:👉 https://pan.quark.cn/s/20c6f6f8d87b这些资源主要面向本地用户,方便进行创作与学习。
Style transfer [Single reference image] Text-to-image version-uso
This is a workflow for generating new images from text using the style of a reference imageUsage1、Upload the style reference image2、Fill in the promptYou can click 【Test Effect】The entire process only takes about 1 minute. If you are satisfied with the result, you can download the workflow to your local machine for deployment!
Style transfer [Dual reference image] Text-to-image version-uso
This is a workflow for generating new images based on the style of a reference image, using text-to-image generation1、Upload the style reference imageUsage2、Fill in the promptYou can click 【Test Effect】The entire process only takes about 1 minute. If you are satisfied with the result, you can download the workflow to your local machine for deployment!

Real2Life – Anime/Illustration to Photoreal Workflow
A simple but powerful ComfyUI workflow that turns any 2D illustration, anime frame, comic panel or drawing into a realistic photo.It uses Florence 2 to automatically caption the input image and convert it into a clean prompt, then generates a photoreal result with Flux 1 Dev + Flux Redux, a custom LoRA, Control Net for a better fidelity poses, Face Detailer for higher fidelity faces, and a light upscale with Ultimate SD Upscaler for extra sharpness.Just drop your 2D image in, hit generate, and get a realistic version in a few steps.This workflow includes a LoRA that is not created by me.All credits for this LoRA belong to its original author:👉 AIDigitalMediaAgency📎 LoRA download: https://civitai.com/models/726732/realistic-people-photograph-fluxI'm actually working on a v2 where no LoRA will be required at all.

DyPE + Flux Ultra-Resolution Upscale
🎥 YouTube Video TutorialWant to know what this workflow actually does and how to start fast?This video explains what the tool is, how to launch the workflow instantly, and shares my core design logic — no local setup, no complicated environment.Everything starts directly on RunningHub, so you can experience it in action first.👉 YouTube Tutorial: https://youtu.be/pjLPTAkwp4EBefore you begin, I recommend watching the video thoroughly — getting the full context helps you understand the tool faster and avoid common detours.⚙️ RunningHub WorkflowTry the workflow online right now — no installation required.👉 Workflow: https://www.runninghub.ai/post/1987808205147451394/?inviteCode=rh-v1111If the results meet your expectations, you can later deploy it locally for customization.🎁 Fan Benefits:Register to get 1000 points + daily login 100 points — enjoy 4090 performance and 48 GB super power!📺 Bilibili Updates (Mainland China & Asia-Pacific)If you’re in the Asia-Pacific region, you can watch the video below to see the workflow demonstration and creative breakdown.📺 Bilibili Video: https://www.bilibili.com/video/BV1H9CcB7Eh3/☕ Support Me on Ko-fiIf you find my content helpful and want to support future creations, you can buy me a coffee ☕.Every bit of support helps me keep creating — just like a spark that can ignite a blazing flame.👉 Ko-fi: https://ko-fi.com/aiksk💼 Business ContactFor collaboration or inquiries, please contact aiksk95 on WeChat.🎥 YouTube 视频教程想了解这个工作流到底是怎样的工具,以及如何快速启动?视频主要介绍 工具定位、快速启动方法 和 我的构筑思路。我们会直接在 RunningHub 上进行演示,让你第一时间看到实际效果。👉 YouTube 教程: https://youtu.be/pjLPTAkwp4E开始前建议尽量完整地观看视频 —— 把握整体思路会更快上手,也能少走常见弯路。⚙️ 在线体验工作流现在就可以在线体验,无需安装。👉 工作流: https://www.runninghub.ai/post/1987808205147451394/?inviteCode=rh-v1111打开上方链接即可直接运行该工作流,实时查看生成效果。如果觉得效果理想,你也可以在本地进行自定义部署。🎁 粉丝福利:注册即送 1000 积分,每日登录 100 积分,畅玩 4090 体验 48 G 超级性能!📺 Bilibili 更新(中国大陆及南亚太地区)如果你在中国大陆或南亚太地区,可以通过下方视频查看该工作流的实测效果与构思讲解。📺 B站视频: https://www.bilibili.com/video/BV1H9CcB7Eh3/我会在 夸克网盘 持续更新模型资源:👉 https://pan.quark.cn/s/20c6f6f8d87b这些资源主要面向本地用户,方便进行创作与学习。

DyPE + Flux 4K Reverse Prompt Text-to-Image
🎥 YouTube Video TutorialWant to know what this workflow actually does and how to start fast?This video explains what the tool is, how to launch the workflow instantly, and shares my core design logic — no local setup, no complicated environment.Everything starts directly on RunningHub, so you can experience it in action first.👉 YouTube Tutorial: https://youtu.be/Nt8HaA0tUjkBefore you begin, I recommend watching the video thoroughly — getting the full context helps you understand the tool faster and avoid common detours.⚙️ RunningHub WorkflowTry the workflow online right now — no installation required.👉 Workflow: https://www.runninghub.ai/post/1986344333613944833/?inviteCode=rh-v1111If the results meet your expectations, you can later deploy it locally for customization.🎁 Fan Benefits:Register to get 1000 points + daily login 100 points — enjoy 4090 performance and 48 GB super power!📺 Bilibili Updates (Mainland China & Asia-Pacific)If you’re in the Asia-Pacific region, you can watch the video below to see the workflow demonstration and creative breakdown.📺 Bilibili Video: https://www.bilibili.com/video/BV1Ms2FBFEwZ/☕ Support Me on Ko-fiIf you find my content helpful and want to support future creations, you can buy me a coffee ☕.Every bit of support helps me keep creating — just like a spark that can ignite a blazing flame.👉 Ko-fi: https://ko-fi.com/aiksk💼 Business ContactFor collaboration or inquiries, please contact aiksk95 on WeChat.🎥 YouTube 视频教程想了解这个工作流到底是怎样的工具,以及如何快速启动?视频主要介绍 工具定位、快速启动方法 和 我的构筑思路。我们会直接在 RunningHub 上进行演示,让你第一时间看到实际效果。👉 YouTube 教程: https://youtu.be/Nt8HaA0tUjk开始前建议尽量完整地观看视频 —— 把握整体思路会更快上手,也能少走常见弯路。⚙️ 在线体验工作流现在就可以在线体验,无需安装。👉 工作流: https://www.runninghub.ai/post/1986344333613944833/?inviteCode=rh-v1111打开上方链接即可直接运行该工作流,实时查看生成效果。如果觉得效果理想,你也可以在本地进行自定义部署。🎁 粉丝福利:注册即送 1000 积分,每日登录 100 积分,畅玩 4090 体验 48 G 超级性能!📺 Bilibili 更新(中国大陆及南亚太地区)如果你在中国大陆或南亚太地区,可以通过下方视频查看该工作流的实测效果与构思讲解。📺 B站视频: https://www.bilibili.com/video/BV1Ms2FBFEwZ/我会在 夸克网盘 持续更新模型资源:👉 https://pan.quark.cn/s/20c6f6f8d87b这些资源主要面向本地用户,方便进行创作与学习。

DyPE + Flux 4K Image-to-Image
🎥 YouTube Video TutorialWant to know what this workflow actually does and how to start fast?This video explains what the tool is, how to launch the workflow instantly, and shares my core design logic — no local setup, no complicated environment.Everything starts directly on RunningHub, so you can experience it in action first.👉 YouTube Tutorial: https://youtu.be/Nt8HaA0tUjkBefore you begin, I recommend watching the video thoroughly — getting the full context helps you understand the tool faster and avoid common detours.⚙️ RunningHub WorkflowTry the workflow online right now — no installation required.👉 Workflow: https://www.runninghub.ai/post/1986344345538363393/?inviteCode=rh-v1111If the results meet your expectations, you can later deploy it locally for customization.🎁 Fan Benefits:Register to get 1000 points + daily login 100 points — enjoy 4090 performance and 48 GB super power!📺 Bilibili Updates (Mainland China & Asia-Pacific)If you’re in the Asia-Pacific region, you can watch the video below to see the workflow demonstration and creative breakdown.📺 Bilibili Video: https://www.bilibili.com/video/BV1Ms2FBFEwZ/☕ Support Me on Ko-fiIf you find my content helpful and want to support future creations, you can buy me a coffee ☕.Every bit of support helps me keep creating — just like a spark that can ignite a blazing flame.👉 Ko-fi: https://ko-fi.com/aiksk💼 Business ContactFor collaboration or inquiries, please contact aiksk95 on WeChat.🎥 YouTube 视频教程想了解这个工作流到底是怎样的工具,以及如何快速启动?视频主要介绍 工具定位、快速启动方法 和 我的构筑思路。我们会直接在 RunningHub 上进行演示,让你第一时间看到实际效果。👉 YouTube 教程: https://youtu.be/Nt8HaA0tUjk开始前建议尽量完整地观看视频 —— 把握整体思路会更快上手,也能少走常见弯路。⚙️ 在线体验工作流现在就可以在线体验,无需安装。👉 工作流: https://www.runninghub.ai/post/1986344345538363393/?inviteCode=rh-v1111打开上方链接即可直接运行该工作流,实时查看生成效果。如果觉得效果理想,你也可以在本地进行自定义部署。🎁 粉丝福利:注册即送 1000 积分,每日登录 100 积分,畅玩 4090 体验 48 G 超级性能!📺 Bilibili 更新(中国大陆及南亚太地区)如果你在中国大陆或南亚太地区,可以通过下方视频查看该工作流的实测效果与构思讲解。📺 B站视频: https://www.bilibili.com/video/BV1Ms2FBFEwZ/我会在 夸克网盘 持续更新模型资源:👉 https://pan.quark.cn/s/20c6f6f8d87b这些资源主要面向本地用户,方便进行创作与学习。

DyPE + Flux 4K One-Click Generation
🎥 YouTube Video TutorialWant to know what this workflow actually does and how to start fast?This video explains what the tool is, how to launch the workflow instantly, and shares my core design logic — no local setup, no complicated environment.Everything starts directly on RunningHub, so you can experience it in action first.👉 YouTube Tutorial: https://youtu.be/Nt8HaA0tUjkBefore you begin, I recommend watching the video thoroughly — getting the full context helps you understand the tool faster and avoid common detours.⚙️ RunningHub WorkflowTry the workflow online right now — no installation required.👉 Workflow: https://www.runninghub.ai/post/1986344354744860674/?inviteCode=rh-v1111If the results meet your expectations, you can later deploy it locally for customization.🎁 Fan Benefits:Register to get 1000 points + daily login 100 points — enjoy 4090 performance and 48 GB super power!📺 Bilibili Updates (Mainland China & Asia-Pacific)If you’re in the Asia-Pacific region, you can watch the video below to see the workflow demonstration and creative breakdown.📺 Bilibili Video: https://www.bilibili.com/video/BV1Ms2FBFEwZ/☕ Support Me on Ko-fiIf you find my content helpful and want to support future creations, you can buy me a coffee ☕.Every bit of support helps me keep creating — just like a spark that can ignite a blazing flame.👉 Ko-fi: https://ko-fi.com/aiksk💼 Business ContactFor collaboration or inquiries, please contact aiksk95 on WeChat.🎥 YouTube 视频教程想了解这个工作流到底是怎样的工具,以及如何快速启动?视频主要介绍 工具定位、快速启动方法 和 我的构筑思路。我们会直接在 RunningHub 上进行演示,让你第一时间看到实际效果。👉 YouTube 教程: https://youtu.be/Nt8HaA0tUjk开始前建议尽量完整地观看视频 —— 把握整体思路会更快上手,也能少走常见弯路。⚙️ 在线体验工作流现在就可以在线体验,无需安装。👉 工作流: https://www.runninghub.ai/post/1986344354744860674/?inviteCode=rh-v1111打开上方链接即可直接运行该工作流,实时查看生成效果。如果觉得效果理想,你也可以在本地进行自定义部署。🎁 粉丝福利:注册即送 1000 积分,每日登录 100 积分,畅玩 4090 体验 48 G 超级性能!📺 Bilibili 更新(中国大陆及南亚太地区)如果你在中国大陆或南亚太地区,可以通过下方视频查看该工作流的实测效果与构思讲解。📺 B站视频: https://www.bilibili.com/video/BV1Ms2FBFEwZ/我会在 夸克网盘 持续更新模型资源:👉 https://pan.quark.cn/s/20c6f6f8d87b这些资源主要面向本地用户,方便进行创作与学习。

Achieve More Stable Transfer - (Universal Transfer + Union-Pro-2.0)
🎥 YouTube Video TutorialWant to know what this workflow actually does and how to start fast?This video explains what the tool is, how to launch the workflow instantly, and shares my core design logic — no local setup, no complicated environment.Everything starts directly on RunningHub, so you can experience it in action first.👉 YouTube Tutorial: https://www.youtube.com/watch?v=tUrXYISl3McBefore you begin, I recommend watching the video thoroughly — getting the full context helps you understand the tool faster and avoid common detours.⚙️ RunningHub WorkflowTry the workflow online right now — no installation required.👉 Workflow: https://www.runninghub.ai/post/1922178231896588290/?inviteCode=rh-v1111If the results meet your expectations, you can later deploy it locally for customization.🎁 Fan Benefits: Register to get 1000 points + daily login 100 points — enjoy 4090 performance and 48 GB super power!📺 Bilibili Updates (Mainland China & Asia-Pacific)If you’re in the Asia-Pacific region, you can watch the video below to see the workflow demonstration and creative breakdown.📺 Bilibili Video: https://www.bilibili.com/video/BV1LMEFzXEEm/☕ Support Me on Ko-fiIf you find my content helpful and want to support future creations, you can buy me a coffee ☕.Every bit of support helps me keep creating — just like a spark that can ignite a blazing flame.👉 Ko-fi: https://ko-fi.com/aiksk💼 Business ContactFor collaboration or inquiries, please contact aiksk95 on WeChat.🎥 YouTube 视频教程想了解这个工作流到底是怎样的工具,以及如何快速启动?视频主要介绍 工具定位、快速启动方法 和 我的构筑思路。我们会直接在 RunningHub 上进行演示,让你第一时间看到实际效果。👉 YouTube 教程: https://www.youtube.com/watch?v=tUrXYISl3Mc开始前建议尽量完整地观看视频 —— 把握整体思路会更快上手,也能少走常见弯路。⚙️ 在线体验工作流现在就可以在线体验,无需安装。👉 工作流: https://www.runninghub.ai/post/1922178231896588290/?inviteCode=rh-v1111打开上方链接即可直接运行该工作流,实时查看生成效果。如果觉得效果理想,你也可以在本地进行自定义部署。🎁 粉丝福利: 注册即送 1000 积分,每日登录 100 积分,畅玩 4090 体验 48 G 超级性能!📺 Bilibili 更新(中国大陆及南亚太地区)如果你在中国大陆或南亚太地区,可以通过下方视频查看该工作流的实测效果与构思讲解。📺 B站视频: https://www.bilibili.com/video/BV1LMEFzXEEm/我会在 夸克网盘 持续更新模型资源:👉 https://pan.quark.cn/s/20c6f6f8d87b这些资源主要面向本地用户,方便进行创作与学习。
ACE-Step Music Generation
🎥 YouTube Video TutorialWant to know what this workflow actually does and how to start fast?This video explains what the tool is, how to launch the workflow instantly, and shares my core design logic — no local setup, no complicated environment.Everything starts directly on RunningHub, so you can experience it in action first.👉 YouTube Tutorial: https://www.youtube.com/watch?v=i2IJQYxAVtMBefore you begin, I recommend watching the video thoroughly — getting the full context helps you understand the tool faster and avoid common detours.⚙️ RunningHub WorkflowTry the workflow online right now — no installation required.👉 Workflow: https://www.runninghub.ai/post/1920352067703996417/?inviteCode=rh-v1111If the results meet your expectations, you can later deploy it locally for customization.🎁 Fan Benefits: Register to get 1000 points + daily login 100 points — enjoy 4090 performance and 48 GB super power!📺 Bilibili Updates (Mainland China & Asia-Pacific)If you’re in the Asia-Pacific region, you can watch the video below to see the workflow demonstration and creative breakdown.📺 Bilibili Video: https://www.bilibili.com/video/BV1De5LzLEb5/☕ Support Me on Ko-fiIf you find my content helpful and want to support future creations, you can buy me a coffee ☕.Every bit of support helps me keep creating — just like a spark that can ignite a blazing flame.👉 Ko-fi: https://ko-fi.com/aiksk💼 Business ContactFor collaboration or inquiries, please contact aiksk95 on WeChat.🎥 YouTube 视频教程想了解这个工作流到底是怎样的工具,以及如何快速启动?视频主要介绍 工具定位、快速启动方法 和 我的构筑思路。我们会直接在 RunningHub 上进行演示,让你第一时间看到实际效果。👉 YouTube 教程: https://www.youtube.com/watch?v=i2IJQYxAVtM开始前建议尽量完整地观看视频 —— 把握整体思路会更快上手,也能少走常见弯路。⚙️ 在线体验工作流现在就可以在线体验,无需安装。👉 工作流: https://www.runninghub.ai/post/1920352067703996417/?inviteCode=rh-v1111打开上方链接即可直接运行该工作流,实时查看生成效果。如果觉得效果理想,你也可以在本地进行自定义部署。🎁 粉丝福利: 注册即送 1000 积分,每日登录 100 积分,畅玩 4090 体验 48 G 超级性能!📺 Bilibili 更新(中国大陆及南亚太地区)如果你在中国大陆或南亚太地区,可以通过下方视频查看该工作流的实测效果与构思讲解。📺 B站视频: https://www.bilibili.com/video/BV1De5LzLEb5/我会在 夸克网盘 持续更新模型资源:👉 https://pan.quark.cn/s/20c6f6f8d87b这些资源主要面向本地用户,方便进行创作与学习。

Step1X-Edit / ICEdit Comparison Test
🎥 YouTube Video TutorialWant to know what this workflow actually does and how to start fast?This video explains what the tool is, how to launch the workflow instantly, and shares my core design logic — no local setup, no complicated environment.Everything starts directly on RunningHub, so you can experience it in action first.👉 YouTube Tutorial: https://www.youtube.com/watch?v=W-WmNd8vhTQBefore you begin, I recommend watching the video thoroughly — getting the full context helps you understand the tool faster and avoid common detours.⚙️ RunningHub WorkflowTry the workflow online right now — no installation required.👉 Workflow: https://www.runninghub.ai/post/1920116976738304001/?inviteCode=rh-v1111If the results meet your expectations, you can later deploy it locally for customization.🎁 Fan Benefits: Register to get 1000 points + daily login 100 points — enjoy 4090 performance and 48 GB super power!📺 Bilibili Updates (Mainland China & Asia-Pacific)If you’re in the Asia-Pacific region, you can watch the video below to see the workflow demonstration and creative breakdown.📺 Bilibili Video: https://www.bilibili.com/video/BV1mUVmzwEvC/☕ Support Me on Ko-fiIf you find my content helpful and want to support future creations, you can buy me a coffee ☕.Every bit of support helps me keep creating — just like a spark that can ignite a blazing flame.👉 Ko-fi: https://ko-fi.com/aiksk💼 Business ContactFor collaboration or inquiries, please contact aiksk95 on WeChat.🎥 YouTube 视频教程想了解这个工作流到底是怎样的工具,以及如何快速启动?视频主要介绍 工具定位、快速启动方法 和 我的构筑思路。我们会直接在 RunningHub 上进行演示,让你第一时间看到实际效果。👉 YouTube 教程: https://www.youtube.com/watch?v=W-WmNd8vhTQ开始前建议尽量完整地观看视频 —— 把握整体思路会更快上手,也能少走常见弯路。⚙️ 在线体验工作流现在就可以在线体验,无需安装。👉 工作流: https://www.runninghub.ai/post/1920116976738304001/?inviteCode=rh-v1111打开上方链接即可直接运行该工作流,实时查看生成效果。如果觉得效果理想,你也可以在本地进行自定义部署。🎁 粉丝福利: 注册即送 1000 积分,每日登录 100 积分,畅玩 4090 体验 48 G 超级性能!📺 Bilibili 更新(中国大陆及南亚太地区)如果你在中国大陆或南亚太地区,可以通过下方视频查看该工作流的实测效果与构思讲解。📺 B站视频: https://www.bilibili.com/video/BV1mUVmzwEvC/我会在 夸克网盘 持续更新模型资源:👉 https://pan.quark.cn/s/20c6f6f8d87b这些资源主要面向本地用户,方便进行创作与学习。

ICEdit Image Editing
🎥 YouTube Video TutorialWant to know what this workflow actually does and how to start fast?This video explains what the tool is, how to launch the workflow instantly, and shares my core design logic — no local setup, no complicated environment.Everything starts directly on RunningHub, so you can experience it in action first.👉 YouTube Tutorial: https://www.youtube.com/watch?v=W-WmNd8vhTQBefore you begin, I recommend watching the video thoroughly — getting the full context helps you understand the tool faster and avoid common detours.⚙️ RunningHub WorkflowTry the workflow online right now — no installation required.👉 Workflow: https://www.runninghub.ai/post/1919467308178411521/?inviteCode=rh-v1111If the results meet your expectations, you can later deploy it locally for customization.🎁 Fan Benefits: Register to get 1000 points + daily login 100 points — enjoy 4090 performance and 48 GB super power!📺 Bilibili Updates (Mainland China & Asia-Pacific)If you’re in the Asia-Pacific region, you can watch the video below to see the workflow demonstration and creative breakdown.📺 Bilibili Video: https://www.bilibili.com/video/BV1mUVmzwEvC/☕ Support Me on Ko-fiIf you find my content helpful and want to support future creations, you can buy me a coffee ☕.Every bit of support helps me keep creating — just like a spark that can ignite a blazing flame.👉 Ko-fi: https://ko-fi.com/aiksk💼 Business ContactFor collaboration or inquiries, please contact aiksk95 on WeChat.🎥 YouTube 视频教程想了解这个工作流到底是怎样的工具,以及如何快速启动?视频主要介绍 工具定位、快速启动方法 和 我的构筑思路。我们会直接在 RunningHub 上进行演示,让你第一时间看到实际效果。👉 YouTube 教程: https://www.youtube.com/watch?v=W-WmNd8vhTQ开始前建议尽量完整地观看视频 —— 把握整体思路会更快上手,也能少走常见弯路。⚙️ 在线体验工作流现在就可以在线体验,无需安装。👉 工作流: https://www.runninghub.ai/post/1919467308178411521/?inviteCode=rh-v1111打开上方链接即可直接运行该工作流,实时查看生成效果。如果觉得效果理想,你也可以在本地进行自定义部署。🎁 粉丝福利: 注册即送 1000 积分,每日登录 100 积分,畅玩 4090 体验 48 G 超级性能!📺 Bilibili 更新(中国大陆及南亚太地区)如果你在中国大陆或南亚太地区,可以通过下方视频查看该工作流的实测效果与构思讲解。📺 B站视频: https://www.bilibili.com/video/BV1mUVmzwEvC/我会在 夸克网盘 持续更新模型资源:👉 https://pan.quark.cn/s/20c6f6f8d87b这些资源主要面向本地用户,方便进行创作与学习。

Flex.2-preview + Redux-512 Strong Reference
🎥 YouTube Video TutorialWant to know what this workflow actually does and how to start fast?This video explains what the tool is, how to launch the workflow instantly, and shares my core design logic — no local setup, no complicated environment.Everything starts directly on RunningHub, so you can experience it in action first.👉 YouTube Tutorial: https://www.youtube.com/watch?v=PsdexaXO2V4Before you begin, I recommend watching the video thoroughly — getting the full context helps you understand the tool faster and avoid common detours.⚙️ RunningHub WorkflowTry the workflow online right now — no installation required.👉 Workflow: https://www.runninghub.ai/post/1917238666479992833/?inviteCode=rh-v1111If the results meet your expectations, you can later deploy it locally for customization.🎁 Fan Benefits: Register to get 1000 points + daily login 100 points — enjoy 4090 performance and 48 GB super power!📺 Bilibili Updates (Mainland China & Asia-Pacific)If you’re in the Asia-Pacific region, you can watch the video below to see the workflow demonstration and creative breakdown.📺 Bilibili Video: https://www.bilibili.com/video/BV1LxGqz5EeW/☕ Support Me on Ko-fiIf you find my content helpful and want to support future creations, you can buy me a coffee ☕.Every bit of support helps me keep creating — just like a spark that can ignite a blazing flame.👉 Ko-fi: https://ko-fi.com/aiksk💼 Business ContactFor collaboration or inquiries, please contact aiksk95 on WeChat.🎥 YouTube 视频教程想了解这个工作流到底是怎样的工具,以及如何快速启动?视频主要介绍 工具定位、快速启动方法 和 我的构筑思路。我们会直接在 RunningHub 上进行演示,让你第一时间看到实际效果。👉 YouTube 教程: https://www.youtube.com/watch?v=PsdexaXO2V4开始前建议尽量完整地观看视频 —— 把握整体思路会更快上手,也能少走常见弯路。⚙️ 在线体验工作流现在就可以在线体验,无需安装。👉 工作流: https://www.runninghub.ai/post/1917238666479992833/?inviteCode=rh-v1111打开上方链接即可直接运行该工作流,实时查看生成效果。如果觉得效果理想,你也可以在本地进行自定义部署。🎁 粉丝福利: 注册即送 1000 积分,每日登录 100 积分,畅玩 4090 体验 48 G 超级性能!📺 Bilibili 更新(中国大陆及南亚太地区)如果你在中国大陆或南亚太地区,可以通过下方视频查看该工作流的实测效果与构思讲解。📺 B站视频: https://www.bilibili.com/video/BV1LxGqz5EeW/我会在 夸克网盘 持续更新模型资源:👉 https://pan.quark.cn/s/20c6f6f8d87b这些资源主要面向本地用户,方便进行创作与学习。

ControlNet Universal - Flex.2-preview
🎥 YouTube Video TutorialWant to know what this workflow actually does and how to start fast?This video explains what the tool is, how to launch the workflow instantly, and shares my core design logic — no local setup, no complicated environment.Everything starts directly on RunningHub, so you can experience it in action first.👉 YouTube Tutorial: https://www.youtube.com/watch?v=PsdexaXO2V4Before you begin, I recommend watching the video thoroughly — getting the full context helps you understand the tool faster and avoid common detours.⚙️ RunningHub WorkflowTry the workflow online right now — no installation required.👉 Workflow: https://www.runninghub.ai/post/1917163629534449665/?inviteCode=rh-v1111If the results meet your expectations, you can later deploy it locally for customization.🎁 Fan Benefits: Register to get 1000 points + daily login 100 points — enjoy 4090 performance and 48 GB super power!📺 Bilibili Updates (Mainland China & Asia-Pacific)If you’re in the Asia-Pacific region, you can watch the video below to see the workflow demonstration and creative breakdown.📺 Bilibili Video: https://www.bilibili.com/video/BV1LxGqz5EeW/☕ Support Me on Ko-fiIf you find my content helpful and want to support future creations, you can buy me a coffee ☕.Every bit of support helps me keep creating — just like a spark that can ignite a blazing flame.👉 Ko-fi: https://ko-fi.com/aiksk💼 Business ContactFor collaboration or inquiries, please contact aiksk95 on WeChat.🎥 YouTube 视频教程想了解这个工作流到底是怎样的工具,以及如何快速启动?视频主要介绍 工具定位、快速启动方法 和 我的构筑思路。我们会直接在 RunningHub 上进行演示,让你第一时间看到实际效果。👉 YouTube 教程: https://www.youtube.com/watch?v=PsdexaXO2V4开始前建议尽量完整地观看视频 —— 把握整体思路会更快上手,也能少走常见弯路。⚙️ 在线体验工作流现在就可以在线体验,无需安装。👉 工作流: https://www.runninghub.ai/post/1917163629534449665/?inviteCode=rh-v1111打开上方链接即可直接运行该工作流,实时查看生成效果。如果觉得效果理想,你也可以在本地进行自定义部署。🎁 粉丝福利: 注册即送 1000 积分,每日登录 100 积分,畅玩 4090 体验 48 G 超级性能!📺 Bilibili 更新(中国大陆及南亚太地区)如果你在中国大陆或南亚太地区,可以通过下方视频查看该工作流的实测效果与构思讲解。📺 B站视频: https://www.bilibili.com/video/BV1LxGqz5EeW/我会在 夸克网盘 持续更新模型资源:👉 https://pan.quark.cn/s/20c6f6f8d87b这些资源主要面向本地用户,方便进行创作与学习。

Flex.2-preview - Inpainting
🎥 YouTube Video TutorialWant to know what this workflow actually does and how to start fast?This video explains what the tool is, how to launch the workflow instantly, and shares my core design logic — no local setup, no complicated environment.Everything starts directly on RunningHub, so you can experience it in action first.👉 YouTube Tutorial: https://www.youtube.com/watch?v=PsdexaXO2V4Before you begin, I recommend watching the video thoroughly — getting the full context helps you understand the tool faster and avoid common detours.⚙️ RunningHub WorkflowTry the workflow online right now — no installation required.👉 Workflow: https://www.runninghub.ai/post/1917082119976456193/?inviteCode=rh-v1111If the results meet your expectations, you can later deploy it locally for customization.🎁 Fan Benefits: Register to get 1000 points + daily login 100 points — enjoy 4090 performance and 48 GB super power!📺 Bilibili Updates (Mainland China & Asia-Pacific)If you’re in the Asia-Pacific region, you can watch the video below to see the workflow demonstration and creative breakdown.📺 Bilibili Video: https://www.bilibili.com/video/BV1LxGqz5EeW/☕ Support Me on Ko-fiIf you find my content helpful and want to support future creations, you can buy me a coffee ☕.Every bit of support helps me keep creating — just like a spark that can ignite a blazing flame.👉 Ko-fi: https://ko-fi.com/aiksk💼 Business ContactFor collaboration or inquiries, please contact aiksk95 on WeChat.🎥 YouTube 视频教程想了解这个工作流到底是怎样的工具,以及如何快速启动?视频主要介绍 工具定位、快速启动方法 和 我的构筑思路。我们会直接在 RunningHub 上进行演示,让你第一时间看到实际效果。👉 YouTube 教程: https://www.youtube.com/watch?v=PsdexaXO2V4开始前建议尽量完整地观看视频 —— 把握整体思路会更快上手,也能少走常见弯路。⚙️ 在线体验工作流现在就可以在线体验,无需安装。👉 工作流: https://www.runninghub.ai/post/1917082119976456193/?inviteCode=rh-v1111打开上方链接即可直接运行该工作流,实时查看生成效果。如果觉得效果理想,你也可以在本地进行自定义部署。🎁 粉丝福利: 注册即送 1000 积分,每日登录 100 积分,畅玩 4090 体验 48 G 超级性能!📺 Bilibili 更新(中国大陆及南亚太地区)如果你在中国大陆或南亚太地区,可以通过下方视频查看该工作流的实测效果与构思讲解。📺 B站视频: https://www.bilibili.com/video/BV1LxGqz5EeW/我会在 夸克网盘 持续更新模型资源:👉 https://pan.quark.cn/s/20c6f6f8d87b这些资源主要面向本地用户,方便进行创作与学习。

Flex.2-preview - Image-to-Image
🎥 YouTube Video TutorialWant to know what this workflow actually does and how to start fast?This video explains what the tool is, how to launch the workflow instantly, and shares my core design logic — no local setup, no complicated environment.Everything starts directly on RunningHub, so you can experience it in action first.👉 YouTube Tutorial: https://www.youtube.com/watch?v=PsdexaXO2V4Before you begin, I recommend watching the video thoroughly — getting the full context helps you understand the tool faster and avoid common detours.⚙️ RunningHub WorkflowTry the workflow online right now — no installation required.👉 Workflow: https://www.runninghub.ai/post/1917082177446809601/?inviteCode=rh-v1111If the results meet your expectations, you can later deploy it locally for customization.🎁 Fan Benefits: Register to get 1000 points + daily login 100 points — enjoy 4090 performance and 48 GB super power!📺 Bilibili Updates (Mainland China & Asia-Pacific)If you’re in the Asia-Pacific region, you can watch the video below to see the workflow demonstration and creative breakdown.📺 Bilibili Video: https://www.bilibili.com/video/BV1LxGqz5EeW/☕ Support Me on Ko-fiIf you find my content helpful and want to support future creations, you can buy me a coffee ☕.Every bit of support helps me keep creating — just like a spark that can ignite a blazing flame.👉 Ko-fi: https://ko-fi.com/aiksk💼 Business ContactFor collaboration or inquiries, please contact aiksk95 on WeChat.🎥 YouTube 视频教程想了解这个工作流到底是怎样的工具,以及如何快速启动?视频主要介绍 工具定位、快速启动方法 和 我的构筑思路。我们会直接在 RunningHub 上进行演示,让你第一时间看到实际效果。👉 YouTube 教程: https://www.youtube.com/watch?v=PsdexaXO2V4开始前建议尽量完整地观看视频 —— 把握整体思路会更快上手,也能少走常见弯路。⚙️ 在线体验工作流现在就可以在线体验,无需安装。👉 工作流: https://www.runninghub.ai/post/1917082177446809601/?inviteCode=rh-v1111打开上方链接即可直接运行该工作流,实时查看生成效果。如果觉得效果理想,你也可以在本地进行自定义部署。🎁 粉丝福利: 注册即送 1000 积分,每日登录 100 积分,畅玩 4090 体验 48 G 超级性能!📺 Bilibili 更新(中国大陆及南亚太地区)如果你在中国大陆或南亚太地区,可以通过下方视频查看该工作流的实测效果与构思讲解。📺 B站视频: https://www.bilibili.com/video/BV1LxGqz5EeW/我会在 夸克网盘 持续更新模型资源:👉 https://pan.quark.cn/s/20c6f6f8d87b这些资源主要面向本地用户,方便进行创作与学习。

Universal Transfer - Local Secondary Transfer - Redux-512 - Strong Reference
🎥 YouTube Video TutorialWant to know what this workflow actually does and how to start fast?This video explains what the tool is, how to launch the workflow instantly, and shares my core design logic — no local setup, no complicated environment.Everything starts directly on RunningHub, so you can experience it in action first.👉 YouTube Tutorial: https://www.youtube.com/watch?v=PsdexaXO2V4Before you begin, I recommend watching the video thoroughly — getting the full context helps you understand the tool faster and avoid common detours.⚙️ RunningHub WorkflowTry the workflow online right now — no installation required.👉 Workflow: https://www.runninghub.ai/post/1917404896793137154/?inviteCode=rh-v1111If the results meet your expectations, you can later deploy it locally for customization.🎁 Fan Benefits: Register to get 1000 points + daily login 100 points — enjoy 4090 performance and 48 GB super power!📺 Bilibili Updates (Mainland China & Asia-Pacific)If you’re in the Asia-Pacific region, you can watch the video below to see the workflow demonstration and creative breakdown.📺 Bilibili Video: https://www.bilibili.com/video/BV1LxGqz5EeW/☕ Support Me on Ko-fiIf you find my content helpful and want to support future creations, you can buy me a coffee ☕.Every bit of support helps me keep creating — just like a spark that can ignite a blazing flame.👉 Ko-fi: https://ko-fi.com/aiksk💼 Business ContactFor collaboration or inquiries, please contact aiksk95 on WeChat.🎥 YouTube 视频教程想了解这个工作流到底是怎样的工具,以及如何快速启动?视频主要介绍 工具定位、快速启动方法 和 我的构筑思路。我们会直接在 RunningHub 上进行演示,让你第一时间看到实际效果。👉 YouTube 教程: https://www.youtube.com/watch?v=PsdexaXO2V4开始前建议尽量完整地观看视频 —— 把握整体思路会更快上手,也能少走常见弯路。⚙️ 在线体验工作流现在就可以在线体验,无需安装。👉 工作流: https://www.runninghub.ai/post/1917404896793137154/?inviteCode=rh-v1111打开上方链接即可直接运行该工作流,实时查看生成效果。如果觉得效果理想,你也可以在本地进行自定义部署。🎁 粉丝福利: 注册即送 1000 积分,每日登录 100 积分,畅玩 4090 体验 48 G 超级性能!📺 Bilibili 更新(中国大陆及南亚太地区)如果你在中国大陆或南亚太地区,可以通过下方视频查看该工作流的实测效果与构思讲解。📺 B站视频: https://www.bilibili.com/video/BV1LxGqz5EeW/我会在 夸克网盘 持续更新模型资源:👉 https://pan.quark.cn/s/20c6f6f8d87b这些资源主要面向本地用户,方便进行创作与学习。

HiDream VS Flux Comparison Test
🎥 YouTube Video TutorialWant to know what this workflow actually does and how to start fast? This video explains what the tool is, how to launch the workflow instantly, and shares my core design logic — no local setup, no complicated environment. Everything starts directly on RunningHub, so you can experience it in action first. 👉 YouTube Tutorial: https://www.youtube.com/watch?v=dbsRZltW96QBefore you begin, I recommend watching the video thoroughly — getting the full context helps you understand the tool faster and avoid common detours.⚙️ RunningHub WorkflowTry the workflow online right now — no installation required. 👉 Workflow: https://www.runninghub.ai/post/1910919824812507138/?inviteCode=rh-v1111If the results meet your expectations, you can later deploy it locally for customization.🎁 Fan Benefits: Register to get 1000 points + daily login 100 points — enjoy 4090 performance and 48 GB super power!📺 Bilibili Updates (Mainland China & Asia-Pacific)If you’re in the Asia-Pacific region, you can watch the video below to see the workflow demonstration and creative breakdown. 📺 Bilibili Video: https://www.bilibili.com/video/BV1qhdzYnEem☕ Support Me on Ko-fiIf you find my content helpful and want to support future creations, you can buy me a coffee ☕. Every bit of support helps me keep creating — just like a spark that can ignite a blazing flame. 👉 Ko-fi: https://ko-fi.com/aiksk💼 Business ContactFor collaboration or inquiries, please contact aiksk95 on WeChat.🎥 YouTube 视频教程想了解这个工作流到底是怎样的工具,以及如何快速启动? 视频主要介绍 工具定位、快速启动方法 和 我的构筑思路。 我们会直接在 RunningHub 上进行演示,让你第一时间看到实际效果。 👉 YouTube 教程: https://www.youtube.com/watch?v=dbsRZltW96Q开始前建议尽量完整地观看视频 —— 把握整体思路会更快上手,也能少走常见弯路。⚙️ 在线体验工作流现在就可以在线体验,无需安装。 👉 工作流: https://www.runninghub.ai/post/1910919824812507138/?inviteCode=rh-v1111打开上方链接即可直接运行该工作流,实时查看生成效果。 如果觉得效果理想,你也可以在本地进行自定义部署。🎁 粉丝福利: 注册即送 1000 积分,每日登录 100 积分,畅玩 4090 体验 48 G 超级性能!📺 Bilibili 更新(中国大陆及南亚太地区)如果你在中国大陆或南亚太地区,可以通过下方视频查看该工作流的实测效果与构思讲解。 📺 B站视频: https://www.bilibili.com/video/BV1qhdzYnEem我会在 夸克网盘 持续更新模型资源: 👉 https://pan.quark.cn/s/20c6f6f8d87b 这些资源主要面向本地用户,方便进行创作与学习。

Nunchaku ULTIMATE upscaler for FLUX
Nunchaku ULTIMATE upscaler for FLUXMakes a Picture with a Standard FLUX or FLUXSchnell Model + Lora.Then upscale it with UltimateSD UpscaleIt works fine on my 4060 8GB Laptop.

Generate Single Front-Facing Character Image – Consistent Character Suite (Step 1)
🎥 YouTube Video TutorialWant to know what this workflow actually does and how to start fast?This video explains what the tool is, how to launch the workflow instantly, and shares my core design logic — no local setup, no complicated environment.Everything starts directly on RunningHub, so you can experience it in action first.👉 YouTube Tutorial: https://www.youtube.com/watch?v=pOvsPavdA9YBefore you begin, I recommend watching the video thoroughly — getting the full context helps you understand the tool faster and avoid common detours.⚙️ RunningHub WorkflowTry the workflow online right now — no installation required.👉 Workflow: https://www.runninghub.ai/post/1904394489316941826/?inviteCode=rh-v1111If the results meet your expectations, you can later deploy it locally for customization.🎁 Fan Benefits: Register to get 1000 points + daily login 100 points — enjoy 4090 performance and 48 GB super power!📺 Bilibili Updates (Mainland China & Asia-Pacific)If you’re in the Asia-Pacific region, you can watch the video below to see the workflow demonstration and creative breakdown.📺 Bilibili Video: https://www.bilibili.com/video/BV18GobY2EeP☕ Support Me on Ko-fiIf you find my content helpful and want to support future creations, you can buy me a coffee ☕.Every bit of support helps me keep creating — just like a spark that can ignite a blazing flame.👉 Ko-fi: https://ko-fi.com/aiksk💼 Business ContactFor collaboration or inquiries, please contact aiksk95 on WeChat.🎥 YouTube 视频教程想了解这个工作流到底是怎样的工具,以及如何快速启动?视频主要介绍 工具定位、快速启动方法 和 我的构筑思路。我们会直接在 RunningHub 上进行演示,让你第一时间看到实际效果。👉 YouTube 教程: https://www.youtube.com/watch?v=pOvsPavdA9Y开始前建议尽量完整地观看视频 —— 把握整体思路会更快上手,也能少走常见弯路。⚙️ 在线体验工作流现在就可以在线体验,无需安装。👉 工作流: https://www.runninghub.ai/post/1904394489316941826/?inviteCode=rh-v1111打开上方链接即可直接运行该工作流,实时查看生成效果。如果觉得效果理想,你也可以在本地进行自定义部署。🎁 粉丝福利: 注册即送 1000 积分,每日登录 100 积分,畅玩 4090 体验 48 G 超级性能!📺 Bilibili 更新(中国大陆及南亚太地区)如果你在中国大陆或南亚太地区,可以通过下方视频查看该工作流的实测效果与构思讲解。📺 B站视频: https://www.bilibili.com/video/BV18GobY2EeP我会在 夸克网盘 持续更新模型资源:👉 https://pan.quark.cn/s/20c6f6f8d87b这些资源主要面向本地用户,方便进行创作与学习。

Universal ACE++ Reference Edit
🎥 YouTube Video TutorialWant to know what this workflow actually does and how to start fast?This video explains what the tool is, how to launch the workflow instantly, and shares my core design logic — no local setup, no complicated environment.Everything starts directly on RunningHub, so you can experience it in action first.👉 YouTube Tutorial: https://www.youtube.com/watch?v=YFnOEKRt2BABefore you begin, I recommend watching the video thoroughly — getting the full context helps you understand the tool faster and avoid common detours.⚙️ RunningHub WorkflowTry the workflow online right now — no installation required.👉 Workflow: http://runninghub.ai/post/1894293083604037633/?inviteCode=rh-v1111If the results meet your expectations, you can later deploy it locally for customization.🎁 Fan Benefits: Register to get 1000 points + daily login 100 points — enjoy 4090 performance and 48 GB super power!📺 Bilibili Updates (Mainland China & Asia-Pacific)If you’re in the Asia-Pacific region, you can watch the video below to see the workflow demonstration and creative breakdown.📺 Bilibili Video: https://www.bilibili.com/video/BV13BPeeSEkp☕ Support Me on Ko-fiIf you find my content helpful and want to support future creations, you can buy me a coffee ☕.Every bit of support helps me keep creating — just like a spark that can ignite a blazing flame.👉 Ko-fi: https://ko-fi.com/aiksk💼 Business ContactFor collaboration or inquiries, please contact aiksk95 on WeChat.🎥 YouTube 视频教程想了解这个工作流到底是怎样的工具,以及如何快速启动?视频主要介绍 工具定位、快速启动方法 和 我的构筑思路。我们会直接在 RunningHub 上进行演示,让你第一时间看到实际效果。👉 YouTube 教程: https://www.youtube.com/watch?v=YFnOEKRt2BA开始前建议尽量完整地观看视频 —— 把握整体思路会更快上手,也能少走常见弯路。⚙️ 在线体验工作流现在就可以在线体验,无需安装。👉 工作流: http://runninghub.ai/post/1894293083604037633/?inviteCode=rh-v1111打开上方链接即可直接运行该工作流,实时查看生成效果。如果觉得效果理想,你也可以在本地进行自定义部署。🎁 粉丝福利: 注册即送 1000 积分,每日登录 100 积分,畅玩 4090 体验 48 G 超级性能!📺 Bilibili 更新(中国大陆及南亚太地区)如果你在中国大陆或南亚太地区,可以通过下方视频查看该工作流的实测效果与构思讲解。📺 B站视频: https://www.bilibili.com/video/BV13BPeeSEkp我会在 夸克网盘 持续更新模型资源:👉 [https://pan.quark.cn/s/20c6f6f8d87b]这些资源主要面向本地用户,方便进行创作与学习。

DyPE+Krea Text-to-Image Correction Stable Version V1 (2-4K HD Direct Output)
You can click on the link below and try it out directly. If the effect is good, you can deploy it locallyhttps://www.runninghub.cn/post/1984246530523742209/?inviteCode=rh-v1121Fan benefits, register to get 1000 points, daily login 100 points, play 4090! Experience the super power of 48G!B-site video: https://www.bilibili.com/video/BV1hQ1YBdEnf/Knowledge Planet: https://t.zsxq.com/7F90AGraphic tutorial: https://t.zsxq.com/lNK8vThe workflow is very simple to use, and I have uploaded a tutorial on how to use it on YouTube. You can try it out and follow the tutorial and Civitai's workflow to easily reproduce the results. Thank you. If you have any other questions, please leave a comment in the comment sectionThis tutorial is very important, not watching it will surely lead to a lot of problems! Watch the video tutorial before trying !!!! Very important! Especially a key point at the end!

Complete TXT2IMG and IMG2IMG workflows
After a long time, I have compiled my personal workflow for generating locally on comfyui. This workflow is primarily designed for flux, but you can modify it according to your needs.FLUX 1.D — T2IMG / IMG2IMG Workflow for ComfyUIA modular ComfyUI workflow designed for flexible text-to-image and image-to-image generation using FLUX and LoRA models.The setup integrates advanced sampler controls, metadata saving, conditioning management, and Florence 2 model support.🧩 Features✅ Dual text encoding with CLIP + T5✅ Support for LoRA (MODEL + CLIP)✅ Text-to-Image and Image-to-Image workflows combined✅ Advanced control over:Sampler / SchedulerCFG Scale, Steps, SeedWidth & Height✅ Metadata saving with full generation parameters✅ Integration with Florence 2 model loader✅ Preconnected nodes for clean extension or modification⚙️ RequirementsComfyUIInstalled custom nodes:comfyui-kjnodescomfyui-image-savercomfyui-florence2comfy-coreLora manager---

Flux_ Background change+reference image lighting workflow
Youtube:https://www.youtube.com/watch?v=UAnMcw_U-zcoverseas: https://www.runninghub.ai/post/1982485690057400322/?inviteCode=sdhs0trbRegister through the above link to receive 1000RH coins, log in daily and receive an additional 100 coins for free!中国版:https://www.runninghub.cn/post/1982485690057400322/?inviteCode=sdhs0trb通过上述链接注册领1000RH币,每日登录再送100币,免费玩!